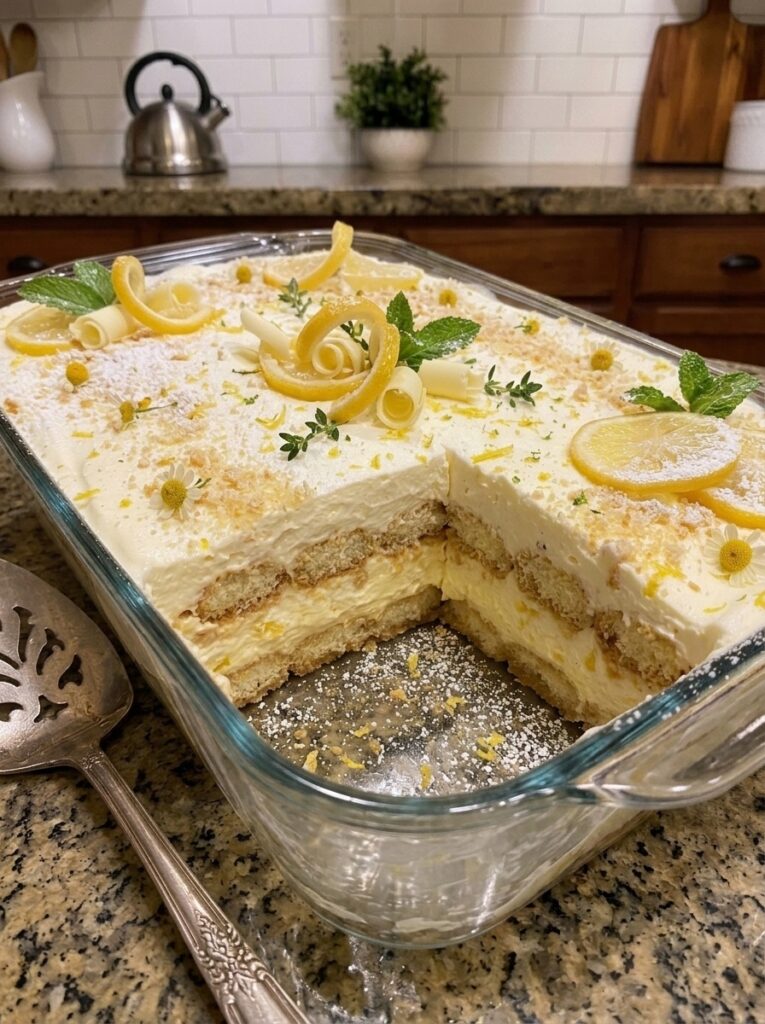
Classic tiramisu holds a special place in the hearts of dessert lovers everywhere, but this Lemon Tiramisu offers something wonderfully different — a bright, citrus-forward take on the beloved Italian dessert that feels perfectly suited for spring and summer celebrations. Delicate ladyfinger cookies are soaked in a fresh lemon syrup instead of the traditional coffee, then layered with a luscious, tangy mascarpone cream filling infused with fresh lemon juice and zest. The result is a dessert that’s light, creamy, and absolutely bursting with sunny citrus flavor.
Whether you’re planning a spring brunch, a summer garden party, a holiday celebration, or simply want an elegant, make-ahead dessert that feels a little different from the usual chocolate and coffee flavors, this Lemon Tiramisu delivers beautifully. It comes together with simple no-bake techniques and rewards your patience with a stunning, layered dessert that’s guaranteed to impress.
Let’s dive into everything that makes this citrus-forward tiramisu such a refreshing standout.
Why You’ll Love This Lemon Tiramisu
It’s a bright, refreshing twist on a beloved classic. For those who love tiramisu but want something lighter and more suited to warm-weather entertaining, this lemon version delivers all the beloved texture and elegance of the original with a completely different, sunnier flavor profile.
It’s completely no-bake. With no oven required, this dessert is ideal for spring and summer gatherings when you’d rather not heat up the kitchen.
The lemon flavor is bright and multi-layered. Between the lemon syrup used to soak the ladyfingers and the fresh lemon juice and zest folded into the mascarpone filling, every single bite delivers layered, vibrant citrus flavor.
It’s a fantastic make-ahead dessert. Because it needs to chill for at least 6 hours, or ideally overnight, this dessert is perfect for preparing a day in advance of a party or celebration, freeing up your time when guests arrive.
It looks absolutely stunning when served. With its beautiful layers, elegant lemon slice garnish, and delicate white chocolate shavings, this dessert makes for a gorgeous centerpiece on any dessert table.
It’s perfect for those who don’t love coffee-flavored desserts. Since this version skips the traditional coffee soak entirely, it’s a wonderful option for those who love the tiramisu format but aren’t fans of coffee flavor, including kids and coffee-averse guests.
It serves a crowd. With 9 to 12 servings from a single 8×8-inch dish, this dessert is well-suited for parties, potlucks, and gatherings where a generous, elegant dessert is needed.
Ingredient Breakdown: What You’ll Need and Why
Understanding the role of each ingredient helps ensure the best possible texture and flavor in your finished Lemon Tiramisu.
The Lemon Syrup
Water and granulated sugar, heated together until the sugar dissolves, form a simple syrup base that helps moisten and sweeten the ladyfinger cookies. Fresh lemon juice and lemon zest, stirred in after the syrup has been removed from the heat, infuse the syrup with bright, aromatic citrus flavor that soaks beautifully into the cookies during assembly. Allowing the syrup to cool completely before using it is essential, as a warm syrup can cause the ladyfingers to become overly soft or fall apart during dipping.
The Filling
Mascarpone cheese, softened, provides that classic light, slightly sweet, and incredibly creamy base traditional to tiramisu filling. Cream cheese, also softened, adds a subtle tang that complements the bright lemon flavor beautifully.
Heavy whipping cream, whipped to stiff peaks and folded into the cheese mixture, lightens the filling considerably, creating that signature airy, mousse-like texture characteristic of tiramisu.
Powdered sugar sweetens the filling smoothly, while vanilla extract adds warm, aromatic depth that balances the bright acidity of the lemon. Fresh lemon juice and lemon zest, both folded directly into the filling, are the true stars here, infusing every spoonful with vibrant, unmistakable citrus flavor.
The Ladyfinger Layers
Ladyfinger cookies form the structural layers of this dessert, offering a light, slightly sponge-like texture that soaks up the lemon syrup beautifully without becoming soggy when dipped properly and quickly.
The Topping
A beautiful array of toppings finishes this dessert: whipped cream adds an additional layer of light, creamy texture, fresh lemon slices reinforce the citrus theme and add stunning visual appeal, lemon zest sprinkled over the top intensifies the aroma and flavor, white chocolate shavings (optional) add an elegant, slightly sweet finishing touch, and fresh mint leaves provide a pop of color and a refreshing, aromatic contrast to the rich, creamy layers below.
Step-by-Step Directions
Step 1: Make the Lemon Syrup
In a small saucepan, combine the water and granulated sugar over medium heat. Heat, stirring occasionally, until the sugar has completely dissolved. Remove the saucepan from the heat and stir in the fresh lemon juice and lemon zest. Set the syrup aside and let it cool completely before using it to dip the ladyfingers — this step is important, as a warm syrup can cause the cookies to fall apart.
Step 2: Make the Filling Base
In a large mixing bowl, beat together the softened mascarpone cheese, softened cream cheese, powdered sugar, vanilla extract, fresh lemon juice, and lemon zest until the mixture is completely smooth and well combined.
Step 3: Whip the Cream
In a separate bowl, whip the heavy whipping cream until stiff peaks form. Be careful not to overwhip, as this can cause the cream to become grainy or begin to separate.
Step 4: Fold the Whipped Cream into the Filling
Gently fold the whipped cream into the mascarpone and lemon mixture using a folding motion rather than vigorous stirring, preserving the light, airy texture of the whipped cream for a fluffy, mousse-like filling.
Step 5: Dip the Ladyfingers
Once the lemon syrup has cooled completely, quickly dip each ladyfinger cookie into the syrup, being careful not to soak them for too long. A brief dip on each side is sufficient — ladyfingers absorb liquid quickly and can become overly soggy or fall apart if left in the syrup too long.
Step 6: Assemble the First Layer
Arrange a layer of the dipped ladyfingers in the bottom of an 8×8-inch baking dish, fitting them snugly together to create an even base layer.
Step 7: Add the First Layer of Filling
Spread half of the lemon cream filling evenly over the layer of ladyfingers, smoothing it out with a spatula.
Step 8: Repeat the Layers
Dip the remaining ladyfingers in the lemon syrup and arrange a second layer on top of the filling. Spread the remaining filling evenly over this second layer of ladyfingers.
Step 9: Smooth and Cover
Smooth the top layer of filling with a spatula for a clean, even finish, then cover the dish tightly.
Step 10: Chill
Refrigerate the assembled dessert for at least 6 hours, or ideally overnight, to allow the layers to set properly and the flavors to fully develop. This chilling time is essential for achieving the perfect texture, allowing the ladyfingers to soften slightly while the filling firms up.
Step 11: Decorate and Serve
Just before serving, decorate the top of the tiramisu with whipped cream, fresh lemon slices, lemon zest, white chocolate shavings (if using), and fresh mint leaves for a beautiful, elegant presentation.
Expert Tips for the Best Lemon Tiramisu
Let the lemon syrup cool completely before dipping the cookies. A warm syrup can cause the delicate ladyfingers to become overly soft or fall apart during assembly, so patience here is important.
Make sure your cheeses are properly softened. Cold mascarpone or cream cheese can result in a lumpy filling, so allow both to come to room temperature before beginning for the smoothest possible texture.
Don’t overwhip the heavy cream. Whip just until stiff peaks form, as overwhipping can cause the cream to become grainy, affecting the overall texture of the folded filling.
Dip the ladyfingers quickly. A brief dip on each side is all that’s needed. Ladyfingers absorb liquid rapidly, and soaking them too long will cause them to become mushy and fall apart during assembly.
Use freshly squeezed lemon juice and freshly grated zest. Bottled lemon juice and pre-packaged zest lack the bright, vibrant flavor of fresh lemons, which is essential to this dessert’s signature citrus punch.
Don’t skip the chilling time. This dessert truly needs those 6 hours (or overnight) in the refrigerator to develop the right texture and allow the flavors to meld together fully.
Add the toppings just before serving. Garnishing too far in advance can cause whipped cream to deflate and lemon slices to lose their fresh appearance, so save the final decoration for right before you plan to serve the dessert.
Serving Suggestions
This bright, elegant dessert makes a wonderful addition to a variety of gatherings:
- Serve alongside a chilled glass of prosecco or sparkling wine for an elegant pairing at spring or summer gatherings.
- Pair with fresh berries on the side for an extra burst of fruity brightness alongside the citrus flavor.
- Offer with hot tea, particularly a citrus or Earl Grey blend, for a lovely afternoon pairing.
- Include as part of a spring or summer dessert table, alongside other light, fruity treats.
- Serve for special celebrations such as bridal showers, Mother’s Day, Easter, or any warm-weather gathering where a refreshing, elegant dessert is exactly what’s needed.
Storage Instructions
Refrigerator: Store the tiramisu covered tightly in the refrigerator for up to 3-4 days. The flavors and texture continue to improve slightly over the first day or two as the layers meld together.
Freezer: While this dessert can technically be frozen, the texture of the fresh lemon topping and whipped cream may change upon thawing. If freezing, it’s best to do so before adding the final toppings, wrapping the assembled base tightly and freezing for up to 1 month. Thaw overnight in the refrigerator and add fresh toppings just before serving.
Serving tip: For the cleanest slices, use a sharp knife and wipe it clean between cuts, especially since the layers are soft and creamy.
Frequently Asked Questions
Can I make this dessert ahead of time for a party? Yes, this dessert is ideal for making ahead. In fact, preparing it the day before serving allows the flavors and texture to develop even further, making it one of the best make-ahead desserts for entertaining.
Can I use bottled lemon juice instead of fresh? Fresh lemon juice is strongly recommended for the brightest, most vibrant flavor, as bottled lemon juice often has a duller, slightly less fresh taste that can affect the overall quality of the dessert.
What can I substitute for ladyfingers? If ladyfingers aren’t available, a light sponge cake cut into strips can be used as a substitute, though the classic tiramisu texture is best achieved with traditional ladyfinger cookies.
Can I make this recipe without mascarpone cheese? While mascarpone is traditional and offers the best authentic flavor, you can substitute additional cream cheese in its place, though the flavor will be slightly tangier and less delicate.
Is there a way to make this dessert less sweet? Yes, you can reduce the powdered sugar slightly in the filling and in the lemon syrup if you prefer a more tart, less sweet dessert overall.
Can I make individual servings instead of one large dish? Absolutely. This recipe can easily be assembled in individual cups or jars for a fun, personal-sized presentation, perfect for parties or elegant dinner gatherings.
How long does this dessert need to chill before serving? At minimum, this dessert needs 6 hours in the refrigerator, though chilling overnight yields the best texture and flavor development.
Print
Lemon Tiramisu: A Bright, Refreshing Twist on the Italian Classic
Description
Prep Time: 25 minutes Chill Time: 6 hours Total Time: 6 hours 25 minutes Servings: 9–12
Ingredients
For the Lemon Syrup:
- 1 cup water
- ¼ cup granulated sugar
- ⅓ cup fresh lemon juice
- 1 teaspoon lemon zest
For the Filling:
- 8 oz mascarpone cheese, softened
- 8 oz cream cheese, softened
- 1 cup heavy whipping cream
- ¾ cup powdered sugar
- 1 teaspoon vanilla extract
- 2 tablespoons fresh lemon juice
- 1 tablespoon lemon zest
For the Layers:
- 24 ladyfinger cookies
For the Topping:
- Whipped cream
- Fresh lemon slices
- Lemon zest
- White chocolate shavings (optional)
- Fresh mint leaves
Instructions
- Combine the water and sugar in a small saucepan and heat until the sugar dissolves. Remove from heat and stir in the lemon juice and lemon zest. Let cool completely.
- Beat the mascarpone, cream cheese, powdered sugar, vanilla extract, lemon juice, and lemon zest until smooth.
- Whip the heavy cream until stiff peaks form, then gently fold it into the mascarpone mixture.
- Quickly dip each ladyfinger into the cooled lemon syrup, being careful not to soak them.
- Arrange a layer of dipped ladyfingers in the bottom of an 8×8-inch baking dish.
- Spread half of the lemon cream filling over the cookies.
- Repeat with another layer of dipped ladyfingers and the remaining filling.
- Smooth the top and cover the dish.
- Refrigerate for at least 6 hours, or overnight for the best flavor and texture.
- Decorate with whipped cream, fresh lemon slices, lemon zest, white chocolate shavings, and mint leaves before serving.