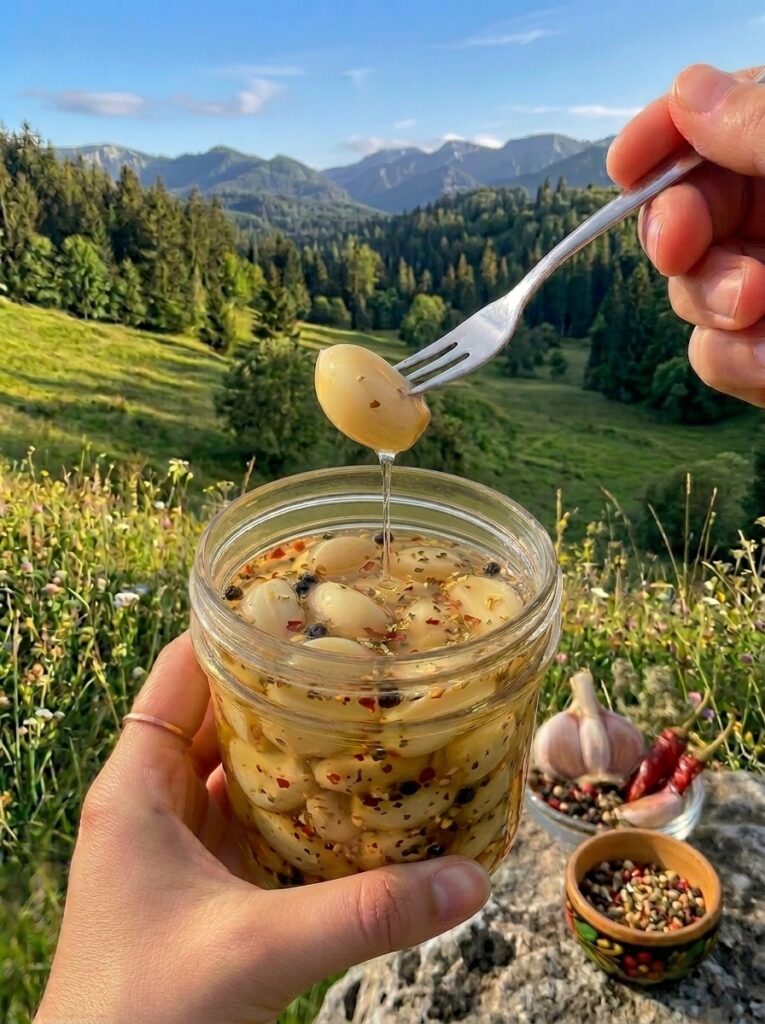
If you’ve never made pickled garlic at home, prepare to be a little obsessed. This Spicy Pickled Garlic recipe transforms plain, ordinary garlic cloves into something addictive — tangy, briny, gently sweet, and laced with just the right amount of heat. It’s the kind of condiment that starts as an afterthought on a charcuterie board and ends up being the first thing everyone reaches for.
What makes this recipe so appealing isn’t just the flavor, though. It’s how ridiculously easy it is to make. There’s no canning equipment required, no complicated water bath process, and no need for special skills. You simply peel some garlic, simmer a quick brine, pour it over the cloves, and let the refrigerator do the rest. A few days later, you’re rewarded with a jar of garlic that’s mellowed just enough to lose its raw bite while gaining a spicy, tangy complexity that’s downright irresistible.
In this article, we’ll walk through exactly what pickled garlic is, why this version deserves a permanent spot in your fridge, a full ingredient breakdown, step-by-step instructions, expert tips for the best results, creative variations, serving ideas, storage guidance, and answers to the most frequently asked questions about making pickled garlic at home. By the end, you’ll be fully equipped to make a jar (or three) of your own.
What Is Spicy Pickled Garlic?
Spicy Pickled Garlic is a quick refrigerator pickle made by submerging peeled garlic cloves in a hot vinegar brine seasoned with salt, sugar, crushed red pepper flakes, oregano, and black peppercorns. Unlike shelf-stable canned pickles, which require a proper water bath canning process to be safely stored at room temperature, this is a refrigerator pickle — meaning it’s made quickly, stored cold, and enjoyed within a matter of weeks rather than months or years on a pantry shelf.
The magic of pickled garlic lies in the transformation that happens during the pickling process. Raw garlic can be sharp, pungent, and sometimes overwhelming, but once it sits in an acidic brine for several days, that harsh edge softens considerably. What’s left behind is a cloves that’s tangy, slightly sweet, gently spicy, and far more mellow than raw garlic, while still retaining that unmistakable garlicky punch. It’s a completely different eating experience — one that turns garlic from a background ingredient into a standout bite on its own.
This particular recipe leans into bold, spicy flavors thanks to the crushed red pepper flakes and black peppercorns, while the oregano adds a subtle herbal note that rounds everything out. The result is a versatile, punchy condiment that works in far more places than you might expect.
Why You’ll Love This Recipe
There are plenty of reasons this Spicy Pickled Garlic recipe has become a favorite for home cooks and condiment lovers alike.
It’s incredibly low-effort. With just a handful of pantry staples and about 15 minutes of active prep time, this recipe delivers big flavor without demanding much from you. There’s no canning equipment, no special jars, and no complicated technique involved.
No canning skills required. Because this is a refrigerator pickle rather than a shelf-stable canning recipe, you skip the need for sterilized jars, water bath processing, and precise acidity measurements that traditional canning requires. Just simmer, pour, cool, and chill.
The flavor only gets better with time. Unlike some recipes that taste best immediately, pickled garlic actually improves the longer it sits in the brine. Letting the jar rest for at least 3 to 5 days allows the flavors to fully develop and the raw bite of the garlic to mellow into something far more complex and enjoyable.
It’s endlessly versatile. A jar of spicy pickled garlic can elevate everything from a simple sandwich to an elaborate charcuterie spread. We’ll dive into all the ways to use it a little further down.
It’s a great make-ahead condiment. Since it needs a few days to develop flavor anyway, this is the kind of recipe you can prep in advance and have ready to go whenever you need a flavor boost.
Customizable heat level. By adjusting the amount of crushed red pepper flakes, you can dial the spice level up or down to suit your taste, making this recipe approachable for both spice lovers and those who prefer a milder kick.
Ingredient Breakdown: What You’ll Need and Why
Let’s take a closer look at each ingredient in this recipe and the role it plays in building that signature bold, tangy flavor.
2 Cups Peeled Garlic Cloves
Garlic is, of course, the star of this recipe. Using pre-peeled garlic cloves from the store can save significant time, though peeling whole heads yourself works just as well if you don’t mind the extra step. When selecting your cloves, look for garlic that’s firm and free of soft spots, sprouting, or discoloration, as these can indicate the garlic is past its prime. Two cups of peeled cloves is roughly the equivalent of several whole heads of garlic, depending on size.
1 Cup White Vinegar
White vinegar forms the acidic backbone of the pickling brine. Its clean, sharp flavor and high acidity are essential for both the pickling process and food safety in a refrigerator pickle. White vinegar also won’t discolor the garlic the way apple cider vinegar or other darker vinegars might, helping the cloves retain an appealing look in the jar.
1 Cup Water
Water dilutes the vinegar slightly, balancing out the acidity so the brine isn’t overwhelmingly sharp. This ratio of equal parts vinegar and water creates a brine that’s tangy but not overpowering, allowing the other flavors to shine through.
1 Teaspoon Salt
Salt is essential in any pickling brine—it enhances flavor, helps draw out moisture, and plays a role in the overall pickling process. A plain, non-iodized salt (such as pickling salt or kosher salt) is often preferred for pickling, since iodized table salt can sometimes cause slight discoloration or cloudiness in the brine.
1 Tablespoon Sugar
A touch of sugar balances the sharpness of the vinegar and rounds out the overall flavor profile. It doesn’t make the pickled garlic sweet, but rather softens the acidity just enough to create a more balanced, well-rounded taste.
1–2 Teaspoons Crushed Red Pepper Flakes
This is where the “spicy” in Spicy Pickled Garlic comes from. Crushed red pepper flakes infuse the brine with heat as it simmers, and that heat carries through into the garlic as it pickles. Use 1 teaspoon for a milder kick or 2 teaspoons if you want these cloves to bring some real heat.
1 Teaspoon Dried Oregano
Oregano adds a warm, herbal, slightly earthy note that complements the garlic and heat beautifully. It’s a classic pairing with vinegar-based brines and adds a Mediterranean-inspired depth to the overall flavor.
½ Teaspoon Black Peppercorns
Whole black peppercorns contribute a subtle, sharp spiciness and a bit of visual interest floating in the jar. Unlike ground pepper, whole peppercorns release their flavor gradually into the brine rather than clouding it or settling to the bottom.
Step-by-Step Instructions
Making this Spicy Pickled Garlic is a simple, six-step process that takes only a few minutes of active work.
Step 1: Prepare the Garlic
Start by peeling your garlic cloves, whether you’re working from pre-peeled store-bought garlic or peeling whole heads yourself. As you go, discard any cloves that are damaged, soft, discolored, or sprouting, keeping only firm, healthy cloves for pickling. Having everything peeled and ready before you start the brine will make the rest of the process go smoothly.
Step 2: Make the Brine
In a saucepan, combine the white vinegar, water, salt, sugar, crushed red pepper flakes, dried oregano, and black peppercorns. Place the saucepan over medium heat and bring the mixture to a gentle simmer, stirring occasionally until the salt and sugar have fully dissolved into the liquid. You don’t need a rolling boil here — a gentle simmer is enough to properly infuse the brine with all those bold flavors.
Step 3: Fill the Jar
While the brine is heating, place your peeled garlic cloves into a clean glass jar. Pack them in fairly snugly, but leave enough room for the brine to fully surround each clove.
Step 4: Add the Brine
Once the brine has finished simmering, carefully pour the hot vinegar mixture over the garlic cloves in the jar, making sure the liquid completely covers all of the garlic. Be sure to include the red pepper flakes, oregano, and peppercorns from the saucepan as well, since they’ll continue to flavor the garlic as it sits.
Step 5: Cool and Refrigerate
Allow the filled jar to cool to room temperature on the counter before sealing it with a lid. Once cooled, seal the jar tightly and transfer it to the refrigerator.
Step 6: Let the Flavor Develop
This is the hardest part: waiting. For the best flavor, let the jar sit in the refrigerator for at least 3 to 5 days before serving. This resting period allows the garlic to fully absorb the brine’s flavors and mellow out from its raw, sharp state into something tangy, spicy, and far more complex.
Helpful Tips for the Best Results
- Use fresh, firm garlic. The quality of your garlic directly affects the final result, so start with firm cloves free of soft spots or sprouting.
- Don’t skip the resting period. It can be tempting to dig in right away, but the flavor genuinely transforms over those first several days. Waiting the full 3 to 5 days (or longer) makes a noticeable difference.
- Make sure the garlic stays submerged. Cloves that float above the brine line can discolor or spoil faster than those fully covered in liquid. If needed, you can weigh the garlic down slightly to keep it submerged.
- Use a clean, glass jar. A clean jar helps prevent unwanted bacteria from affecting the pickling process and keeps your finished product tasting its best.
- Adjust the heat to your taste. Start with 1 teaspoon of red pepper flakes if you’re unsure about spice level, and increase to 2 teaspoons next time if you want more heat.
- Give the jar an occasional gentle shake. This helps redistribute the spices and brine evenly around the garlic while it’s pickling in the fridge.
Fun Variations to Try
This recipe is a fantastic base for experimentation. Here are a few ideas to make it your own.
Herb-Forward Pickled Garlic: Add a few sprigs of fresh rosemary or thyme to the jar along with the oregano for a more herbaceous, Mediterranean-inspired flavor.
Extra Spicy Version: Add a sliced fresh chili pepper, such as a jalapeño or serrano, directly into the jar along with the garlic for an extra layer of heat and flavor.
Sweet and Spicy Garlic: Increase the sugar slightly for a more pronounced sweet-and-spicy balance, similar to a bread-and-butter style pickle but with a garlicky twist.
Smoky Pickled Garlic: Add a pinch of smoked paprika to the brine for a subtle smoky undertone that pairs beautifully with grilled meats.
Mixed Pickle Jar: Add a few thin slices of carrot or a handful of pearl onions to the jar along with the garlic for a colorful, multi-vegetable pickle blend.
Serving Suggestions
Spicy Pickled Garlic is one of those condiments that seems to fit in almost anywhere. Chop it up and fold it into pasta salads or grain bowls for a punchy, tangy kick. Toss whole cloves onto a charcuterie or antipasto board alongside cheeses, cured meats, and olives for an eye-catching, flavor-packed addition. Layer it into sandwiches and burgers for a bold bite that cuts through rich, fatty flavors. Scatter it over grilled meats or pizza just before serving for a burst of heat and acidity. It also makes a fantastic addition to a Bloody Mary garnish, a relish tray, or even blended straight into a homemade vinaigrette for an instant flavor upgrade.
Storage Instructions
Proper storage is essential for both flavor and food safety with this recipe, so it’s worth paying close attention to this section.
This is a refrigerator pickle, not a shelf-stable canning recipe. That distinction matters. Because this recipe doesn’t involve the sterilization and sealing process used in traditional water bath or pressure canning, it is not safe to store at room temperature for extended periods. It must be kept refrigerated at all times, both during the initial pickling period and after opening.
Refrigerator shelf life: When kept properly sealed and refrigerated, this pickled garlic typically stays fresh for several weeks. Always use a clean utensil when removing cloves from the jar to avoid introducing contaminants that could shorten its shelf life.
Watch for signs of spoilage. As with any refrigerator pickle, keep an eye out for any unusual odors, discoloration, sliminess, or mold, and discard the jar if you notice any of these signs.
Do not attempt to can this recipe for pantry storage. Because the brine ratios and processing method here are designed specifically for refrigerator storage, this recipe should not be substituted into a shelf-stable canning process without following proper, tested canning guidelines for acidity and processing times.
Frequently Asked Questions
Is this recipe safe to store at room temperature? No. This is a refrigerator pickle recipe, not a shelf-stable canning recipe, meaning it must be kept refrigerated at all times and is not intended for room-temperature pantry storage.
How long does pickled garlic last in the fridge? When properly sealed and refrigerated, this spicy pickled garlic typically stays fresh for several weeks. Always check for any signs of spoilage, such as off odors or discoloration, before eating.
Do I need to peel the garlic myself, or can I use pre-peeled cloves? Either option works well. Pre-peeled garlic cloves from the store save time, while peeling whole heads yourself allows you to hand-select the freshest cloves.
Why does the garlic need to sit for several days before eating? The resting period allows the raw, sharp bite of the garlic to mellow out while it absorbs the tangy, spicy flavors of the brine. Waiting at least 3 to 5 days results in a much more balanced and enjoyable flavor than eating it right away.
Can I adjust the spice level? Yes. This recipe calls for 1 to 2 teaspoons of crushed red pepper flakes, so you can start on the lower end for a milder version or use the full amount for a spicier jar.
Does the garlic turn blue or green in the jar? Is that safe? Occasionally, garlic can take on a blue, green, or purple tint when exposed to certain acidic environments due to natural pigment compounds in the garlic reacting with the brine. This is generally considered a harmless, purely cosmetic reaction rather than a sign of spoilage, though the color change can vary depending on the garlic itself.
Can I reuse the brine for a second batch of garlic? It’s best to make a fresh brine for each new batch of garlic rather than reusing old brine, as the flavor and acidity level can weaken after the first use, potentially affecting both taste and safety.
What size jar works best for this recipe? A standard pint or quart-sized glass mason jar works well for 2 cups of garlic cloves, though you can scale the recipe up and use a larger jar if you’d like to make a bigger batch.
Can I use this pickled garlic in cooking, or is it just for serving cold? Both. While pickled garlic is delicious served cold straight from the jar, it also holds up well when chopped and stirred into warm dishes like pasta, stir-fries, or sauces, adding a tangy, spicy depth to cooked meals as well.
Final Thoughts
Spicy Pickled Garlic is proof that a handful of pantry staples and a little patience can produce something genuinely exciting. What starts as a simple jar of garlic and vinegar transforms, over just a few days in the fridge, into a bold, tangy, spicy condiment that can elevate everything from a weeknight sandwich to an elegant charcuterie spread. It’s low-effort, endlessly versatile, and the kind of homemade staple that, once you try it, you’ll wonder how your kitchen ever functioned without it.
Just remember the essentials: keep it refrigerated, give it those crucial few days to develop flavor, and don’t be afraid to adjust the spice level to make it your own. Would you try these spicy pickled garlic cloves?
Print
Spicy Pickled Garlic: The Bold, Tangy Condiment That Belongs on Everything
Description
Bold, tangy, spicy, and packed with flavor! These Spicy Pickled Garlic cloves are easy to make and perfect for adding a punch to sandwiches, salads, burgers, charcuterie boards, pasta, grilled meats, and more.
Ingredients
- 2 cups peeled garlic cloves
- 1 cup white vinegar
- 1 cup water
- 1 teaspoon salt
- 1 tablespoon sugar
- 1–2 teaspoons crushed red pepper flakes
- 1 teaspoon dried oregano
- ½ teaspoon black peppercorns
Instructions
Prepare the Garlic
Peel the garlic cloves and discard any damaged or soft pieces.
2. Make the Brine
Add vinegar, water, salt, sugar, red pepper flakes, oregano, and peppercorns to a saucepan. Bring to a gentle simmer and stir until the salt and sugar dissolve.
3. Fill the Jar
Place the garlic cloves into a clean glass jar.
4. Add the Brine
Pour the hot vinegar mixture over the garlic until completely covered.
5. Cool & Refrigerate
Let the jar cool to room temperature, then seal and refrigerate.
6. Let the Flavor Develop
For the best flavor, wait at least 3–5 days before serving.