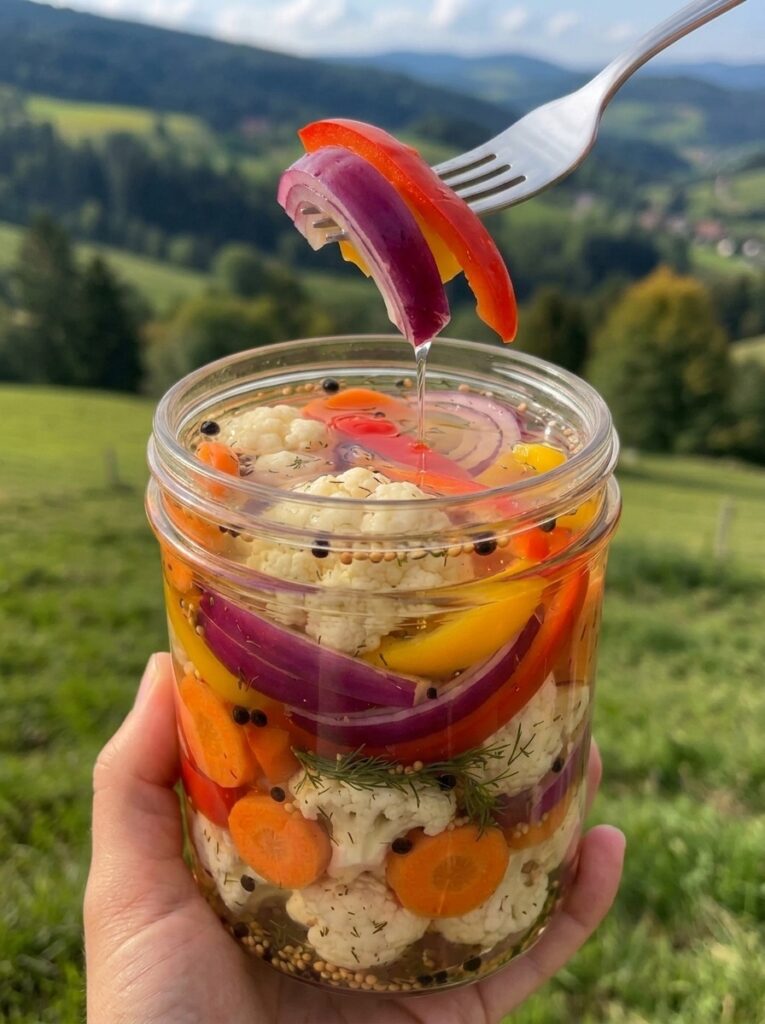
Bright, crunchy, tangy, and packed with flavor, these colorful Rainbow Pickled Vegetables are an easy refrigerator pickle that makes the perfect topping for sandwiches, burgers, salads, tacos, and more. With five vibrant vegetables packed into one jar, this recipe is as beautiful to look at as it is delicious to eat, and it comes together with just a simple brine and a little patience in the fridge.
If you’ve ever wanted to get into pickling but felt intimidated by canning equipment, water baths, or sterilizing jars, this recipe is the perfect place to start. There’s no canning involved here, just a quick simmered brine poured over fresh vegetables and a stint in the refrigerator. The result is a jar of crisp, tangy, endlessly versatile pickled vegetables that will keep your fridge stocked with flavor for weeks.
What Are Rainbow Pickled Vegetables?
Rainbow Pickled Vegetables are a quick refrigerator pickle made by packing raw, colorful vegetables, cauliflower, carrots, bell peppers, and red onion, into a jar and covering them with a hot vinegar brine seasoned with garlic, peppercorns, mustard seeds, and dill. Unlike traditional canning, which requires sterilized jars and a water bath to make pickles shelf-stable, refrigerator pickles like this one are simply chilled and stored cold, which keeps the process fast, approachable, and beginner-friendly.
The “rainbow” in the name comes from the eye-catching mix of colors in the jar, white cauliflower, orange carrots, red and yellow bell peppers, and purple-red onion, all suspended in a golden, herb-flecked brine. It’s a dish that’s as much about visual appeal as it is about flavor, making it a natural favorite for entertaining, meal prep, or simply brightening up your fridge.
Why You’ll Love This Recipe
There’s a lot to love about this easy, colorful refrigerator pickle, whether you’re a seasoned pickler or trying it for the first time.
- No canning required: A simple refrigerator pickle with no water bath or special equipment needed.
- Ready in just one day: While the flavor deepens over time, these pickles are ready to eat after just 24 hours in the fridge.
- Beautiful presentation: The mix of colorful vegetables makes this jar as pretty as it is tasty, perfect for gifting or serving at a gathering.
- Endlessly versatile: Use them as a topping, a side, or a snack straight from the jar.
- Customizable crunch and tang: Adjust the vegetables, brine ratio, or seasonings to suit your taste.
- Great make-ahead recipe: Prepare a jar in advance and always have a tangy, crunchy topping ready to go.
- Budget-friendly: A simple, affordable way to use up fresh vegetables and stretch your grocery budget.
Ingredient Breakdown
Understanding what each ingredient contributes helps you get the best flavor and texture, and make substitutions with confidence.
Cauliflower florets (1 cup) Cauliflower adds a satisfying crunch and mild flavor that soaks up the tangy brine beautifully. Cut the florets into bite-sized pieces so they pickle evenly and fit easily into the jar.
Carrot, thinly sliced (1 large) Carrot brings natural sweetness and vibrant orange color to the jar. Slicing it thinly, either into rounds or matchsticks, helps it pickle quickly and stay crisp.
Red bell pepper, sliced (1) Red bell pepper adds sweetness, color, and a slightly softer crunch compared to the other vegetables.
Yellow bell pepper, sliced (1) Yellow bell pepper contributes another pop of color and a mild, slightly fruity sweetness that balances the tangy brine.
Red onion, thinly sliced (½ small) Red onion adds a sharp, tangy bite and a beautiful purple-red hue that bleeds slightly into the brine, adding even more color to the jar.
Garlic cloves (2) Whole garlic cloves infuse the brine with a subtle savory depth without overpowering the other flavors. They soften slightly during pickling and become a flavorful bonus for anyone who enjoys pickled garlic.
White vinegar (1 cup) White vinegar is the backbone of the brine, providing the sharp, tangy acidity that defines pickled vegetables. Its clean, neutral flavor lets the vegetables and seasonings shine.
Water (1 cup) Water dilutes the vinegar slightly, balancing the acidity so the pickles are tangy without being overwhelmingly sharp.
Sugar (1 tablespoon) A small amount of sugar rounds out the brine, balancing the acidity of the vinegar with a touch of sweetness.
Salt (1½ teaspoons) Salt enhances flavor throughout the brine and helps draw out some moisture from the vegetables, contributing to that classic pickled crunch.
Black peppercorns (½ teaspoon) Whole peppercorns add a subtle warmth and gentle spice to the brine as it simmers and infuses.
Mustard seeds (½ teaspoon) Mustard seeds bring a mild tang and a bit of texture, a classic addition in pickling recipes that adds complexity to the brine.
Dried dill (½ teaspoon) Dill lends a fresh, herby note that pairs perfectly with the tangy brine and complements the natural sweetness of the vegetables.
Step-by-Step Instructions
Step 1: Prepare the Vegetables
Wash all the vegetables thoroughly. Cut the cauliflower into bite-sized florets, thinly slice the carrot, slice the bell peppers into strips, and thinly slice the red onion.
Step 2: Pack the Jar
Pack the cauliflower, carrots, bell peppers, onion, and garlic cloves into a clean glass jar, layering the colors as you go for a beautiful visual effect.
Step 3: Make the Brine
In a saucepan, combine the vinegar, water, sugar, salt, peppercorns, mustard seeds, and dill.
Step 4: Simmer the Brine
Bring the brine to a gentle simmer over medium heat, stirring occasionally, until the sugar and salt have fully dissolved.
Step 5: Pour Over the Vegetables
Carefully pour the hot brine over the packed vegetables in the jar, making sure everything is completely submerged and covered.
Step 6: Cool to Room Temperature
Let the jar sit uncovered at room temperature until it has cooled completely, this helps prevent condensation from forming inside the sealed jar.
Step 7: Seal and Refrigerate
Seal the jar with a tight-fitting lid and refrigerate for at least 24 hours to allow the flavors to develop before eating.
Step 8: Enjoy
Once chilled, your rainbow pickled vegetables are ready to enjoy cold and crunchy, straight from the jar or as a topping for your favorite dishes.
Tips for the Best Results
- Slice vegetables evenly: Consistent, thin slices help all the vegetables pickle at the same rate and absorb the brine evenly.
- Use a clean jar: While this isn’t a shelf-stable canning recipe, starting with a clean, dry glass jar helps keep your pickles fresh for longer.
- Pack tightly, but don’t overcrowd: Snugly packed vegetables stay submerged in the brine more easily, but leave a little headspace to make sealing and pouring easier.
- Make sure the brine fully covers the vegetables: Any exposed vegetables above the brine line may not pickle evenly, so top off with a bit more water and vinegar if needed.
- Be patient: While these pickles are ready after 24 hours, letting them sit for 2 to 3 days deepens the flavor significantly.
- Shake or stir occasionally: Gently shaking the jar during the first day or two helps distribute the seasonings evenly throughout the brine.
Variations to Try
This colorful pickling base is easy to adapt based on what vegetables you have on hand or your flavor preferences.
- Spicy rainbow pickles: Add a sliced jalapeño or a pinch of red pepper flakes to the brine for a spicy kick.
- Green rainbow pickles: Swap in green beans, broccoli florets, or sliced green bell pepper for even more color variety.
- Herbed pickles: Add a sprig of fresh dill or a few fresh thyme leaves to the jar for an extra herby aroma.
- Sweet and tangy pickles: Increase the sugar slightly for a milder, sweeter brine that balances the vinegar’s sharpness.
- Garlic-forward pickles: Add a few extra garlic cloves for a more pronounced, savory garlic flavor throughout the jar.
- Apple cider vinegar swap: Replace the white vinegar with apple cider vinegar for a slightly fruitier, milder tang.
Serving Suggestions
These bright, tangy pickled vegetables are incredibly versatile and can be used in all kinds of dishes.
- Pile them onto sandwiches, burgers, or wraps for a crunchy, tangy contrast.
- Add a handful to tacos or burrito bowls for extra color, crunch, and acidity.
- Toss into salads for a quick flavor and texture boost.
- Serve alongside grilled meats, cheese boards, or charcuterie spreads.
- Enjoy straight from the jar as a low-calorie, crunchy snack.
- Chop finely and stir into potato salad, pasta salad, or grain bowls for a bright, tangy kick.
How to Store Rainbow Pickled Vegetables
This is a refrigerator pickle, not a shelf-stable canning recipe, so proper cold storage is essential.
Refrigerator: Store the sealed jar in the refrigerator at all times. The pickles will keep well for up to 3 to 4 weeks, staying crisp and flavorful throughout.
Do not can or store at room temperature: Because this recipe isn’t processed using proper canning methods, it should never be stored outside the refrigerator or treated as shelf-stable.
Always use a clean utensil to remove pickles from the jar to help prevent contamination and extend freshness.
Frequently Asked Questions
Is this a canning recipe? No. This is a refrigerator pickle, meaning the vegetables are simply covered in a hot brine and then stored cold rather than processed in a water bath for shelf stability. It must be kept refrigerated at all times.
How long do these pickled vegetables last? Stored properly in the refrigerator, these pickled vegetables typically stay fresh and crisp for about 3 to 4 weeks.
Can I use different vegetables? Absolutely. This recipe is very flexible, green beans, radishes, celery, or broccoli florets can all be substituted or added for even more variety.
Do I have to wait 24 hours before eating them? For the best flavor, yes, letting the jar sit for at least 24 hours allows the vegetables to properly absorb the brine. They’ll continue to develop even more flavor over the following 2 to 3 days.
Why did my brine turn cloudy or pink? This is completely normal, especially with red onion in the jar, which can tint the brine a light pink or purple color as it sits. It doesn’t affect safety or flavor.
Can I reuse the brine for a new batch of vegetables? While it’s best to make a fresh brine for food safety and flavor consistency, a once-used brine can sometimes be reused for a quick, milder pickle, just keep in mind it will be less concentrated in flavor and shouldn’t be reused indefinitely.
Can I make this recipe less sweet or more tangy? Yes, feel free to reduce the sugar slightly for a sharper, more vinegar-forward pickle, or increase it slightly for a milder, sweeter flavor.
Why are my vegetables not as crunchy as I’d like? Slicing vegetables too thick or letting them pickle for an extended period can soften their texture. For maximum crunch, slice vegetables thinly and enjoy within the first couple of weeks.
Can I double this recipe? Yes, this recipe scales up easily. Just make sure you have a large enough jar or divide the mixture between two jars, and adjust the brine quantity proportionally.
Print
Rainbow Pickled Vegetables
Description
Bright, crunchy, tangy, and packed with flavor. These colorful pickled vegetables are an easy refrigerator pickle that makes the perfect topping for sandwiches, burgers, salads, tacos, and more.
Ingredients
- 1 cup cauliflower florets
- 1 large carrot, thinly sliced
- 1 red bell pepper, sliced
- 1 yellow bell pepper, sliced
- ½ small red onion, thinly sliced
- 2 garlic cloves
- 1 cup white vinegar
- 1 cup water
- 1 tablespoon sugar
- 1½ teaspoons salt
- ½ teaspoon black peppercorns
- ½ teaspoon mustard seeds
- ½ teaspoon dried dill
Instructions
- Wash and prepare all the vegetables.
- Pack the cauliflower, carrots, bell peppers, onion, and garlic into a clean glass jar.
- In a saucepan, combine the vinegar, water, sugar, salt, peppercorns, mustard seeds, and dill.
- Bring the brine to a gentle simmer, stirring until the sugar and salt dissolve.
- Carefully pour the hot brine over the vegetables until completely covered.
- Let the jar cool to room temperature.
- Seal and refrigerate for at least 24 hours for the flavors to develop.
- Enjoy cold and crunchy.
Notes
The vegetables become more flavorful after 2–3 days in the refrigerator.