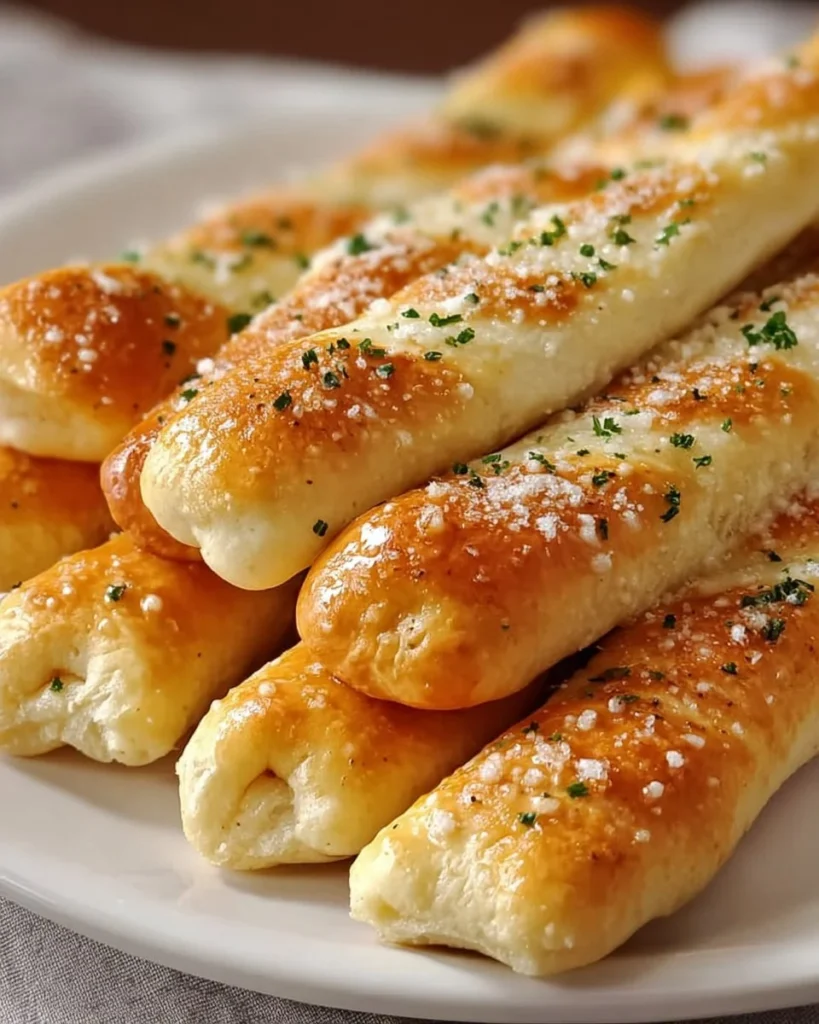
As you step into the world of Olive Garden’s famous breadsticks, the air fills with the intoxicating aroma of freshly baked bread. These breadsticks boast a golden brown crust, soft and pillowy interior, and the promise of deliciousness. Just the mere thought of pulling apart one of these soft, warm sticks evokes a sense of comfort and nostalgia, conjuring images of family gatherings, joyous occasions, and delicious pasta meals. Each bite delivers a delightful crunch that softens into a tender chew, while the heavenly garlic butter glaze elevates your taste buds to new heights.
Picture this: as you break into a warm breadstick, you immediately catch the enticing scent of garlic mingling with melted butter. The moment you take your first taste, a delightful explosion of flavors dances on your palate. These breadsticks cradle the comforting sweetness of dough, underscored by an umami kick from the garlic. Whether served alongside a hearty soup, fresh salad, or as the star of your appetizer spread, each breadstick invites you to savor the experience, leaving you yearning for more.
The joy of making Olive Garden-style breadsticks at home transforms an ordinary meal into a luxurious event. Not only do you impress family and friends with your culinary skills, but you fill your home with warmth and delightful aromas. Let’s delve into the secrets of whipping up these delightful delights.
Why You’ll Love This Olive Garden Breadsticks Recipe
Olive Garden breadsticks have become iconic, thanks to their soft, airy texture and delicious flavor enhanced by a slathering of garlic butter. They offer several reasons to fall in love with them beyond just their taste.
-
Versatile Ocassions: Perfect for a cozy dinner at home, a gathering with friends, or as a delicious treat alongside your favorite pasta.
-
Comfort Food Elevated: Biting into a warm, buttery breadstick evokes nostalgia and happiness, making every meal feel like a celebration.
-
Crowd-Pleaser: Whether you serve them as an appetizer or alongside your main course, they never fail to bring smiles to faces.
The combination of fresh ingredients and the joy of creating something delightful makes these breadsticks stand out on any dining table.
Preparation Phase & Tools to Use
Before diving into the dough, gather the essential tools that make this baking endeavor a breeze. Each tool plays a crucial role in crafting these delectable breadsticks.
-
Large Mixing Bowl: This serves as your dough’s home during the initial mixing and rising phases. The larger, the better, to allow room for the yeast to work its magic.
-
Wooden Spoon or Dough Scraper: Use a wooden spoon for mixing your ingredients until they form a rough dough, or turn to a dough scraper for kneading.
-
Baking Sheet: A standard baking sheet holds your shaped breadsticks while they rise and bake to perfection.
-
Clean Kitchen Towel: Covering your dough with a towel keeps it warm and prevents it from drying out during the rising phase.
Practical Preparation Tips
- Ensure your water is warm (about 110°F) but not hot, as boiling water can kill the yeast.
- Kneading the dough on a floured surface helps develop the gluten, creating that fluffy texture we adore in breadsticks.
Ingredients for Olive Garden Breadsticks
- 2 cups warm water: Acts as the foundation of your dough, activating the yeast.
- 2 tablespoons sugar: Feeds the yeast and helps achieve a subtle sweetness.
- 1 tablespoon active dry yeast: The star ingredient that makes the bread rise and gives it that fluffy texture.
- 5 cups all-purpose flour: This provides the structure; feel free to substitute with bread flour for a chewier texture.
- 1 tablespoon salt: Enhances flavor and controls yeast activity.
- 1/4 cup unsalted butter, melted: Adds richness and moisture.
- 2 tablespoons garlic powder: Infuses the breadsticks with aromatic flavor.
- 1/4 cup unsalted butter (for brushing): Turns your breadsticks into a buttery, glossy treat.
- Salt (for sprinkling): A finishing touch that enhances every delicious bite.
Key Ingredients and Substitutions
If you’re feeling adventurous, try mixing in herbs like rosemary or thyme for a unique twist. For a dairy-free version, substitute the butter with olive oil or coconut oil.
How to Make Olive Garden Breadsticks
-
Combine Ingredients: In a large bowl, mix warm water, sugar, and yeast. Let it sit for about 5 minutes until frothy. This step is crucial as it activates the yeast, ensuring your breadsticks rise beautifully.
-
Mix in Butter and Salt: Stir in the melted butter and salt. Next, gradually add flour, mixing it until a dough begins to form. You are looking for a slightly sticky but manageable texture.
-
Knead the Dough: Transfer the dough onto a floured surface and knead for about 5-7 minutes until it feels smooth and elastic. Kneading develops gluten, which gives your breadsticks their characteristic chew.
-
Let It Rise: Place the dough in a greased bowl, cover it with a clean kitchen towel, and let it rise in a warm area for about 1 hour or until it has doubled in size. Patience is key here—the yeast is doing its magic!
-
Prepare to Bake: Preheat your oven to 400°F (200°C). The heat will ensure that your breadsticks turn out golden brown and fluffy.
-
Shape the Dough: Punch down the risen dough to release air bubbles. Divide it into 12 equal pieces and shape each piece into a stick.
-
Second Rise: Place the dough sticks on a baking sheet and let them rise for another 15-20 minutes. This second rise will give your breadsticks that airy texture.
-
Bake: Slide the baking sheet into the oven and bake for about 15 minutes or until the breadsticks are golden brown. The moment your oven dings, the delectable scent will envelop your kitchen.
-
Prepare Garlic Butter: While the breadsticks bake, melt the remaining butter and mix in the garlic powder to create a luscious topping.
-
Finish and Serve: Brush the garlic butter generously over the warm breadsticks, and sprinkle with salt before serving. This final touch transforms ordinary bread into something extraordinary.
Chef’s Notes & Helpful Tips
- Make-Ahead Tips: Prepare the dough a day in advance and let it rise in the refrigerator overnight. Let it come to room temperature before shaping.
- Cooking Alternatives: Try making breadsticks in an air fryer for a crispy texture or bake them in a cast-iron skillet for a rustic presentation.
- Customization Ideas: Experiment with different seasonings or dips. For a cheesy version, sprinkle grated Parmesan cheese on top before baking.
Common Mistakes to Avoid
Creating the perfect breadstick can be tricky, so steer clear of these common pitfalls:
- Incorrect Yeast Activation: Ensure your water is warm enough for the yeast to activate but not so hot that it kills it. A thermometer can come in handy.
- Under or Over Kneading: Proper kneading is essential; over-kneaded dough creates tough breadsticks, while under-kneading results in dense, flat sticks. Listen to your dough!
- Skipping the Rise: Allowing the dough to rise is crucial for flavor and texture. Don’t rush this process; it rewards patience.
What to Serve With Olive Garden Breadsticks
These delightful breadsticks complement a variety of dishes, making them incredibly versatile:
- Pasta Dishes: Pair them with your favorite spaghetti or fettuccine for a comforting meal.
- Salads: Serve alongside a fresh Caesar or garden salad for a refreshing contrast.
- Soups: Perfect with minestrone or a creamy tomato soup, adding warmth and heartiness.
- Cheesy Dips: Enjoy them with a gooey cheese dip for a delightful appetizer.
- Charcuterie Board: Add them to a platter with cured meats and cheeses for a sophisticated touch.
- Bruschetta: Use the breadsticks as a base to create delicious bruschetta, topped with fresh tomatoes and basil.
Storage & Reheating Instructions
To keep your breadsticks fresh and delectable:
-
In the Fridge: Store them in an airtight container for up to 4 days. Reheat in the oven at 350°F (175°C) until warmed through.
-
In the Freezer: Freeze cooled breadsticks in an airtight bag for up to 3 months. For best results, thaw overnight in the fridge before reheating.
-
Reheating: For that just-baked quality, heat them in the oven or toaster oven until warm and crisp, brushing with a little extra garlic butter if desired.
Estimated Nutrition Information
Approximate values per serving (1 breadstick):
- Calories: 150
- Protein: 3g
- Carbohydrates: 25g
- Fat: 5g
- Fiber: 1g
Please note that nutritional values can vary based on preparation and ingredients.
FAQs
-
Can I use instant yeast instead of active dry yeast?
Yes! You can substitute instant yeast; skip the proofing step and add it directly to the flour mixture. -
Are these breadsticks vegan?
To make them vegan, use plant-based butter and omit the dairy in the recipe. -
How can I achieve a crispy exterior?
Bake the breadsticks until golden brown and brush them with melted butter right after pulling them from the oven. -
What if my dough doesn’t rise?
If your dough doesn’t rise, it may be due to inactive yeast or a cold environment. Ensure your yeast is fresh and the dough is kept in a warm spot. -
Can these breadsticks be made gluten-free?
You can use a gluten-free flour blend, but the texture may differ slightly. Choose a blend formulated for yeast baking for the best results.
Conclusion
Creating your very own Olive Garden breadsticks at home is not only a rewarding culinary adventure but also an invitation to experience comfort in every bite. The blend of buttery, garlicky goodness paired with a fluffy interior makes these breadsticks an unforgettable treat that shines at any meal. As you pull a warm stick apart and bask in the aroma, you welcome a slice of that beloved restaurant experience into your home. Start this mouthwatering journey today—your taste buds will thank you!
Print
Olive Garden Breadsticks
- Total Time: 30 minutes
- Yield: 12 servings 1x
- Diet: Vegetarian
Description
Enjoy the soft, buttery, and garlicky goodness of Olive Garden’s iconic breadsticks, made fresh at home.
Ingredients
- 2 cups warm water
- 2 tablespoons sugar
- 1 tablespoon active dry yeast
- 5 cups all-purpose flour
- 1 tablespoon salt
- 1/4 cup unsalted butter, melted
- 2 tablespoons garlic powder
- 1/4 cup unsalted butter (for brushing)
- Salt (for sprinkling)
Instructions
- Combine Ingredients: In a large bowl, mix warm water, sugar, and yeast. Let it sit for about 5 minutes until frothy.
- Mix in Butter and Salt: Stir in the melted butter and salt. Gradually add flour, mixing until a dough begins to form.
- Knead the Dough: Transfer the dough onto a floured surface and knead for about 5-7 minutes until smooth and elastic.
- Let It Rise: Place the dough in a greased bowl, cover with a clean kitchen towel, and let it rise in a warm area for about 1 hour or until doubled.
- Prepare to Bake: Preheat oven to 400°F (200°C).
- Shape the Dough: Punch down the risen dough, divide into 12 pieces, and shape each into a stick.
- Second Rise: Place the sticks on a baking sheet and let them rise for another 15-20 minutes.
- Bake: Bake for about 15 minutes or until golden brown.
- Prepare Garlic Butter: Melt remaining butter and mix in garlic powder.
- Finish and Serve: Brush garlic butter over warm breadsticks, sprinkle with salt before serving.
Notes
For a garlic lover’s dream, brush extra garlic butter before serving. Store leftovers in an airtight container for up to 4 days.
- Prep Time: 15 minutes
- Cook Time: 15 minutes
- Category: Appetizer
- Method: Baking
- Cuisine: Italian
Nutrition
- Serving Size: 1 breadstick
- Calories: 150
- Sugar: 2g
- Sodium: 200mg
- Fat: 5g
- Saturated Fat: 2g
- Unsaturated Fat: 3g
- Trans Fat: 0g
- Carbohydrates: 25g
- Fiber: 1g
- Protein: 3g
- Cholesterol: 15mg
Keywords: breadsticks, garlic bread, Olive Garden, Italian, comfort food