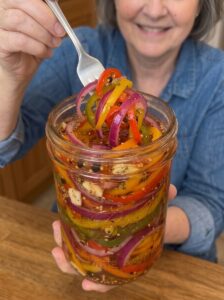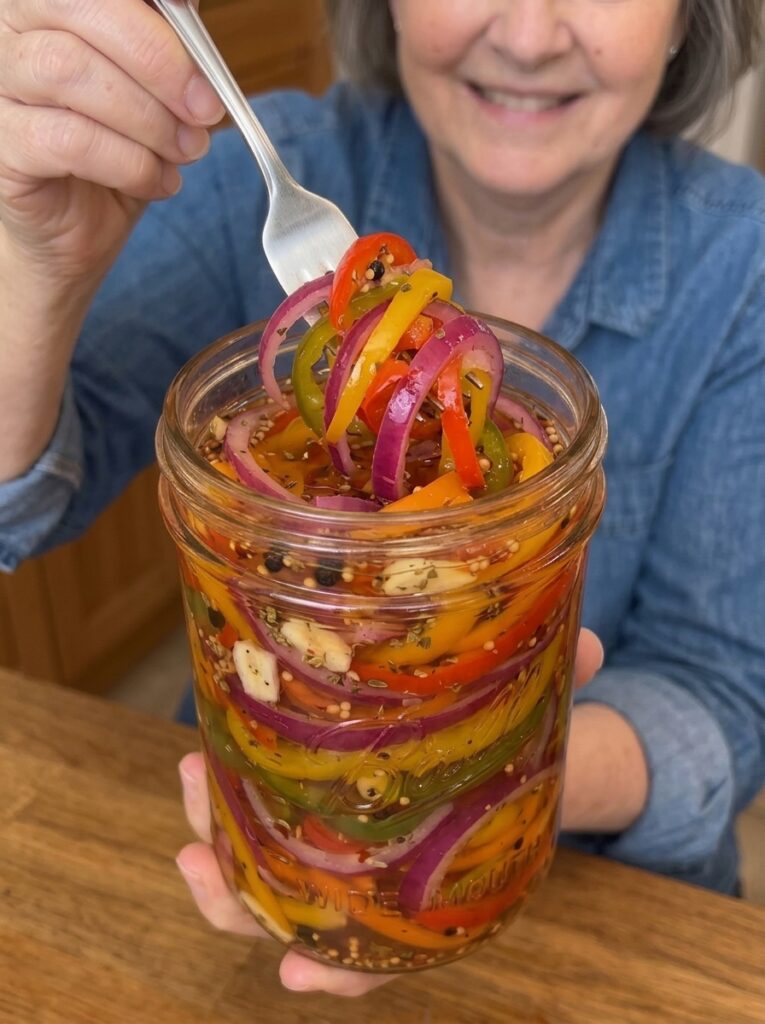
Some recipes earn a permanent place in your refrigerator door, and these Sweet and Tangy Pickled Peppers and Onions are one of them. Crisp bell peppers, thinly sliced red onions, and fresh garlic are tucked into a jar and covered with a perfectly balanced sweet-and-sour brine flavored with mustard seeds, black peppercorns, and a little optional heat. After a day in the refrigerator, the vegetables turn bright, tangy, and irresistibly crunchy, ready to lift almost any meal from ordinary to memorable.
What makes this recipe so appealing is how little effort it asks of you. There is no canning equipment, no special technique, and no long waiting period. You slice the vegetables, warm a simple brine on the stove, pour it into a jar, and let the refrigerator do the rest. In about 15 minutes of hands-on work, you create a colorful condiment that works on juicy cheeseburgers, loaded hot dogs, tacos, nachos, deli sandwiches, grain bowls, and smoky barbecue plates.
In this complete guide, you will learn exactly how to make pickled peppers and onions at home, why each ingredient matters, how to keep the vegetables crisp, how to customize the flavor, how to store the jar safely, and how to answer the most common questions people ask about refrigerator pickles. You will also find a full recipe card you can save and use again and again.
What Are Pickled Peppers and Onions?
Pickled peppers and onions are sliced vegetables preserved in a seasoned brine made from vinegar, water, sugar, and salt. The acidity of the vinegar gives the vegetables their signature tang, while the sugar softens the sharpness and adds a gentle sweetness. Aromatics such as garlic, mustard seeds, and peppercorns build layers of flavor that make the pickles taste far more complex than the short ingredient list suggests.
This particular recipe is a quick pickle, also called a refrigerator pickle. Unlike traditional canned pickles, which are processed in a boiling water bath so they can be stored at room temperature, quick pickles are kept cold from start to finish. The hot brine is poured over the raw vegetables, which slightly softens them while keeping most of their crunch. Once cooled, the jar goes straight into the refrigerator, where the flavors develop over the next day or two.
Because the vegetables are only lightly cooked by the hot brine, they keep a fresh, vibrant character that is quite different from long-cooked or heavily fermented pickles. Red onions turn a brilliant pink, the bell peppers stay colorful, and the garlic mellows into a soft, savory background note.
Why You Will Love This Recipe
It is incredibly simple. You only need a knife, a saucepan, and a jar. There are no complicated steps and no special skills required.
Big flavor with basic ingredients. Vinegar, water, sugar, salt, and a few spices transform humble vegetables into a bold, craveable condiment.
It is wonderfully versatile. These pickles work on burgers, hot dogs, tacos, sandwiches, wraps, salads, grilled meats, roasted vegetables, cheese boards, and more.
Crunchy and colorful. The mix of red, yellow, or orange peppers with deep purple onions makes every dish look more appetizing.
Budget-friendly. Peppers, onions, and pantry staples cost far less than store-bought jars of specialty pickles, and you control the sweetness, spice, and salt level.
No canning required. Because this is a refrigerator recipe, you can skip the pressure of canning rules and sterilizing equipment.
Ready quickly. The pickles taste good after 24 hours and even better after 2 to 3 days.
Easy to customize. Add more heat, more sweetness, different herbs, or different vegetables to suit your own taste.
Ingredients Breakdown
Understanding the role of each ingredient helps you get consistent, delicious results every time.
The Vegetables
- 2 large bell peppers (red, yellow, or orange), thinly sliced
- 1 large red onion, thinly sliced
- 3 garlic cloves, peeled and lightly crushed
Bell peppers. Red, yellow, and orange peppers are naturally sweet, which balances the acidity of the brine beautifully. Green bell peppers are more bitter and grassy, so they are less ideal for this recipe, though you can use one for variety. Choose firm, glossy peppers with no soft spots, since fresh vegetables stay crunchier. Slice them into thin, even strips so they pickle uniformly.
Red onion. Red onions have a milder, slightly sweet flavor and a gorgeous color that deepens in the brine. Slice them thinly, about one-eighth of an inch thick, so they absorb the flavor quickly and soften to a pleasant crisp-tender texture.
Garlic. Lightly crushing the cloves releases their aroma without making the brine overpowering. Over time the garlic mellows and becomes a delicious bonus to eat from the jar.
The Brine
- 1 cup (240 ml) white vinegar (5% acidity)
- 1 cup (240 ml) water
- 3 tablespoons granulated sugar
- 1 tablespoon pickling salt
White vinegar. Distilled white vinegar with 5 percent acidity gives a clean, sharp tang and keeps the color of the vegetables bright. Always check the label for the acidity level. A one-to-one ratio of vinegar to water creates a balanced brine that is tangy without being harsh.
Water. Water dilutes the vinegar so the pickles are pleasantly sour instead of overwhelmingly acidic. Filtered water is a good choice if your tap water has a strong taste.
Sugar. Three tablespoons add sweetness that rounds out the acidity. This is what gives these pickles their signature sweet-and-tangy flavor.
Pickling salt. Pickling salt dissolves cleanly and contains no anti-caking agents or additives that could cloud the brine. If you do not have it, you can use fine sea salt or kosher salt, but measure carefully, because different salts vary in volume and saltiness.
The Spices
- 1 teaspoon mustard seeds
- 1 teaspoon black peppercorns
- 1/2 teaspoon red pepper flakes (optional)
- 1/2 teaspoon dried oregano (optional)
Mustard seeds. These add a subtle, earthy tang and the classic pickle aroma.
Black peppercorns. Peppercorns bring gentle warmth and a woody depth.
Red pepper flakes. Add these if you want a hint of heat. Half a teaspoon gives a mild background kick; increase it for spicier pickles.
Dried oregano. A small pinch of oregano gives the pickles a Mediterranean flair that pairs well with sandwiches, grilled meats, and pizza.
Step-by-Step Instructions
Step 1: Slice the Vegetables
Wash the bell peppers thoroughly and remove the stems, seeds, and white ribs. Slice them into thin strips. Peel the red onion and slice it thinly into half-moons or rings. Cutting everything to a similar thickness ensures even pickling and a consistent texture.
Step 2: Fill the Jar
Choose a clean, heat-safe glass jar, such as a quart-size mason jar. Pack the sliced peppers, onions, and crushed garlic cloves into the jar, layering them so the colors are evenly distributed. Press them down gently, but do not crush them. Leave a little space at the top so the brine can cover everything.
Step 3: Prepare the Brine
In a saucepan, combine the vinegar, water, sugar, pickling salt, mustard seeds, black peppercorns, and the optional red pepper flakes. Add the oregano now if you are using it.
Step 4: Heat the Mixture
Place the saucepan over medium heat and bring the brine to a gentle boil, stirring occasionally until the sugar and salt have dissolved completely. This takes only a few minutes. Remove the pan from the heat as soon as it boils.
Step 5: Pour Over the Vegetables
Carefully pour the hot brine into the jar, covering the vegetables completely. Use a funnel if you have one to avoid spills. Tap the jar gently on the counter or run a clean spoon handle along the inside edge to release trapped air bubbles. Make sure all the vegetables are submerged, since anything exposed to air can spoil faster and lose its color.
Step 6: Cool Safely
Let the jar cool briefly on the counter, uncovered or loosely covered, until it is no longer steaming. Then seal the lid and refrigerate promptly. Do not leave the jar at room temperature for long periods.
Step 7: Let the Flavors Develop
Refrigerate the pickles for at least 24 hours before eating. For a deeper sweet-and-tangy flavor, wait 2 to 3 days. The vegetables continue to absorb the brine and the flavors blend beautifully over time.
Step 8: Serve and Enjoy
Use a clean fork or tongs to remove the pickles from the jar, and add them to your favorite meals. They are also delicious chilled, straight from the jar.
Tips for the Best Pickled Peppers and Onions
Slice thinly and evenly. Thin slices absorb flavor faster and soften evenly. A sharp knife or a mandoline makes this easier. If you use a mandoline, protect your fingers with the guard.
Start with fresh, firm vegetables. Crisp vegetables stay crisper after pickling. Avoid peppers that are soft, wrinkled, or past their prime.
Do not overcook the vegetables. Pour the hot brine over raw vegetables rather than simmering them in the pot. This preserves their crunch.
Check your vinegar label. Use vinegar with at least 5 percent acidity for safe, reliable results. Do not reduce the vinegar in the recipe.
Use a clean jar and clean utensils. Wash the jar in hot soapy water and rinse well. Always use a clean fork or spoon to remove pickles so you do not introduce bacteria.
Keep everything submerged. If the vegetables float above the brine, press them down with a clean fermentation weight or a small piece of folded parchment paper.
Avoid iodized salt. It can cloud the brine and darken the vegetables.
Be patient. The pickles are good after one day, but the flavor is noticeably better after two or three.
Taste and adjust next time. If you prefer sweeter pickles, add a little more sugar in your next batch. For more tang, reduce the sugar slightly.
Variations and Substitutions
Spicy pickled peppers and onions. Increase the red pepper flakes to a full teaspoon, or add a few slices of fresh jalapeno or serrano pepper for real heat.
Garlic lover’s version. Add two or three extra garlic cloves for a bolder, more savory flavor.
Herbed pickles. Add a sprig of fresh dill, thyme, or rosemary to the jar for an aromatic twist.
Apple cider vinegar version. Replace half of the white vinegar with apple cider vinegar for a fruitier, softer tang. Make sure it also has 5 percent acidity.
Honey or maple sweetener. Swap the sugar for honey or maple syrup for a slightly different sweetness. Stir well to dissolve it into the hot brine.
Reduced-sugar pickles. Cut the sugar to 2 tablespoons for a tangier, less sweet result.
Add other vegetables. Thin slices of carrot, cucumber, cauliflower florets, or jalapenos all pickle well in this brine.
Whole spice additions. A few coriander seeds, a bay leaf, or a pinch of turmeric can add new flavor dimensions and a golden color.
Mini sweet peppers. Sliced mini sweet peppers make a pretty, bite-size alternative to large bell peppers.
Serving Suggestions
These pickled peppers and onions are one of the most flexible condiments you can keep on hand.
- Burgers and smash burgers. Pile them on top for a tangy crunch that cuts through rich meat and melted cheese.
- Hot dogs and sausages. They add color, acidity, and texture to grilled sausages, brats, and chili dogs.
- Tacos, nachos, and quesadillas. The sweet-and-sour bite brightens spicy, cheesy, and meaty fillings.
- Sandwiches, wraps, and subs. Layer them into turkey, roast beef, chicken, or vegetarian sandwiches for instant flavor.
- Grilled chicken, BBQ ribs, and roasted vegetables. Serve them alongside as a fresh, tangy counterpoint to smoky, savory dishes.
- Salads and grain bowls. Toss a handful into green salads, rice bowls, or pasta salads.
- Cheese and charcuterie boards. Their color and acidity pair beautifully with cheese, cured meats, and crackers.
- Eggs and breakfast plates. Try them on avocado toast, omelets, or breakfast sandwiches.
- Straight from the jar. Many people enjoy them chilled as a snack.
Storage Tips
This is a refrigerator pickle recipe, not a shelf-stable canning recipe. The jar must be kept cold at all times and should never be stored at room temperature after it has cooled.
Refrigerator temperature. Keep the pickles at 40 degrees Fahrenheit (4 degrees Celsius) or below.
Keep the vegetables submerged. Make sure the vegetables stay covered by the brine to protect their quality and flavor.
Storage time. For the best flavor and texture, enjoy the pickles within 1 to 2 weeks. The vegetables will gradually soften as they sit in the brine.
Use clean utensils. Always remove pickles with a clean fork or tongs, never with your fingers, to avoid contaminating the jar.
Signs of spoilage. Discard the pickles if you notice an off smell, mold, sliminess, a cloudy or bubbling brine that was not there before, or any unusual appearance. When in doubt, throw it out.
Freezing is not recommended. Freezing destroys the crisp texture of the vegetables, leaving them limp and watery.
Reusing the brine. For food safety and flavor, it is best not to reuse the brine for a new batch of vegetables once the pickles are finished.
Recipe Card
Sweet and Tangy Pickled Peppers and Onions
Prep time: 15 minutes Cook time: 5 minutes Chilling time: 24 hours minimum (2 to 3 days for best flavor) Yield: 1 quart jar Course: Condiment, side Cuisine: American
Ingredients
- 2 large bell peppers (red, yellow, or orange), thinly sliced
- 1 large red onion, thinly sliced
- 3 garlic cloves, peeled and lightly crushed
- 1 cup (240 ml) white vinegar (5% acidity)
- 1 cup (240 ml) water
- 3 tablespoons granulated sugar
- 1 tablespoon pickling salt
- 1 teaspoon mustard seeds
- 1 teaspoon black peppercorns
- 1/2 teaspoon red pepper flakes (optional)
- 1/2 teaspoon dried oregano (optional)
Instructions
- Wash the bell peppers and slice them into thin strips. Thinly slice the red onion.
- Arrange the peppers, onions, and garlic in a clean, heat-safe glass jar.
- In a saucepan, combine the vinegar, water, sugar, salt, mustard seeds, black peppercorns, and optional red pepper flakes and oregano.
- Bring the mixture to a gentle boil, stirring until the sugar and salt dissolve completely.
- Carefully pour the hot brine into the jar until all the vegetables are submerged.
- Let the jar cool briefly, then refrigerate promptly.
- Refrigerate for at least 24 hours. For a deeper sweet-and-tangy flavor, wait 2 to 3 days.
- Serve on burgers, hot dogs, tacos, sandwiches, and more, or enjoy chilled straight from the jar.
Storage: Keep refrigerated at 40 degrees Fahrenheit (4 degrees Celsius) or below, with the vegetables submerged in brine. Best within 1 to 2 weeks.
Frequently Asked Questions
How long do pickled peppers and onions last in the refrigerator?
For the best quality, eat them within 1 to 2 weeks. They remain safe as long as they are kept refrigerated, covered in brine, and handled with clean utensils, but their crunch fades over time.
Can I store these pickles at room temperature?
No. This is a refrigerator-pickle recipe, not a shelf-stable canning recipe. The jar must stay in the refrigerator at all times. If you want shelf-stable pickles, you need to follow a tested canning recipe designed for that purpose.
How long should I wait before eating them?
They are ready after 24 hours in the refrigerator, but waiting 2 to 3 days gives a deeper and more balanced sweet-and-tangy flavor.
Why did my pickles turn out soft?
Soft pickles usually come from vegetables that were not fresh, slices that were cut too thin, brine that was boiled with the vegetables inside, or pickles stored too long. Use firm vegetables, pour the hot brine over raw slices, and eat the jar within two weeks.
Can I use apple cider vinegar instead of white vinegar?
Yes, as long as it has 5 percent acidity. Apple cider vinegar gives a slightly fruitier, mellower flavor and a golden tint to the brine. White vinegar keeps the colors brighter.
Can I use regular table salt?
It is best to use pickling salt, kosher salt, or fine sea salt. Iodized table salt can make the brine cloudy and may darken the vegetables. If you must use a different salt, measure by weight when possible, since volume varies between types.
Can I reduce the sugar?
Yes. You can lower the sugar to 2 tablespoons for a tangier pickle. The sugar mainly affects flavor and balance, but do not reduce the vinegar or salt.
Can I add other vegetables to the jar?
Absolutely. Sliced carrots, cucumbers, cauliflower, jalapenos, and radishes all work well in this brine. Keep the total volume of vegetables roughly the same so the brine covers everything.
Do I need to sterilize the jar?
Because the pickles are refrigerated and eaten within a short time, full sterilization is not required. However, the jar must be very clean. Wash it in hot soapy water, rinse thoroughly, and make sure it is heat-safe before adding hot brine.
Final Thoughts
Sweet and Tangy Pickled Peppers and Onions prove that a few simple ingredients and a little patience can create a condiment that makes everything taste better. They are crunchy, colorful, balanced, and endlessly useful, whether you are topping a burger, brightening a taco, or stacking a sandwich. Because they take just minutes to prepare and require no canning, they are perfect for beginners and busy home cooks alike.
Keep a jar in your refrigerator, follow the storage guidelines, and enjoy them within one to two weeks for the best flavor and crunch. Once you taste how much a homemade jar elevates your everyday meals, you may never go back to the store-bought version.
Which would you add more of next time: red onions or sweet peppers? Share your favorite way to enjoy them in the comments.
Print
Sweet and Tangy Pickled Peppers and Onions: Easy Refrigerator Pickle Recipe
Description
Prep time: 15 minutes Cook time: 5 minutes Chilling time: 24 hours minimum (2 to 3 days for best flavor) Yield: 1 quart jar Course: Condiment, side Cuisine: American
Ingredients
- 2 large bell peppers (red, yellow, or orange), thinly sliced
- 1 large red onion, thinly sliced
- 3 garlic cloves, peeled and lightly crushed
- 1 cup (240 ml) white vinegar (5% acidity)
- 1 cup (240 ml) water
- 3 tablespoons granulated sugar
- 1 tablespoon pickling salt
- 1 teaspoon mustard seeds
- 1 teaspoon black peppercorns
- 1/2 teaspoon red pepper flakes (optional)
- 1/2 teaspoon dried oregano (optional)
Instructions
- Wash the bell peppers and slice them into thin strips. Thinly slice the red onion.
- Arrange the peppers, onions, and garlic in a clean, heat-safe glass jar.
- In a saucepan, combine the vinegar, water, sugar, salt, mustard seeds, black peppercorns, and optional red pepper flakes and oregano.
- Bring the mixture to a gentle boil, stirring until the sugar and salt dissolve completely.
- Carefully pour the hot brine into the jar until all the vegetables are submerged.
- Let the jar cool briefly, then refrigerate promptly.
- Refrigerate for at least 24 hours. For a deeper sweet-and-tangy flavor, wait 2 to 3 days.
- Serve on burgers, hot dogs, tacos, sandwiches, and more, or enjoy chilled straight from the jar.