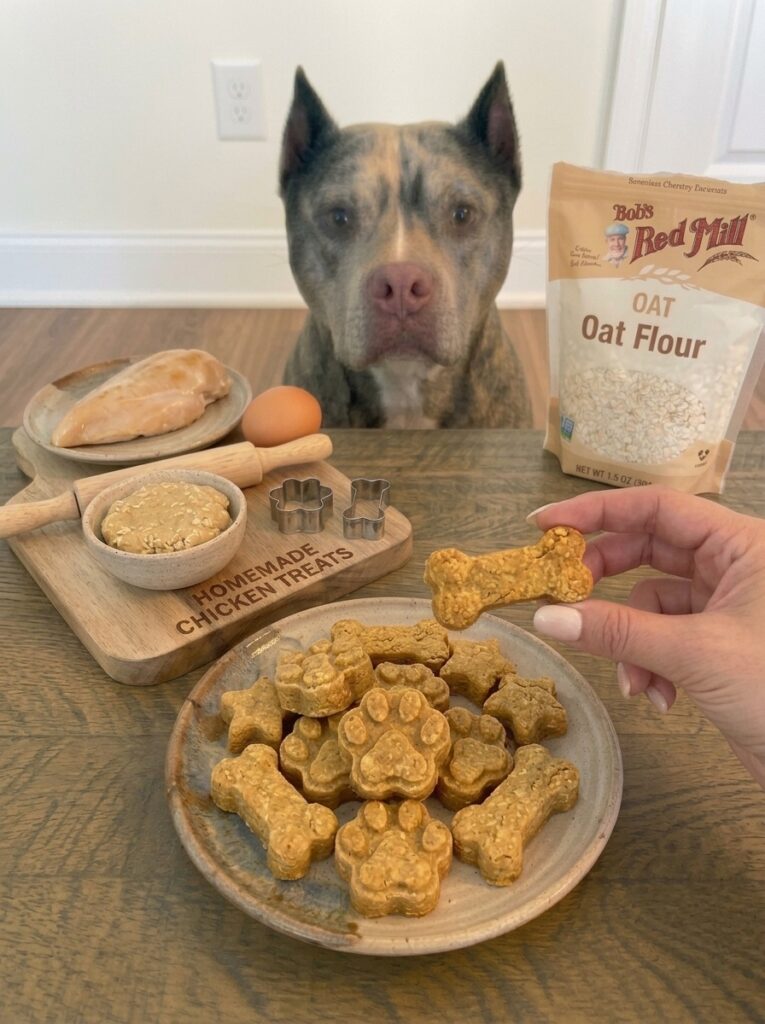
Three simple ingredients, one very happy pup. These homemade chicken dog treats are easy to make, protein-rich, and perfect for rewarding your furry friend. If you’re looking for a simple, wholesome dog treat recipe with nothing extra added, no fillers, no seasonings, no mystery ingredients, this one is about as straightforward as it gets. Just chicken, egg, and oat flour, baked into small, chewy bites your dog will genuinely go crazy for.
This recipe is especially great for dog owners who want full control over what’s going into their pet’s treats, whether that’s because of allergies, sensitivities, or simply a desire to know exactly what your dog is eating. With just three pantry staples and a food processor, you can have a batch of homemade, protein-packed dog treats ready in under 30 minutes.
What Are Homemade Chicken Dog Treats?
Homemade Chicken Dog Treats are a simple, protein-forward dog treat made from cooked, shredded chicken breast, egg, and oat flour. The chicken is blended down to a fine, smooth texture, then combined with egg and oat flour to form a soft dough that’s rolled out, cut into small bite-sized pieces, and baked until firm.
Unlike many dog treats that rely heavily on grains, starches, or added flavorings to create their taste, this recipe lets real chicken do the heavy lifting. The result is a treat that smells and tastes like an actual, meaty snack to your dog, which is exactly why so many pups find these treats so irresistible.
Why You’ll Love This Recipe
There’s a lot to love about this ultra-simple, protein-rich dog treat recipe, whether you’re baking for a picky eater or a dog with food sensitivities.
- Just three ingredients, chicken, egg, and oat flour, nothing else needed.
- High in protein, thanks to real, whole chicken breast as the base.
- No added salt, garlic, onion, or seasonings, which can be harmful to dogs.
- Simple to prepare with a food processor or blender and one mixing bowl.
- Great for training, since the meaty aroma makes these treats a strong, high-value reward.
- Budget-friendly compared to premium meat-based treats from the pet store.
- Freezer-friendly, so you can bake a big batch and always have treats on hand.
- Naturally appealing to picky eaters, thanks to the real chicken flavor.
Ingredient Breakdown
Understanding what each ingredient contributes helps you get the best results and make safe adjustments if needed.
Boneless, skinless chicken breast (1) Chicken breast is the star of this recipe, providing lean protein and a rich, meaty flavor dogs love. Using boneless, skinless breast keeps things simple and safe, since bones should never be included in homemade dog treats and skin adds unnecessary fat. Always cook the chicken thoroughly before blending, plain, with no salt, oil, or seasoning of any kind.
Egg (1) The egg acts as a binder, helping hold the blended chicken and oat flour together into a workable dough while adding a bit of extra protein.
Oat flour (½ cup) Oat flour gives the dough enough structure to roll and cut into shapes while keeping the overall recipe grain-gentle. It’s naturally free of wheat, making it a good option for dogs with mild wheat sensitivities. You can make your own oat flour at home by grinding rolled oats in a blender or food processor until fine.
Step-by-Step Instructions
Step 1: Cook the Chicken
Cook the chicken breast thoroughly, plain and unseasoned, using your preferred method, boiling, baking, or poaching all work well. Let the cooked chicken cool completely before moving on to the next step.
Step 2: Blend the Chicken
Once cooled, place the chicken in a food processor or blender and pulse until finely shredded or smooth, depending on the texture you prefer for the dough.
Step 3: Mix the Dough
Transfer the blended chicken to a mixing bowl and add the egg and oat flour. Stir or mix until a soft, workable dough forms.
Step 4: Shape the Treats
Roll the dough out on a lightly floured surface to about ¼-inch thickness. Cut into small, bite-sized pieces using a knife or a small cookie cutter.
Step 5: Arrange on a Baking Sheet
Place the cut treats on a parchment-lined baking sheet, spacing them slightly apart.
Step 6: Bake
Bake in a preheated oven at 350°F (175°C) for about 15 to 20 minutes, until the treats are firm and cooked through.
Step 7: Cool Completely
Remove the treats from the oven and let them cool completely on the baking sheet or a wire rack before serving to your dog.
Tips for the Best Results
- Cook the chicken plain: Never season the chicken with salt, garlic, onion, broth, or any spice blend, since many common seasonings are unsafe for dogs.
- Cool before blending: Let the chicken cool fully before blending to avoid a dough that’s too warm and sticky to work with.
- Adjust the blend texture: Blend the chicken until smooth for a finer, more uniform treat, or leave it slightly shredded for more texture.
- Keep pieces small: Cut treats into small, bite-sized pieces, especially for small dogs or when using them as frequent training rewards.
- Bake until firm: Since there’s no preservative in this recipe, make sure treats are baked until fully cooked and firm to the touch for both texture and food safety.
- Let them cool fully before storing: Cooling completely helps prevent condensation and sogginess once treats are placed in a storage container.
Variations to Try
This simple recipe is easy to adjust based on what you have on hand or your dog’s preferences.
- Chicken and pumpkin: Add a tablespoon or two of plain pumpkin purée to the dough for extra moisture and a mild, naturally sweet flavor.
- Chicken and sweet potato: Mix in a couple tablespoons of mashed, plain cooked sweet potato for added texture and nutrients.
- Chicken and oats: Stir a tablespoon of rolled oats into the dough for a bit of extra chew and texture.
- Turkey swap: Substitute the chicken breast with an equal amount of cooked, plain turkey breast for a different protein option.
- Fish version: Substitute the chicken with cooked, plain, boneless white fish, such as cod, fully checked for bones, for a pescatarian twist.
Serving Suggestions
These protein-packed chicken treats fit naturally into all kinds of everyday moments with your dog.
- Use small pieces as a high-value reward during training sessions, thanks to their strong, meaty aroma.
- Offer a treat after a walk, playtime, or a good vet visit.
- Break treats into smaller pieces to fill puzzle toys or treat-dispensing balls for mental enrichment.
- Pack a few in a treat pouch for outings, hikes, or trips to the dog park.
- Use as a rotating protein-based reward alongside other homemade treats for variety.
How to Store Homemade Chicken Dog Treats
Because these treats are made with real meat and egg and contain no preservatives, proper storage is especially important.
Refrigerator: Store cooled treats in an airtight container in the refrigerator and use within a few days.
Freezer: For longer storage, place treats in a single layer on a tray to freeze until solid, then transfer to a freezer-safe bag or container for up to 2 months. Thaw a few at a time in the refrigerator as needed.
Always check treats for any off smell, discoloration, or texture change before serving, and don’t leave them out at room temperature for extended periods, since they contain real meat and egg.
Frequently Asked Questions
Can I season the chicken before baking? No. Avoid salt, garlic, onion, broth, seasoning blends, or any added spices. These are commonly unsafe for dogs, and some, like garlic and onion, can be toxic. Cook the chicken plain.
Can I use chicken thighs instead of chicken breast? Boneless, skinless chicken thighs can be used, though they’re higher in fat than chicken breast, so treats may be slightly richer. Always remove all bones and skin before cooking.
Do these treats need to be refrigerated? Yes. Since these treats are made with real meat and egg and have no preservatives, they should be stored in the refrigerator and used within a few days, or frozen for longer storage.
Can I use a different flour instead of oat flour? Yes, whole wheat flour can be used if your dog doesn’t have a grain sensitivity. For a grain-free option, a dog-safe grain-free flour blend, like chickpea flour, can work as well, though it may slightly change the texture.
How many treats should I give my dog? Treats should make up no more than about 10% of your dog’s daily caloric intake. Start with one small treat and adjust based on your dog’s size, age, and activity level.
Can puppies eat these treats? In small, appropriately sized pieces, most healthy puppies can enjoy these treats as an occasional reward. Introduce any new treat gradually and check with your veterinarian if you’re unsure.
Why is my dough too sticky to roll? This can happen if the chicken wasn’t fully cooled before blending, or if the chicken released extra moisture. Try adding a bit more oat flour, a tablespoon at a time, until the dough is easier to handle.
Can I double this recipe? Yes, this recipe scales up easily. It’s a great option for batch baking and freezing extras so you always have a stash of homemade treats ready to go.
Print
Homemade Chicken Dog Treats
Description
Three simple ingredients, one very happy pup. These homemade chicken treats are easy to make, protein-rich, and perfect for rewarding your furry friend.
Ingredients
- 1 boneless, skinless chicken breast
- 1 egg
- ½ cup oat flour
Instructions
- Cook the chicken thoroughly, then let it cool.
- Blend the chicken until finely shredded or smooth.
- Add the egg and oat flour. Mix until a soft dough forms.
- Roll the dough and cut into small bite-size treats.
- Place on a lined baking sheet.
- Bake at 350°F (175°C) for about 15–20 minutes, until firm and cooked through.
- Cool completely before serving.
Notes
Treats should be given in moderation. Make sure all ingredients are safe for your individual dog, and avoid adding salt, garlic, onion, or seasonings.
Your pup is going to love these homemade chicken dog treats, simple, wholesome, and made with real ingredients you can trust.