There’s something magical about watching your dog’s eyes light up the moment they hear the freezer door open. If your pup has learned to associate that sound with something delicious, these Frozen Banana Peanut Butter Bites are about to become their new favorite obsession. Creamy, cool, and made with just three simple ingredients you probably already have in your kitchen, this recipe is the perfect way to treat your furry best friend while keeping things wholesome and homemade.
Whether you’re looking for a refreshing snack to beat the summer heat, a high-value reward for training sessions, or simply a way to spoil your pup with something made with love, these frozen bites check every box. No baking, no fancy equipment, and no mystery ingredients — just banana, peanut butter, and Greek yogurt combined into a creamy, freezer-friendly treat that dogs go absolutely wild for.
In this article, we’ll walk through everything you need to know to make these bites safely and successfully: the ingredients, the step-by-step process, important safety notes (especially around peanut butter and xylitol), storage tips, fun variations, and answers to the most common questions dog owners ask about frozen treats. By the end, you’ll have everything you need to whip up a batch your dog will beg for all summer long.
What Are Frozen Banana Peanut Butter Bites?
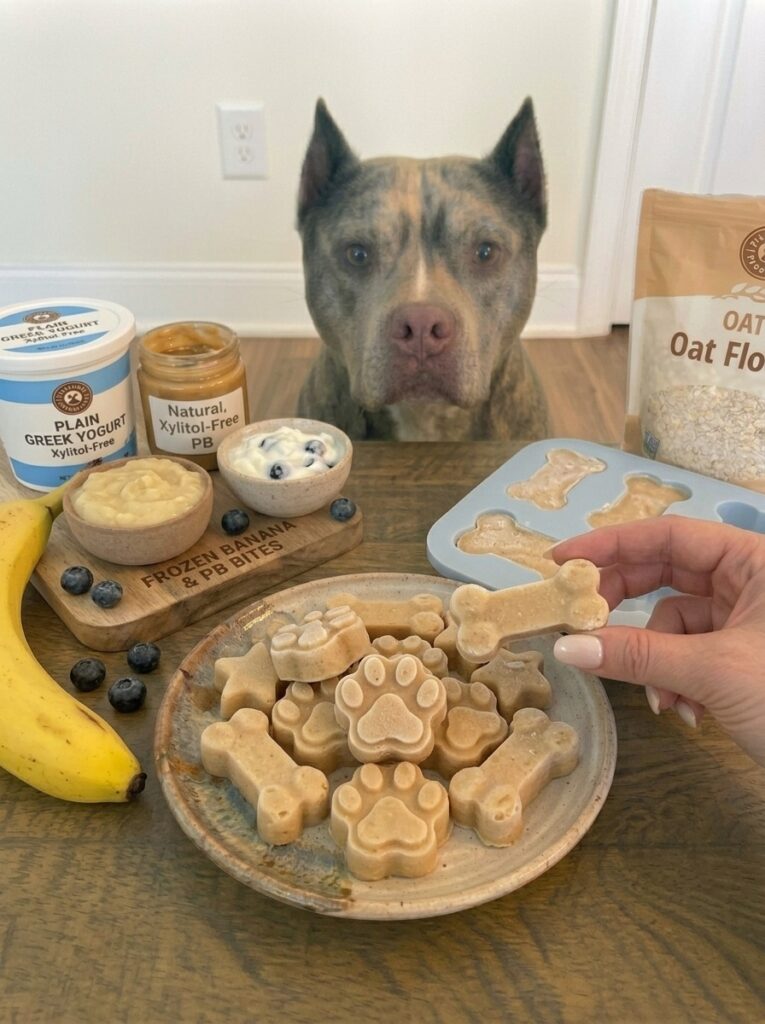
Frozen Banana Peanut Butter Bites are a no-cook, no-bake dog treat made by blending mashed banana, natural peanut butter, and plain Greek yogurt into a smooth, creamy mixture, then freezing it in small portions. Think of them as the dog-friendly cousin of a frozen yogurt bark or a mini peanut butter banana “nice cream” — except formulated specifically with your pup’s safety and nutrition in mind.
The base of this recipe leans on ingredients that are naturally dog-safe in moderation: ripe banana for natural sweetness and potassium, peanut butter for protein and healthy fats (as long as it’s free of xylitol), and Greek yogurt for probiotics and a creamy texture. Once frozen, the mixture firms up into small, poppable bites that are perfect for hot days, training rewards, or just a little extra love.
Unlike many store-bought frozen dog treats, which can contain fillers, preservatives, or added sugars, this recipe puts you in full control of exactly what goes into your dog’s snack. That transparency is one of the biggest reasons homemade treats like this one have become so popular among pet parents who want to nourish their dogs without compromise.
Why You’ll Love This Recipe
There are countless reasons dog owners keep coming back to this recipe again and again, but here are the highlights that make it a true favorite.
It’s incredibly simple. With only three core ingredients and one optional addition, there’s no need for a grocery list or a trip to a specialty pet store. Chances are, you already have everything you need sitting in your kitchen right now.
No cooking required. This is a true no-bake, no-cook recipe. All you need is a bowl, a spoon, a mold or ice cube tray, and a freezer. It’s an ideal project for a lazy afternoon or something to whip up while you’re already in the kitchen making something else.
It’s a fantastic hot-weather treat. Dogs can struggle with the heat just as much as we do, and frozen treats like these offer a fun, hydrating way to help them cool down. The Greek yogurt adds a refreshing tang, while the frozen texture gives dogs something satisfying to lick and chew on a hot afternoon.
It doubles as a training reward. Because the mixture can be portioned into small bites using an ice cube tray or mini silicone molds, these treats are perfectly sized for training sessions where you need something high-value but not overly filling.
You control the ingredients. Store-bought treats often contain preservatives, artificial flavors, or sweeteners that aren’t ideal for dogs. Making these at home means you know exactly what’s going into your pup’s bowl — no guesswork, no hidden additives.
It’s easy to customize. Want to switch things up? This recipe is a fantastic base for variations, whether that means adding blueberries, swapping the mold size, or experimenting with different textures.
Ingredient Breakdown: What You’ll Need and Why
Let’s take a closer look at each ingredient in this recipe, why it’s included, and what to look for when shopping.
🍌 1 Ripe Banana
Bananas are a dog-safe fruit when given in moderation, and they bring natural sweetness to this recipe without the need for added sugar. Ripe bananas are ideal here because they mash easily into a smooth, lump-free consistency and have a more pronounced sweetness than underripe ones. Bananas also contain potassium, vitamin C, and fiber, making them a nutritious addition rather than just a flavor booster. Look for a banana with a few brown speckles on the peel — that’s the sweet spot for ripeness in this recipe.
🥜 ½ Cup Natural Peanut Butter (Xylitol-Free)
Peanut butter is the star flavor of this treat, and dogs generally love it. However, this is the single most important ingredient to double-check before you start. Always choose a natural peanut butter with a short ingredient list — ideally just peanuts, or peanuts with a small amount of salt. Avoid any peanut butter that lists xylitol (sometimes labeled as “birch sugar”) as an ingredient, as this artificial sweetener is highly toxic to dogs even in small amounts. We’ll cover this safety point in more detail below, but it’s worth repeating: always read the label, every single time, even if you’ve used a brand before, since manufacturers can change their formulas.
🥛 ½ Cup Plain Greek Yogurt
Plain Greek yogurt adds creaminess, a pleasant tang, and beneficial probiotics to this recipe. Choose plain, unsweetened Greek yogurt only — flavored varieties often contain added sugar, artificial sweeteners, or fruit additives that aren’t appropriate for dogs. Greek yogurt is also thicker than regular yogurt, which helps this mixture hold its shape well once frozen rather than turning into an icy, watery block.
💧 1 Tablespoon Water, If Needed
Depending on the thickness of your peanut butter and yogurt, the mixture may need a small splash of water to reach a smooth, scoopable consistency. Add this gradually — a little goes a long way, and you don’t want to thin the mixture out too much before freezing.
🫐 Optional: A Few Mashed Blueberries
For a fun twist, fold in a small handful of mashed blueberries before portioning the mixture into molds. Blueberries are considered a dog-safe fruit in moderation and add a pop of color, extra antioxidants, and a slightly tart contrast to the sweetness of the banana and peanut butter.
Step-by-Step Instructions
Making these frozen bites takes just a few minutes of hands-on prep before the freezer does the rest of the work. Here’s exactly how to do it.
Step 1: Mash the Banana
Start by peeling your ripe banana and placing it in a mixing bowl. Using a fork or a potato masher, mash it until it’s smooth and mostly free of lumps. The smoother your banana, the creamier your final texture will be, so take an extra moment here if needed.
Step 2: Mix Everything Together
Add the ½ cup of natural, xylitol-free peanut butter and the ½ cup of plain Greek yogurt to the mashed banana. Stir everything together thoroughly using a spoon or spatula until the mixture is creamy, smooth, and fully combined. If the mixture feels too thick to stir easily or too stiff to spoon into molds, add the tablespoon of water a little at a time until you reach a soft, scoopable consistency. If you’re adding blueberries, gently fold them in at this stage.
Step 3: Fill the Mold
Spoon the mixture into small silicone molds, mini paw-print molds, or a standard ice cube tray. Using a small mold size is ideal here since it creates perfectly portioned bites that are easy for dogs of all sizes to enjoy without overdoing it. If you don’t have a silicone mold on hand, a lined mini muffin tin or even a flat parchment-lined tray (for a bark-style treat you can break apart later) works just as well.
Step 4: Freeze
Place the filled mold in the freezer and let it set for 2 to 3 hours, or until the bites are completely firm to the touch. If you’re using a larger mold or a thicker layer, you may need to add extra time to ensure it freezes solid all the way through.
Step 5: Serve
Once frozen, gently pop the bites out of the mold. Let each piece sit at room temperature for a minute or two to soften slightly before handing it over — this makes it easier and safer for your dog to chew, especially for smaller breeds or dogs with sensitive teeth. Then watch the tail wags begin.
Helpful Tips for the Best Results
- Use very ripe bananas. The riper the banana, the sweeter and smoother the final mixture will be, and the easier it is to mash without lumps.
- Check your peanut butter label every time. Formulas change, and even a trusted brand can occasionally add xylitol or other sweeteners. Reading the label before every batch is a simple habit that keeps your dog safe.
- Don’t skip the mold. Freezing the mixture in a flat container and then cutting it into pieces works, but it’s messier and creates less consistent portions than a mold or ice cube tray.
- Silicone molds are your friend. They make it far easier to pop out frozen bites without cracking or breaking them compared to rigid plastic trays.
- Let treats soften slightly before serving. Straight-from-the-freezer bites can be very hard and, in rare cases, could pose a risk to teeth if a dog bites down too hard. A minute or two of softening time makes all the difference.
- Portion size matters. Use smaller molds for small dogs and slightly larger ones for bigger breeds, keeping calorie density in mind.
Fun Variations to Try
One of the best things about this recipe is how easy it is to adapt. Here are a few ideas to keep things exciting for your pup.
Blueberry Banana Bites: Fold a small handful of mashed blueberries into the base mixture for a fruity, antioxidant-rich twist, as suggested in the original recipe.
Pumpkin Peanut Butter Bites: Swap out the banana for a couple tablespoons of plain canned pumpkin (not pumpkin pie filling) for a fiber-rich, fall-inspired variation.
Apple Peanut Butter Bites: Replace the banana with finely grated apple (seeds and core removed) for a crisp, slightly tart alternative.
Layered Bites: Spoon a small amount of mixture into the mold, freeze for 30 minutes, then top with a second layer — such as plain yogurt swirled with a touch of mashed strawberry — for a fun two-tone treat.
Mini Kong Fillers: Instead of using a mold, spoon the mixture directly into a rubber puzzle toy and freeze. This turns the recipe into a longer-lasting enrichment activity rather than a quick bite.
Serving Suggestions
These frozen bites shine in a variety of situations beyond just a random afternoon snack. Consider using them as a post-walk cooldown treat on hot days, a way to keep your dog occupied and entertained while you’re cooking dinner, or a special reward during training sessions when you need something extra motivating. They also make a great addition to a dog’s birthday celebration or a “pupcake” party, served alongside other homemade dog-safe treats.
Because these bites are calorie-dense, they’re best offered as an occasional treat rather than an everyday staple. A good rule of thumb followed by many pet owners is the “10% rule” — treats, including homemade ones like this, should make up no more than about 10% of your dog’s total daily caloric intake, with the rest coming from a complete and balanced dog food.
Storage Instructions
Because these bites are frozen treats, proper storage is simple but important for maintaining freshness and texture.
Freezer storage: Once the bites are fully frozen and firm, transfer them from the mold into an airtight, freezer-safe container or a resealable freezer bag. Stored this way, they’ll keep well in the freezer for up to 2 to 3 weeks.
Preventing freezer burn: Press out as much air as possible from the storage bag before sealing, or use a container with a tight-fitting lid. This helps prevent the bites from developing an icy texture or absorbing odors from other foods in the freezer.
Thawing before serving: There’s no need to fully thaw these bites before giving them to your dog. A minute or two at room temperature to take the hard edge off is usually enough.
Refrigerator storage: These treats are not designed for refrigerator storage, as the mixture will soften significantly and lose the frozen texture that makes them special. They’re best kept frozen until just before serving.
Frequently Asked Questions
Is peanut butter safe for dogs? Yes, peanut butter is generally safe for dogs in moderation, as long as it does not contain xylitol (also labeled as birch sugar), which is highly toxic to dogs even in very small amounts. Always choose a natural peanut butter with a short, simple ingredient list, and check the label every time you purchase a new jar.
What is xylitol, and why is it dangerous for dogs? Xylitol is an artificial sweetener commonly used in sugar-free products, including some brands of peanut butter, gum, and baked goods. It can cause a rapid and dangerous drop in blood sugar in dogs, along with potential liver damage, even in small quantities. This is why it’s critical to always verify that your peanut butter is labeled xylitol-free before using it in any dog treat recipe.
Can dogs eat Greek yogurt? Plain, unsweetened Greek yogurt is generally considered safe for dogs in moderation and can offer probiotic benefits. Avoid flavored or sweetened yogurts, and keep in mind that some dogs may be sensitive to dairy, so it’s a good idea to introduce it in small amounts first.
Can dogs eat bananas? Yes, bananas are safe for dogs in moderation and offer nutrients like potassium and fiber. Because bananas are also relatively high in natural sugar, they should be given as an occasional treat rather than a daily staple.
How long do these frozen treats last in the freezer? When stored in an airtight container or freezer bag, these bites typically stay fresh for up to 2 to 3 weeks in the freezer.
Can I use crunchy peanut butter instead of smooth? Smooth, natural peanut butter is recommended for the creamiest texture and easiest mixing, but crunchy peanut butter can be used if that’s what you have on hand. Just be aware the texture of the final bites will be slightly less smooth.
Are these treats safe for puppies? In general, small amounts of banana, plain Greek yogurt, and xylitol-free peanut butter are considered safe for most puppies, but every puppy’s dietary needs can differ. It’s always a good idea to check with your veterinarian before introducing any new treat, especially for young or small-breed puppies.
Can I make a bigger batch for multiple dogs or a longer supply? Absolutely. This recipe can easily be doubled or tripled — just make sure you have enough mold space or trays, and adjust your freezer time slightly if you’re using larger molds.
Do these treats replace a balanced diet? No. These bites are intended as an occasional treat and should never replace a complete and balanced dog food. Because they are calorie-dense, they should be given in moderation as part of an overall healthy diet.
Final Thoughts
Frozen Banana Peanut Butter Bites are proof that the best treats don’t need to be complicated. With just a few pantry staples, a mold, and a couple of hours in the freezer, you can create a wholesome, refreshing snack that your dog will absolutely adore — whether it’s a scorching summer afternoon, a training session, or just an ordinary day that deserves a little extra tail-wagging joy. Just remember the golden rules: always choose a xylitol-free peanut butter, stick to plain Greek yogurt, and serve these treats in moderation as part of a balanced routine.
So next time your pup gives you those pleading puppy-dog eyes, you’ll have a go-to recipe ready in your back pocket — one that’s simple, safe, and made with love. Would your pup choose banana or peanut butter first? There’s only one way to find out.
Print
Frozen Banana Peanut Butter Bites: The Easiest Homemade Dog Treat for Hot Summer Days
Description
Creamy, refreshing, and super easy to make! These Frozen Banana Peanut Butter Bites are a simple homemade treat made with banana, peanut butter, and yogurt. Perfect for hot days and a tasty occasional snack for your pup!
Ingredients
- 🍌 1 ripe banana
- 🥜 ½ cup natural peanut butter, xylitol-free
- 🥛 ½ cup plain Greek yogurt
- 💧 1 tbsp water, if needed
Instructions
1️⃣ Mash the Banana
Place the banana in a bowl and mash until smooth.
2️⃣ Mix Everything
Add the peanut butter and plain Greek yogurt. Stir until creamy and well combined.
3️⃣ Fill the Mold
Spoon the mixture into small silicone molds or an ice cube tray.
4️⃣ Freeze ❄️
Place in the freezer for 2–3 hours, or until completely firm.
5️⃣ Serve
Pop out a bite and let it soften slightly before giving it to your pup.
Notes
Use plain Greek yogurt and peanut butter with no xylitol (birch sugar). Give treats in moderation, especially because they can be calorie-dense. Treats should not replace a complete and balanced dog diet.