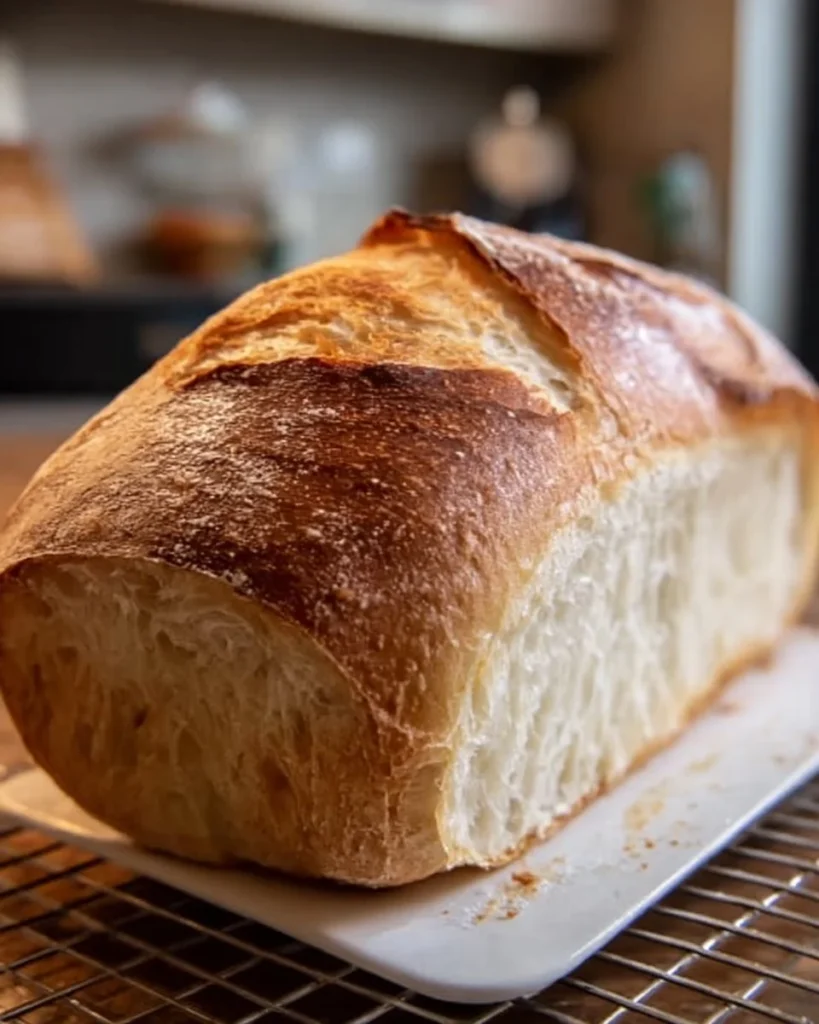
When you envision the perfect loaf of bread, the image that springs to mind is likely that of warm, crusty sourdough bread, its exterior crackling with a golden crust. The aroma wafts around, rich and earthy, calling your name as you dream of the first slice—hot and slathered in butter, oozing with creaminess as it melts into the porous goodness of the freshly baked loaf. With every bite, you experience the satisfying crunch of the crust followed by the soft, chewy texture of the interior. This is not just any bread; it’s homemade sourdough, crafted lovingly in a loaf pan right from your own kitchen.
Imagine pulling that warm loaf from the oven, the steam rising and filling your kitchen with a nostalgic fragrance that evokes memories of cozy family gatherings and comforting Sunday mornings. You can already picture the delighted expressions of your loved ones as you slice into that golden treasure. Each slice reveals its airy structure, and the tangy depth of flavor created by the fermentation process dances on your tongue. It’s not merely a food item; it’s a creation—a labor of love that invites storytelling and shared experiences around the table.
Why You’ll Love This Homemade Sourdough Bread in a Loaf Pan
This recipe is a heartfelt endeavor, perfect for both novice bakers and seasoned sourdough enthusiasts. The simplicity of creating homemade sourdough bread shines through as you embrace the alchemy of natural fermentation. The flavor profile of this bread transcends ordinary loaves; it’s tangy, nutty, and wonderfully complex, with an aroma that’s simply irresistible. It becomes your go-to bread for every occasion, whether you’re crafting gourmet sandwiches, dipping slices into fragrant soups, or enjoying it with a smear of jam for breakfast.
What sets this loaf apart is the intimate connection formed with each ingredient. Your sourdough starter, a living culture, is the heart of this recipe, contributing to not only the bread’s flavor but also its unique texture. Baked in a loaf pan, this bread achieves a perfect balance—a crust that’s crisp enough to crack but tender enough to tear. The unmistakable satisfaction of creating something so delightful from scratch will inspire new traditions in your home, turning regular meals into unforgettable feasts.
Preparation Phase & Tools to Use
To embark on this flavorful adventure, you’ll want to gather a few essential tools:
- Large Mixing Bowl: Vital for blending ingredients and allowing the dough to rise comfortably.
- Loaf Pan: Ensures a beautifully shaped loaf with even baking.
- Dough Scraper: This handy tool simplifies the kneading process and helps manage sticky dough.
- Clean Kitchen Towel: A must for covering the dough as it rises, creating a warm environment for fermentation.
- Oven Thermometer: Ensure your oven is the right temperature for baking perfection.
Preparation Tips: Before beginning, consider the temperature of your kitchen. Yeast loves warmth, so create a cozy spot for your dough to thrive. Keep your ingredients at room temperature, especially the sourdough starter and warm water, to create the best environment for rising.
Ingredients for Homemade Sourdough Bread in a Loaf Pan
- 3 cups all-purpose flour: This forms the backbone of your bread. For a healthier twist, you can substitute half with whole wheat flour.
- 1 cup sourdough starter: The spirit of your bread. A lively starter will ensure a robust flavor, while a well-fed one promises a smooth rise.
- 1 cup warm water: This helps activate the starter. Warm water (around 100°F) is ideal but not too hot, or it could harm your yeast.
- 1 teaspoon salt: Essential for flavor and controlling fermentation.
- 1 tablespoon sugar: A little sweetness aids in developing the crust and balances the sour notes of the dough.
How to Make Homemade Sourdough Bread in a Loaf Pan
-
Mix Dry Ingredients: In a large mixing bowl, whisk together the flour, salt, and sugar until well combined. This step ensures even distribution of flavors and helps with fermentation.
-
Combine Wet Ingredients: In a separate bowl, blend the sourdough starter and warm water, stirring until smooth. This mixture should feel alive and bubbly, a good sign your starter is active.
-
Create the Dough: Gradually pour the wet mixture into the dry ingredients. Stir with a spatula or your hands until a shaggy dough forms. Be less concerned about its stickiness—it means your bread will be delightfully soft.
-
Knead the Dough: Turn the dough out onto a floured surface and knead for about 10 minutes. It will transform from a rough mass into a smooth, elastic ball. This process develops gluten, creating the lovely texture of your bread.
-
First Rise: Place the dough in a greased bowl, covering it with a clean towel. Allow it to rise in a warm spot until it has doubled in size. This can take about 4 to 6 hours, depending on the temperature.
-
Punch Down the Dough: Gently punch down the risen dough to release the air bubbles. Shape it into a loaf, then place it in a greased loaf pan, smoothing the top with your hands.
-
Second Rise: Cover the loaf again and let it rise for an additional 1 to 2 hours. You want it to puff up beautifully, filling the pan.
-
Preheat Your Oven: Preheat your oven to 375°F (190°C). The heat must be just right for that perfect crust.
-
Bake: Place the loaf in the preheated oven, baking for 30 to 35 minutes. You’ll know it’s done when it turns a gorgeous golden brown and sounds hollow when tapped gently.
-
Cool and Slice: Remove the loaf from the oven and let it cool in the pan for 10 minutes. Invert the pan to release the bread, then transfer it to a wire rack to cool completely before slicing. Patience is key—the aroma will be tempting!
Chef’s Notes & Helpful Tips
-
Make-Ahead Tips: Prepare the dough the night before and place it in the refrigerator for the first rise. It will develop deeper flavors, and the next day, allow it to come to room temperature before shaping.
-
Cooking Alternatives: If you want a crusty exterior, consider using a Dutch oven instead of a loaf pan. The steam created will give you an artisan-style loaf.
-
Customization Ideas: Add seeds, nuts, or herbs to your dough for extra flavor. Dried rosemary or sunflower seeds elevate the taste and texture.
Common Mistakes to Avoid
- Using an inactive starter: Always ensure your sourdough starter is bubbly and active. Feed it the night before and wait until it has doubled in size before use.
- Skipping the second rise: Allowing the dough to rise twice is crucial for flavor and structure—never shortcut this step.
- Underbaking: Trust your baking instincts. An underbaked loaf will yield a gummy crumb. Use the tapping method to ensure it sounds hollow and looks golden brown.
What to Serve With Homemade Sourdough Bread
- Avocado Toast: Smash ripe avocados with a dash of lime, sprinkle with salt, and enjoy on a warm slice.
- Buttery Garlic Bread: Slice a few pieces, spread with garlic butter, and toast for a garlicky companion to pasta.
- Creamy Tomato Soup: The perfect partner for dunking and soaking up delicious flavors.
- Breakfast Sandwiches: Use your sourdough for egg and cheese sandwiches—a brunch must-have.
- Charcuterie Boards: Arrange slices with meats, cheeses, olives, and nuts for a sophisticated snack platter.
- Jam and Fresh Butter: Sometimes, the simplest addition becomes the most delightful experience.
- Homemade Pesto: Slather this herby delight across a warm slice for an indulgent appetizer.
Storage & Reheating Instructions
For the best flavor and freshness, store your homemade sourdough bread in a paper bag at room temperature for up to 3 days. If you won’t finish it that quickly, slice and freeze individual pieces—this way, you can toast them straight from the freezer for a quick treat. When ready, simply pop your slices in a toaster or warm them in the oven for that freshly baked feel.
Estimated Nutrition Information
Approximate values per slice (based on 12 slices):
- Calories: 130
- Carbohydrates: 25g
- Protein: 4g
- Fat: 1g
- Fiber: 1g
- Sugar: 1g
Disclaimer: Nutritional information will vary based on exact measurements and substitutions.
FAQs
1. How do I know if my sourdough starter is ready to use?
Your sourdough starter is ready when it has doubled in size within 4–6 hours after feeding, shows bubbles on the surface, and has a pleasant sour smell. A simple test is to drop a spoonful into a glass of water; if it floats, it’s good to go!
2. Can I use whole wheat flour instead of all-purpose flour?
Yes! You can use whole wheat flour for a richer flavor and denser texture. However, consider a mix of all-purpose flour for a lighter loaf that still possesses those whole grain benefits.
3. What can I do if my bread doesn’t rise?
If your bread doesn’t rise, check your starter. It might be inactive. Similarly, ensure your dough rises in a warm place. Cold environments can stunt yeast activity.
4. How can I create steam in the oven for a crustier loaf?
Place a pan filled with hot water on the bottom rack of your oven while the bread bakes. This steam will help create a beautiful crust.
5. Can I flavor my sourdough bread?
Absolutely! Try mixing in herbs, garlic, cheese, or even dried fruit like cranberries for a unique twist on your loaf.
Conclusion
Creating your own homemade sourdough bread in a loaf pan is not just about baking; it’s about forging a connection with the ingredients and embracing the beautifully transformative process. This enchanting bread recipe invites you into the world of baking with each rise and fold, culminating in a flavor-packed loaf that adds warmth to any table. As you slice into your masterpiece, savor the rich tang, soft texture, and the delightful crunch of its crust. So roll up your sleeves, gather your ingredients, and let the magic unfold in your kitchen. Every bite beckons you to indulge in a slice of homemade joy!
Print
Homemade Sourdough Bread in a Loaf Pan
- Total Time: 45 minutes
- Yield: 12 servings 1x
- Diet: Vegetarian
Description
Craft your very own warm, crusty sourdough bread in a loaf pan, perfect for any occasion.
Ingredients
- 3 cups all-purpose flour
- 1 cup sourdough starter
- 1 cup warm water
- 1 teaspoon salt
- 1 tablespoon sugar
Instructions
- Mix dry ingredients: In a large mixing bowl, whisk together the flour, salt, and sugar until well combined.
- Combine wet ingredients: In a separate bowl, blend the sourdough starter and warm water until smooth.
- Create the dough: Gradually pour the wet mixture into the dry ingredients. Stir until a shaggy dough forms.
- Knead the dough: Turn the dough out onto a floured surface and knead for about 10 minutes.
- First rise: Place the dough in a greased bowl, cover, and let it rise in a warm spot until doubled in size (4-6 hours).
- Punch down the dough: Gently punch down the risen dough to release air bubbles.
- Second rise: Shape the dough into a loaf, place in a greased loaf pan, cover, and let rise for 1-2 hours.
- Preheat your oven: Set to 375°F (190°C).
- Bake: Place the loaf in the oven for 30-35 minutes until golden brown.
- Cool and slice: Let the loaf cool in the pan for 10 minutes before transferring to a wire rack.
Notes
For better flavor, refrigerate the dough overnight after the first rise. Alternatively, use a Dutch oven for a crustier loaf.
- Prep Time: 15 minutes
- Cook Time: 30 minutes
- Category: Bread
- Method: Baking
- Cuisine: American
Nutrition
- Serving Size: 1 slice
- Calories: 130
- Sugar: 1g
- Sodium: 200mg
- Fat: 1g
- Saturated Fat: 0g
- Unsaturated Fat: 0g
- Trans Fat: 0g
- Carbohydrates: 25g
- Fiber: 1g
- Protein: 4g
- Cholesterol: 0mg
Keywords: sourdough, homemade bread, baking, loaf pan, comfort food