Introduction to Hawaiian Charcuterie Board Ideas
As a passionate home cook, I find joy in creating dishes that not only taste amazing but also tell a story. When I first stumbled upon the concept of a charcuterie board, I was instantly captivated. The idea of combining various flavors, textures, and colors on a single platter felt like an art form. But then, I thought, why not add a tropical twist? That’s when Hawaiian charcuterie boards entered my culinary world.
Imagine a vibrant spread filled with juicy tropical fruits, savory meats, and creamy cheeses, all inspired by the lush landscapes of Hawaii. Each bite transports you to a sun-soaked beach, where the gentle waves kiss the shore and the scent of fresh pineapples fills the air. I remember the first time I made one for a gathering; my friends were amazed! They couldn’t believe how well the flavors melded together, and I felt like a culinary magician.
Creating a Hawaiian charcuterie board is not just about food; it’s about bringing people together. Whether it’s a casual get-together or a festive celebration, this board is sure to impress. Plus, it’s incredibly versatile! You can customize it to suit your taste or dietary preferences, making it a hit for everyone.
In this article, I’ll share my favorite Hawaiian charcuterie board ideas, from the essential ingredients to tips for presentation. So, grab your favorite board and let’s dive into this delicious adventure together!
Ingredients for Hawaiian Charcuterie Board Ideas
Creating a Hawaiian charcuterie board is like painting a beautiful picture with food. Each ingredient plays a vital role in bringing the board to life. I always say, the quality of your ingredients can make or break your board. So, let’s gather the essentials and a few delightful extras to elevate your creation!
Main Ingredients
- Meats:
- 8 oz. of sliced prosciutto
- 8 oz. of smoked salmon
- 8 oz. of Hawaiian-style teriyaki chicken, sliced
- Cheeses:
- 4 oz. of creamy goat cheese
- 4 oz. of sharp cheddar cheese, cubed
- 4 oz. of brie cheese, sliced
- Fruits:
- 1 ripe pineapple, cut into bite-sized chunks
- 1 cup of strawberries, halved
- 1 cup of kiwi, sliced
- Vegetables:
- 1 cup of baby carrots
- 1 cup of cucumber, sliced
- 1 cup of bell peppers, sliced
- Dips and Spreads:
- ½ cup of sweet chili sauce
- ½ cup of hummus
Optional Add-ons
- Nuts: A handful of macadamia nuts or almonds for crunch.
- Olives: A mix of green and black olives for a briny touch.
- Herbs: Fresh mint or cilantro to sprinkle on top for a burst of freshness.
- Crackers: A variety of crackers or breadsticks to complement the cheeses.
- Chocolate: A few pieces of dark chocolate for a sweet finish.
When selecting your ingredients, I recommend visiting local farmers’ markets or specialty stores. Freshness is key! The vibrant colors and flavors of fresh produce will truly shine on your board. Plus, supporting local vendors adds a special touch to your culinary adventure.
How to Prepare Hawaiian Charcuterie Board Ideas
Now that we have our ingredients ready, it’s time to bring our Hawaiian charcuterie board to life! I love this part because it’s where creativity meets deliciousness. Follow these steps, and you’ll have a stunning board that will wow your guests and make your taste buds dance!
Step 1: Choose Your Board
The first step is selecting the right board. I often use a wooden cutting board or a large platter. The size depends on how many people you’re serving. A bigger board allows for more variety, while a smaller one is perfect for an intimate gathering.
Tips for Selecting the Right Board
- Consider the shape: Round boards are great for a cozy feel, while rectangular ones offer more space for arrangement.
- Choose a board with a lip: This helps keep everything in place and prevents spills.
- Make it personal: Use a board that reflects your style, whether it’s rustic, modern, or colorful.
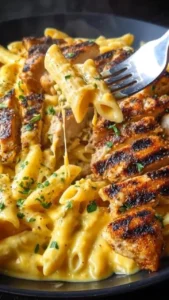
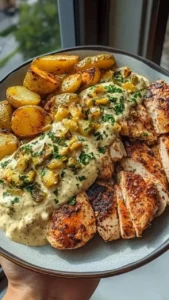
Step 2: Arrange the Meats
Next, it’s time to lay down the foundation with meats. I like to start with the meats because they often take up the most space. Arrange them in clusters or fanned out for a beautiful presentation.
Tips for Meat Selection
- Mix textures: Combine soft meats like prosciutto with firmer options like teriyaki chicken for variety.
- Vary the colors: Use different types of meats to create a visually appealing contrast.
- Don’t forget the flavors: Choose meats that complement each other, like the sweetness of teriyaki with the saltiness of smoked salmon.
Step 3: Add Cheeses
Now, let’s bring in the cheeses! I love how cheese adds creaminess and richness to the board. Place them near the meats, but don’t be afraid to mix them up a bit!
Tips for Cheese Pairing
- Balance flavors: Pair sharp cheeses with milder ones to create a delightful contrast.
- Cut into different shapes: Cubes, slices, and wedges add visual interest.
- Label your cheeses: If you have guests who may not be familiar with certain types, a little label can go a long way!
Step 4: Incorporate Fruits and Vegetables
Fruits and veggies add a burst of color and freshness. I love how they brighten up the board and provide a refreshing crunch. Scatter them around the meats and cheeses for a lively look.
Tips for Freshness and Variety
- Choose seasonal produce: Fresh fruits and veggies taste better and look more vibrant.
- Mix colors: Use a rainbow of fruits and veggies to make your board pop.
- Cut into bite-sized pieces: This makes it easy for guests to grab and enjoy!
Step 5: Include Dips and Spreads
Dips and spreads are the finishing touches that tie everything together. I like to place them in small bowls or ramekins on the board. They add flavor and a fun element to the experience!
Tips for Flavor Combinations
- Pair sweet dips with savory items: For example, sweet chili sauce goes wonderfully with the salty prosciutto.
- Offer variety: Include a mix of creamy, spicy, and sweet dips to cater to different tastes.
- Keep it simple: A couple of well-chosen dips can be more effective than a dozen options.
Step 6: Final Touches and Presentation
Finally, it’s time for the grand reveal! Take a step back and look at your board. Add any final touches to make it truly shine. I love to sprinkle fresh herbs or edible flowers for that extra flair.
Tips for an Eye-Catching Display
- Use height: Stack some items or use small bowls to create different levels.
- Fill in gaps: Use nuts or crackers to fill any empty spaces and create a cohesive look.
- Keep it balanced: Make sure the board feels balanced in terms of color and texture.
And there you have it! Your Hawaiian charcuterie board is ready to impress. I can’t wait for you to experience the joy of creating and sharing this delightful spread!
Equipment Needed for Hawaiian Charcuterie Board Ideas
Creating a stunning Hawaiian charcuterie board doesn’t require fancy equipment, but having the right tools can make the process smoother and more enjoyable. Here’s a list of essentials that I always keep handy when I’m crafting my boards.
- Cutting Board or Platter: A large wooden cutting board or a decorative platter serves as the canvas for your masterpiece. If you don’t have a big board, a few smaller ones can work just as well!
- Knives: A sharp knife is essential for slicing meats, cheeses, and fruits. I also keep a cheese knife handy for spreading and cutting softer cheeses.
- Small Bowls: Use these for dips and spreads. They help keep everything organized and add a nice touch to the presentation. If you don’t have small bowls, you can use ramekins or even muffin tins!
- Serving Utensils: Tongs or small spoons are great for serving dips and picking up meats. I always have a few on hand to keep things neat and tidy.
- Toothpicks or Skewers: These are perfect for picking up smaller items like olives or cheese cubes. They also add a fun element to the board!
Remember, the goal is to create a beautiful and inviting spread. If you don’t have all the specific tools, don’t worry! Get creative with what you have at home. The most important part is to enjoy the process and share your delicious creation with others!
Variations of Hawaiian Charcuterie Board Ideas
One of the best things about a Hawaiian charcuterie board is its versatility! You can easily switch things up to suit different occasions or personal tastes. I love experimenting with various themes and flavors, and here are a few delightful variations that I’ve tried and adored.
- Vegetarian Hawaiian Board: Swap out the meats for a variety of plant-based options. Think marinated tofu, smoked tempeh, or even grilled eggplant. Pair these with creamy avocado slices and a selection of cheeses made from nuts for a delicious vegetarian twist.
- Seafood Extravaganza: If you’re a seafood lover like me, consider adding shrimp cocktail, crab salad, or even poke bowls. The fresh flavors of the ocean will transport you straight to the shores of Hawaii!
- Sweet and Savory Board: For a fun dessert twist, incorporate tropical fruits like mango, passion fruit, and coconut alongside sweet treats like chocolate-covered macadamia nuts or Hawaiian-style mochi. This board is perfect for a laid-back gathering or a special celebration.
- Breakfast-Inspired Board: Why not start your day with a Hawaiian breakfast board? Include items like mini pancakes, fresh fruit, coconut yogurt, and even some crispy bacon or sausage. It’s a delightful way to kick off a brunch with friends!
These variations not only keep things exciting but also allow you to cater to different dietary preferences. I encourage you to get creative and make the board your own. After all, the joy of cooking comes from experimenting and sharing your unique flavors with others!
Cooking Notes for Hawaiian Charcuterie Board Ideas
As I dive into the world of Hawaiian charcuterie boards, I’ve learned a few cooking notes that can elevate your experience. These tips are like little treasures I’ve picked up along my culinary journey, and I’m excited to share them with you!
- Prep Ahead: I often prepare my ingredients a few hours in advance. This not only saves time but also allows the flavors to meld together beautifully. Just remember to keep everything covered in the fridge until you’re ready to assemble.
- Room Temperature: For the best taste, let your cheeses and meats sit at room temperature for about 30 minutes before serving. This enhances their flavors and makes them easier to slice and spread.
- Seasonal Ingredients: I love using seasonal fruits and vegetables. They not only taste better but also add a vibrant touch to your board. Keep an eye on what’s fresh at your local market!
- Balance is Key: Aim for a balance of flavors and textures. I like to mix sweet, salty, creamy, and crunchy elements to create a delightful experience for the palate.
- Don’t Overcrowd: While it’s tempting to fill every inch of the board, leaving some space allows each ingredient to shine. It also makes it easier for guests to grab what they want without making a mess.
These cooking notes have helped me create boards that not only look stunning but also taste incredible. I hope they inspire you to craft your own Hawaiian charcuterie board with confidence and creativity!
Serving Suggestions for Hawaiian Charcuterie Board Ideas
When it comes to serving your Hawaiian charcuterie board, presentation is everything! I’ve found that the way you present your board can elevate the entire experience. Here are some of my favorite serving suggestions that will make your board the star of the show.
- Pair with Tropical Drinks: Serve your board alongside refreshing tropical beverages like piña coladas, mai tais, or even a simple coconut water. The flavors will complement each other beautifully and transport your guests to a Hawaiian paradise.
- Use Fun Serving Utensils: I love using colorful tongs, small spoons, or even bamboo skewers for serving. They add a playful touch and make it easy for guests to help themselves.
- Include a Tasting Guide: If you have a variety of cheeses and meats, consider creating a small tasting guide. A simple card with descriptions of each item can spark conversation and help guests explore the flavors.
- Offer Plates and Napkins: Make it easy for your guests by providing small plates and napkins nearby. This way, they can grab what they want without any fuss, allowing them to enjoy the experience fully.
- Set the Mood: Don’t forget about ambiance! Soft music and a cozy setting can enhance the enjoyment of your Hawaiian charcuterie board. I often light a few candles or string up some fairy lights to create a warm atmosphere.
These serving suggestions not only make your Hawaiian charcuterie board more inviting but also create a memorable experience for everyone involved. I can’t wait for you to try these ideas and watch your guests delight in the flavors and presentation!
Tips for Creating Hawaiian Charcuterie Board Ideas
Creating a Hawaiian charcuterie board is a delightful adventure, and I’ve gathered some tips that have helped me along the way. These little nuggets of wisdom can make your board not only beautiful but also a culinary masterpiece that everyone will rave about!
- Think Colorful: A vibrant board is always more appealing. I love to mix bright fruits like mango and dragon fruit with the earthy tones of meats and cheeses. The more colors, the better!
- Layer Flavors: Don’t be afraid to experiment with flavor combinations. Pair sweet fruits with salty meats or creamy cheeses with spicy dips. It’s all about creating a delightful contrast that excites the palate.
- Use Seasonal Ingredients: Fresh, seasonal produce not only tastes better but also looks stunning. I often visit local markets to find the best ingredients that are in season.
- Personal Touch: Add a personal touch by including items that reflect your own tastes or cultural background. Whether it’s a family recipe or a favorite snack, it makes the board uniquely yours.
- Keep It Simple: Sometimes, less is more. A few well-chosen ingredients can create a more elegant and inviting board than one that’s overcrowded. Focus on quality over quantity!
With these tips in your back pocket, you’re ready to create a Hawaiian charcuterie board that will impress your guests and make your taste buds sing. Enjoy the process, and remember, the best part is sharing your creation with others!
Breakdown of Time for Hawaiian Charcuterie Board Ideas
When it comes to creating a Hawaiian charcuterie board, timing is everything! I’ve found that knowing how long each step takes can help you plan better and enjoy the process without feeling rushed. Here’s a simple breakdown of the time you’ll need to create your delicious masterpiece.
- Prep Time: Approximately 30-45 minutes. This includes gathering your ingredients, washing and cutting fruits and vegetables, and arranging everything on the board. I like to take my time here, as it’s where the fun begins!
- Cooking Time: 0 minutes. The beauty of a charcuterie board is that it requires no cooking! You simply assemble the ingredients, making it a stress-free option for any gathering.
- Total Time: About 30-45 minutes. With no cooking involved, you can focus on the creative aspect of arranging your board and making it visually appealing.
By keeping this time breakdown in mind, you can easily fit the preparation of your Hawaiian charcuterie board into your schedule. Plus, it allows you to enjoy the process and savor the excitement of sharing your creation with friends and family!
Nutritional Information for Hawaiian Charcuterie Board Ideas
As a passionate home cook, I always keep an eye on the nutritional aspects of my creations. A Hawaiian charcuterie board is not only a feast for the eyes but can also be a balanced option for your gatherings. Here’s a general overview of the nutritional information you can expect from a typical serving of this delightful board.
- Calories: Approximately 300-400 calories per serving, depending on the ingredients and portion sizes.
- Protein: Around 15-20 grams, thanks to the meats and cheeses, which provide a satisfying source of protein.
- Fats: About 20-25 grams, primarily from the cheeses, meats, and any nuts included. Opting for lower-fat cheese can help reduce this number.
- Carbohydrates: Roughly 20-30 grams, mainly from fruits, vegetables, and any crackers or breadsticks you add.
- Fiber: Approximately 3-5 grams, thanks to the fresh fruits and vegetables, which contribute to a healthy digestive system.
- Vitamins and Minerals: A variety of vitamins and minerals from the colorful fruits and veggies, including Vitamin C, potassium, and antioxidants.
Keep in mind that these values can vary based on the specific ingredients you choose and their quantities. I love to customize my boards to include a mix of healthy options, ensuring that everyone can enjoy a delicious and nutritious experience. So, feel free to adjust the ingredients to suit your dietary needs while still keeping that Hawaiian flair!
Frequently Asked Questions about Hawaiian Charcuterie Board Ideas
As I’ve shared my passion for Hawaiian charcuterie boards, I’ve noticed that many people have questions about how to create the perfect spread. It’s always exciting to see others eager to dive into this culinary adventure! Here are some of the most common queries I’ve encountered, along with my personal insights to help you on your journey.
What is a Hawaiian charcuterie board?
A Hawaiian charcuterie board is a delightful twist on the traditional charcuterie board, featuring a mix of tropical flavors and ingredients inspired by Hawaiian cuisine. It typically includes a variety of meats, cheeses, fresh fruits, vegetables, and dips, all beautifully arranged to create a vibrant and inviting display. Think of it as a mini-vacation on a platter!
Can I make a Hawaiian charcuterie board ahead of time?
Absolutely! I often prepare my ingredients a few hours in advance. Just keep everything covered in the fridge until you’re ready to assemble. This not only saves time but also allows the flavors to meld together beautifully. Just remember to let the cheeses and meats sit at room temperature for about 30 minutes before serving for the best taste!
What are some good meat options for a Hawaiian charcuterie board?
When it comes to meats, I love using a mix of flavors and textures. Some great options include sliced prosciutto, smoked salmon, and Hawaiian-style teriyaki chicken. You can also add spicy salami or even grilled shrimp for a seafood twist. The key is to choose meats that complement each other and bring a taste of the islands to your board!
How do I choose the right cheeses for my board?
Choosing the right cheeses can elevate your Hawaiian charcuterie board! I recommend a mix of creamy and sharp cheeses. For example, creamy goat cheese pairs beautifully with sharp cheddar and brie. This combination creates a delightful contrast in flavors and textures. Don’t forget to cut them into different shapes for visual appeal!
What fruits and vegetables should I include?
Fruits and vegetables are essential for adding color and freshness to your board. I love using tropical fruits like pineapple, strawberries, and kiwi, as they bring a burst of sweetness. For veggies, baby carrots, cucumber slices, and bell peppers add a nice crunch. Feel free to get creative and use whatever is in season or looks fresh at your local market!
Can I customize my Hawaiian charcuterie board for dietary restrictions?
Definitely! One of the best things about charcuterie boards is their versatility. You can easily customize your board to accommodate dietary restrictions. For a vegetarian option, swap out the meats for marinated tofu or grilled vegetables. If you have gluten-free guests, offer gluten-free crackers or fresh veggies for dipping. The possibilities are endless!
With these answers in mind, I hope you feel inspired and ready to create your own Hawaiian charcuterie board. Remember, the joy of cooking comes from sharing your creations with others, so have fun and let your creativity shine!
Conclusion on Hawaiian Charcuterie Board Ideas
As I wrap up this delightful journey into the world of Hawaiian charcuterie boards, I can’t help but feel excited about the endless possibilities they offer. These boards are more than just a collection of ingredients; they are a celebration of flavors, colors, and creativity. Each bite transports you to a tropical paradise, making them perfect for any gathering, from casual get-togethers to festive celebrations.
The beauty of a Hawaiian charcuterie board lies in its versatility. You can customize it to suit your tastes, dietary preferences, and seasonal ingredients. Whether you’re a meat lover, a vegetarian, or someone with specific dietary needs, there’s a way to make this board your own. Plus, the process of assembling the board is a fun and engaging experience that brings people together.
So, the next time you’re looking to impress your guests or simply treat yourself, consider crafting a Hawaiian charcuterie board. With its vibrant colors, delicious flavors, and inviting presentation, it’s sure to be a hit. I can’t wait for you to dive into this culinary adventure and create your own masterpiece. Happy cooking!