Introduction to Skinny Coconut Cheesecake Bars Recipe
As a passionate home cook, I often find myself on a delightful quest to create desserts that are not only delicious but also a bit lighter on the waistline. One sunny afternoon, while dreaming of tropical flavors, I stumbled upon the idea of making Skinny Coconut Cheesecake Bars. The thought of creamy cheesecake combined with the sweet, nutty essence of coconut made my taste buds tingle with excitement!
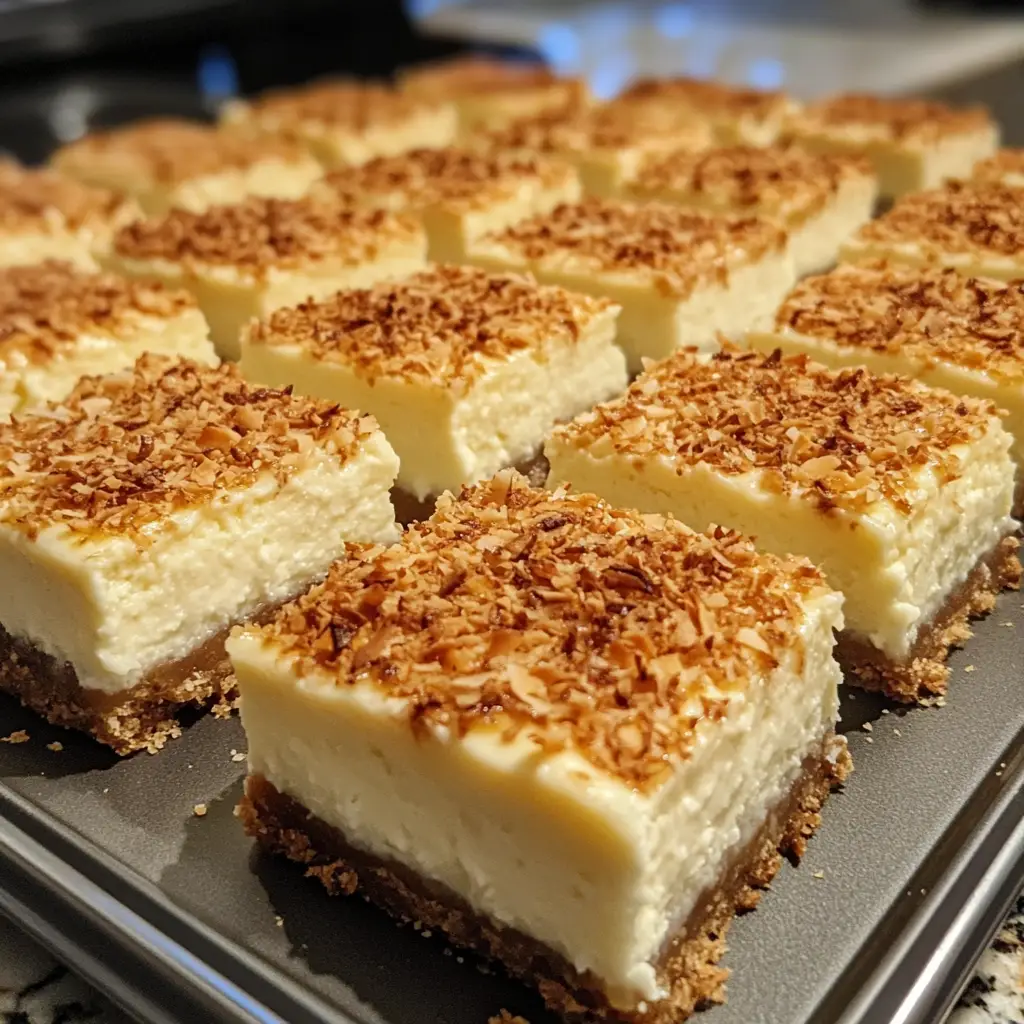
These bars are like a mini vacation for your palate. Imagine biting into a luscious, creamy cheesecake that melts in your mouth, with a hint of coconut that transports you straight to a beachside paradise. The best part? They’re skinny! I love that I can indulge in a sweet treat without the guilt. It’s a win-win situation!
Over the years, I’ve perfected this recipe, and I can’t wait to share it with you. Whether you’re hosting a summer barbecue, celebrating a birthday, or simply craving something sweet, these bars are sure to impress. They’re easy to make, and the ingredients are simple and wholesome. Plus, they’re a fantastic way to sneak in some coconut goodness into your diet!
So, grab your apron and let’s dive into the world of Skinny Coconut Cheesecake Bars. I promise you’ll be hooked after the first bite!
Ingredients for Skinny Coconut Cheesecake Bars Recipe
Before we embark on our culinary adventure, let’s gather all the ingredients we need for these delightful Skinny Coconut Cheesecake Bars. I always believe that the quality of ingredients can make or break a recipe, so I recommend using the freshest and best you can find. Here’s what you’ll need:
Main Ingredients
- 1 cup of almond flour – This will be the base of our crust, giving it a lovely nutty flavor.
- 2 tablespoons of coconut oil, melted – This adds richness and a hint of coconut flavor.
- 2 tablespoons of honey or maple syrup – A natural sweetener to keep things light.
- 1/4 teaspoon of salt – Just a pinch to enhance all the flavors.
- 16 ounces of low-fat cream cheese, softened – The star of our cheesecake filling!
- 1/2 cup of Greek yogurt – This adds creaminess and a bit of tang.
- 1/2 cup of shredded unsweetened coconut – For that tropical flair!
- 1/4 cup of coconut sugar or sweetener of choice – To sweeten the filling without the extra calories.
- 2 large eggs – These help bind everything together.
- 1 teaspoon of vanilla extract – A splash of vanilla makes everything better!
Optional Add-ons
- 1/4 cup of chocolate chips – If you’re feeling indulgent, sprinkle some on top for a chocolatey twist.
- Fresh fruit, like mango or berries – These can be a beautiful topping that adds freshness.
- Extra shredded coconut for garnish – Toast it lightly for a crunchy topping.
- A dash of lime juice – For a zesty kick that pairs wonderfully with coconut.
When I make these bars, I love to source my ingredients from local markets. Freshness is key! If you can find organic options, even better. The taste difference is remarkable, and it makes the whole experience feel special. Now that we have our ingredients ready, let’s move on to the fun part—preparing our Skinny Coconut Cheesecake Bars!
How to Prepare Skinny Coconut Cheesecake Bars Recipe
Now that we have our ingredients ready, it’s time to roll up our sleeves and get cooking! Making Skinny Coconut Cheesecake Bars is a fun and rewarding process. I love how each step brings us closer to that creamy, coconutty goodness. Let’s dive into the preparation!
Step 1: Prepare the Crust
First things first, we need to create a delicious crust that will hold our cheesecake filling. In a mixing bowl, combine the almond flour, melted coconut oil, honey (or maple syrup), and salt. Mix until everything is well combined and resembles a crumbly dough.
Tips for a Perfect Crust
- Make sure your coconut oil is melted but not hot. This helps the crust bind without cooking the flour.
- Press the mixture firmly into the bottom of your baking dish. A flat-bottomed measuring cup works wonders for this!
- For an extra crunch, consider toasting the almond flour lightly in a pan before mixing it in.
Step 2: Make the Cheesecake Filling
Next up is the star of the show—the cheesecake filling! In a large bowl, beat the softened cream cheese until it’s smooth and creamy. Then, add the Greek yogurt, shredded coconut, coconut sugar, eggs, and vanilla extract. Mix until everything is well blended and fluffy.
Tips for Creamy Filling
- Ensure your cream cheese is at room temperature. This prevents lumps and gives you that silky texture.
- Don’t overmix the filling once you add the eggs. Just mix until combined to avoid a dense cheesecake.
- For a tropical twist, you can add a splash of coconut extract for an extra coconut flavor!
Step 3: Bake the Bars
Now it’s time to bake! Pour the cheesecake filling over the prepared crust and spread it evenly. Preheat your oven to 325°F (160°C) and bake for about 25-30 minutes, or until the edges are set but the center is still slightly jiggly.
Tips for Baking Time
- Keep an eye on the bars as they bake. Ovens can vary, so check for doneness a few minutes early.
- If the top starts to brown too quickly, cover it loosely with aluminum foil.
- Letting the bars cool in the oven with the door slightly ajar can help prevent cracking.
Step 4: Cool and Chill
Once baked, remove the bars from the oven and let them cool in the pan for about 30 minutes. After that, transfer them to the refrigerator to chill for at least 2 hours. This step is crucial for the bars to set properly and develop that creamy texture.
Tips for Proper Cooling
- For easier slicing, chill the bars overnight if you can. The flavors meld beautifully!
- Use a sharp knife to cut the bars into squares. Wipe the knife with a damp cloth between cuts for clean edges.
- Top with extra shredded coconut or your favorite fruits just before serving for a beautiful presentation!
And there you have it! The steps to create your very own Skinny Coconut Cheesecake Bars. I can already imagine the delightful aroma wafting through your kitchen. Let’s move on to the next section where we’ll discuss the equipment needed for this recipe!
Equipment Needed for Skinny Coconut Cheesecake Bars Recipe
Before we dive into the kitchen, let’s gather the essential tools that will make our baking adventure smooth and enjoyable. Having the right equipment can make all the difference, and I’ve learned a few tricks along the way. Here’s what you’ll need to whip up those delightful Skinny Coconut Cheesecake Bars:
- Mixing Bowls: A couple of medium-sized mixing bowls will do the trick. I love using glass bowls because they’re easy to clean and you can see the ingredients mixing!
- Measuring Cups and Spoons: Accurate measurements are key in baking. A set of dry measuring cups and a set of measuring spoons will ensure you get it just right.
- Electric Mixer: While a whisk can work, an electric mixer makes it so much easier to achieve that creamy cheesecake filling. If you don’t have one, a sturdy whisk and some elbow grease will do!
- Baking Dish: A 9×9 inch square baking dish is perfect for this recipe. If you don’t have one, a round cake pan can work too—just adjust your cutting technique!
- Parchment Paper: Lining your baking dish with parchment paper makes it super easy to lift the bars out once they’re set. If you don’t have parchment, a light greasing of the pan will suffice.
- Spatula: A rubber spatula is great for scraping down the sides of your mixing bowl and spreading the cheesecake filling evenly.
- Sharp Knife: For slicing the bars into perfect squares. A sharp knife ensures clean cuts, making your bars look as good as they taste!
With these tools in hand, you’re all set to create your Skinny Coconut Cheesecake Bars. Remember, the joy of cooking comes not just from the end result but also from the process itself. So, let’s get ready to bake some magic!
Variations of Skinny Coconut Cheesecake Bars Recipe
As a home cook, I love experimenting with recipes to keep things fresh and exciting. The Skinny Coconut Cheesecake Bars are no exception! Here are a few delightful variations that I’ve tried and absolutely adored:
- Chocolate Coconut Cheesecake Bars: Add a swirl of melted dark chocolate into the cheesecake filling before baking. The rich chocolate pairs beautifully with the coconut, creating a decadent treat!
- Berry Coconut Cheesecake Bars: Fold in some fresh or frozen berries, like raspberries or blueberries, into the filling. The tartness of the berries adds a lovely contrast to the creamy sweetness.
- Lemon Coconut Cheesecake Bars: For a zesty twist, mix in the zest of one lemon and a tablespoon of lemon juice into the filling. This brightens up the flavors and gives a refreshing kick!
- Nutty Coconut Cheesecake Bars: Incorporate chopped nuts, such as pecans or walnuts, into the crust for added texture and flavor. You can also sprinkle some on top for a crunchy finish.
These variations not only keep the recipe interesting but also allow you to cater to different tastes and occasions. I encourage you to get creative and make these bars your own! The possibilities are endless, and each twist brings a new adventure in flavor. Happy baking!
Cooking Notes for Skinny Coconut Cheesecake Bars Recipe
As I’ve journeyed through the delightful world of baking these Skinny Coconut Cheesecake Bars, I’ve gathered a few cooking notes that can help you achieve the best results. These little tips and tricks can make a big difference in your baking experience!
- Room Temperature Ingredients: Always remember to let your cream cheese and eggs come to room temperature before mixing. This simple step helps create a smoother filling without lumps.
- Don’t Rush the Cooling: Patience is key! Allow the bars to cool completely before chilling them in the fridge. This helps them set properly and enhances the flavors.
- Storage Tips: If you have leftovers (which is rare in my house!), store the bars in an airtight container in the fridge. They can last up to a week, but I doubt they’ll stick around that long!
- Freezing for Later: These bars freeze beautifully! Just wrap them tightly in plastic wrap and then in foil. When you’re ready to enjoy, let them thaw in the fridge overnight.
- Experiment with Sweetness: Feel free to adjust the sweetness to your liking. If you prefer a sweeter treat, add a bit more coconut sugar or honey to the filling.
With these cooking notes in your back pocket, you’re well on your way to creating the most scrumptious Skinny Coconut Cheesecake Bars. Remember, every baking adventure is a chance to learn and grow, so don’t hesitate to make it your own!
Serving Suggestions for Skinny Coconut Cheesecake Bars Recipe
Now that our Skinny Coconut Cheesecake Bars are ready to be enjoyed, let’s talk about how to serve them for maximum delight! Presentation can elevate any dish, and these bars are no exception. Here are some of my favorite serving suggestions that will make your dessert shine:
- Garnish with Fresh Fruit: Top each bar with slices of fresh fruit like strawberries, mangoes, or kiwi. The vibrant colors not only look beautiful but also add a refreshing burst of flavor.
- Drizzle with Honey or Chocolate: A light drizzle of honey or melted dark chocolate over the bars can add an extra touch of sweetness and elegance. It’s like a cherry on top!
- Serve with Whipped Cream: A dollop of light whipped cream or coconut whipped cream on the side can make each bite even more indulgent. It’s a creamy dream come true!
- Pair with a Tropical Beverage: Serve these bars alongside a refreshing drink, like coconut water or a fruity smoothie. It creates a lovely tropical vibe that complements the flavors perfectly.
- Chill and Serve: For a refreshing treat on a hot day, serve the bars straight from the fridge. The coolness enhances the creamy texture and makes them even more enjoyable!
These serving suggestions not only enhance the visual appeal but also add layers of flavor to your Skinny Coconut Cheesecake Bars. I love to get creative with my presentations, and I encourage you to do the same! After all, cooking is all about sharing joy and deliciousness with those you love.
Tips for Making Skinny Coconut Cheesecake Bars Recipe
As I’ve whipped up countless batches of Skinny Coconut Cheesecake Bars, I’ve gathered a treasure trove of tips that can help you achieve the best results. These little nuggets of wisdom can make your baking experience smoother and more enjoyable. Here are my top tips to keep in mind:
- Prep Ahead: If you’re short on time, consider prepping the crust and filling a day in advance. Just store them separately in the fridge until you’re ready to bake!
- Use Quality Ingredients: The better the ingredients, the better the bars! Opt for high-quality cream cheese and fresh coconut for the best flavor.
- Don’t Overbake: Keep an eye on your bars while they bake. They should be set around the edges but still slightly jiggly in the center. Overbaking can lead to a dry texture.
- Chill for Flavor: Allowing the bars to chill overnight not only helps them set but also enhances the flavors. Trust me, the wait is worth it!
- Experiment with Toppings: Feel free to get creative with toppings! Whether it’s a sprinkle of toasted coconut or a handful of nuts, toppings can add a delightful crunch and flavor.
With these tips in your back pocket, you’re all set to create the most scrumptious Skinny Coconut Cheesecake Bars. Remember, baking is all about having fun and enjoying the process, so don’t hesitate to make it your own!
Breakdown of Time for Skinny Coconut Cheesecake Bars Recipe
As a home cook, I know that time management is key in the kitchen. When I’m whipping up my Skinny Coconut Cheesecake Bars, I like to have a clear idea of how long each step will take. This way, I can plan my baking adventure without any surprises! Here’s a quick breakdown of the time you’ll need:
- Prep Time: 15 minutes – This includes gathering your ingredients, mixing the crust, and preparing the cheesecake filling. It’s a breeze!
- Cooking Time: 30 minutes – Baking the bars in the oven is where the magic happens. Just set a timer and let the oven do its job!
- Cooling Time: 30 minutes – After baking, let the bars cool in the pan. This step is essential for achieving that perfect texture.
- Chilling Time: 2 hours (or overnight for best results) – This is the hardest part! Allowing the bars to chill helps them set and enhances the flavors.
Total Time: Approximately 3 hours and 15 minutes (or longer if you choose to chill overnight). While it may seem like a long wait, trust me, the end result is worth every minute!
With this time breakdown, you can easily plan your baking session. I often find that the anticipation makes the first bite even sweeter. So, let’s get ready to enjoy some delicious Skinny Coconut Cheesecake Bars!
Nutritional Information for Skinny Coconut Cheesecake Bars Recipe
As a passionate home cook, I always keep an eye on the nutritional value of the dishes I create. It’s important to me that my treats not only taste good but also fit into a balanced lifestyle. Here’s a breakdown of the nutritional information for each serving of my Skinny Coconut Cheesecake Bars:
- Calories: Approximately 150 calories per bar
- Protein: 4 grams
- Fat: 10 grams (mostly healthy fats from coconut and almond flour)
- Carbohydrates: 12 grams
- Fiber: 2 grams
- Sugar: 5 grams (natural sugars from honey and coconut)
These bars are a guilt-free indulgence, allowing you to satisfy your sweet tooth without straying too far from your health goals. I love that they’re made with wholesome ingredients, providing a good balance of protein and healthy fats. Plus, the fiber from the almond flour and shredded coconut helps keep you feeling full!
Remember, nutritional values can vary based on specific brands and ingredient choices, so feel free to adjust as needed. Enjoy your Skinny Coconut Cheesecake Bars knowing they’re a delicious treat that won’t derail your healthy eating habits!
Frequently Asked Questions about Skinny Coconut Cheesecake Bars Recipe
As I’ve shared my Skinny Coconut Cheesecake Bars recipe with friends and family, I’ve noticed a few common questions pop up. It’s always great to clarify any doubts, especially when it comes to baking! Here are some frequently asked questions that I hope will help you on your baking journey:
Can I use regular cream cheese instead of low-fat?
Absolutely! While I prefer low-fat cream cheese for a lighter option, regular cream cheese will work just as well. It may make the bars a bit richer, but they’ll still be delicious!
What can I substitute for almond flour?
If you don’t have almond flour on hand, you can use oat flour or even all-purpose flour. Just keep in mind that the texture may change slightly. Almond flour gives a lovely nutty flavor, but other flours can work too!
How do I know when the cheesecake bars are done baking?
The edges should be set, while the center will still have a slight jiggle. It’s important not to overbake them, as they will continue to firm up while cooling. Trust your instincts, and keep an eye on them!
Can I make these bars vegan?
Yes! To make a vegan version, you can substitute the cream cheese with a plant-based cream cheese alternative and use flax eggs instead of regular eggs. Just mix 1 tablespoon of ground flaxseed with 2.5 tablespoons of water for each egg.
How long do the bars last in the fridge?
These Skinny Coconut Cheesecake Bars can last up to a week in the fridge when stored in an airtight container. However, I doubt they’ll last that long in my house—they’re just too good!
Can I freeze the cheesecake bars?
Yes, they freeze beautifully! Just wrap them tightly in plastic wrap and then in foil. When you’re ready to enjoy, let them thaw in the fridge overnight for the best texture.
These questions are just a few of the common queries I’ve encountered while baking my Skinny Coconut Cheesecake Bars. If you have any other questions, feel free to reach out! Baking is all about sharing knowledge and joy, and I’m here to help you every step of the way!
Conclusion on Skinny Coconut Cheesecake Bars Recipe
As I wrap up my journey through the delightful world of Skinny Coconut Cheesecake Bars, I can’t help but feel a sense of joy and satisfaction. These bars are not just a dessert; they’re a celebration of flavors and a testament to the idea that you can indulge without the guilt. With their creamy texture and tropical coconut essence, they truly transport you to a sunny paradise with every bite.
What I love most about this recipe is its versatility. Whether you’re looking for a light treat for a summer gathering or a sweet pick-me-up after a long day, these bars fit the bill perfectly. Plus, they’re easy to make, allowing you to share your culinary creations with friends and family without spending hours in the kitchen.
So, if you’re ready to embark on your own baking adventure, I encourage you to give these Skinny Coconut Cheesecake Bars a try. With simple ingredients and a few easy steps, you’ll be well on your way to creating a dessert that’s not only delicious but also a little kinder to your waistline. Happy baking, and may your kitchen always be filled with love and laughter!


