Introduction to Witch Hat Chocolate Cookies
As the leaves turn and the air gets crisp, I find myself craving cozy treats that bring a smile to my family’s faces. That’s where these Witch Hat Chocolate Cookies come in! They’re not just adorable; they’re a quick solution for busy days filled with Halloween festivities. With a rich chocolate base and a delightful chocolate kiss on top, these cookies are sure to impress your loved ones. Plus, they’re simple enough to whip up even when life gets hectic. Let’s dive into this deliciously spooky recipe that will make your Halloween celebrations even sweeter!
Why You’ll Love This Witch Hat Chocolate Cookies
These Witch Hat Chocolate Cookies are a delightful blend of ease and taste, making them perfect for busy moms and professionals alike. They come together in just 32 minutes, allowing you to create a festive treat without spending hours in the kitchen. The rich chocolate flavor paired with the whimsical design will have your family and friends raving. Plus, they’re a fun way to get everyone involved in the Halloween spirit!
Ingredients for Witch Hat Chocolate Cookies
Gathering the right ingredients is half the fun of baking! For these Witch Hat Chocolate Cookies, you’ll need a mix of pantry staples and a few special touches to make them truly magical.
- Unsalted butter: This is the base of your cookies, providing richness and flavor. Make sure it’s softened for easy mixing.
- Granulated sugar: This sweetener helps create a lovely texture and adds sweetness to the cookies.
- Brown sugar: Packed with moisture, brown sugar gives your cookies a chewy texture and a hint of caramel flavor.
- Large eggs: Eggs bind the ingredients together and add moisture, making your cookies soft and delicious.
- Vanilla extract: A splash of vanilla enhances the overall flavor, making each bite more delightful.
- All-purpose flour: This is the backbone of your cookie dough, providing structure and stability.
- Unsweetened cocoa powder: The star of the show! It gives these cookies their rich chocolate flavor and dark color.
- Baking soda: This leavening agent helps the cookies rise, ensuring they’re light and fluffy.
- Salt: Just a pinch enhances the sweetness and balances the flavors in your cookies.
- Chocolate kisses: These are the iconic “hats” of your cookies, adding a sweet surprise in every bite.
- Sprinkles (optional): Use orange or purple sprinkles to add a festive touch. They’re perfect for Halloween and can be swapped for any color to match your theme!

How to Make Witch Hat Chocolate Cookies
For exact measurements, check the bottom of the article where you can find everything listed for easy printing. Happy baking!
Making these Witch Hat Chocolate Cookies is a delightful journey that’s as fun as it is delicious! Follow these simple steps, and you’ll have a batch of spooky treats ready to impress. Let’s get started!
Step 1: Preheat the Oven
First things first, preheat your oven to 350°F (175°C). Preheating is crucial because it ensures even baking. If the oven isn’t hot enough, your cookies may spread too much or not rise properly. Trust me, a well-preheated oven is the secret to cookie perfection!
Step 2: Cream the Butter and Sugars
In a large bowl, cream together the softened butter, granulated sugar, and brown sugar until smooth. This process is vital for creating a light and fluffy texture. The air you incorporate while mixing helps the cookies rise beautifully. Aim for a creamy consistency that’s light in color, and you’re on the right track!
Step 3: Add Eggs and Vanilla
Next, add the eggs and vanilla extract to the creamed mixture. The eggs provide moisture and act as a binder, while the vanilla adds a warm, inviting flavor. Mix until everything is well combined, and you’ll start to smell that delicious aroma wafting through your kitchen!
Step 4: Combine Dry Ingredients
In a separate bowl, whisk together the all-purpose flour, cocoa powder, baking soda, and salt. Mixing dry ingredients separately is essential to ensure even distribution of the leavening agent. This step helps prevent any clumps and guarantees that every cookie has the perfect balance of flavors!
Step 5: Mix Wet and Dry Ingredients
Now, gradually add the dry ingredients to the wet mixture. Stir gently until just combined. Be careful not to overmix, as this can lead to tough cookies. You want a soft dough that holds together but isn’t overly dense. A little bit of love goes a long way here!
Step 6: Shape the Cookies
Roll the dough into small balls, about the size of a tablespoon. Place them on a baking sheet lined with parchment paper, leaving space between each cookie. This allows them to spread without merging into one giant cookie. Trust me, you want individual witch hats, not a cookie monster!
Step 7: Bake the Cookies
Bake your cookies in the preheated oven for 10-12 minutes. Keep an eye on them; they’re done when the edges are set but the centers are still soft. This ensures a chewy texture that’s simply irresistible. Let them cool slightly before moving on to the next step!
Step 8: Add Chocolate Kisses
As soon as you pull the cookies from the oven, press a chocolate kiss into the center of each one. The warmth of the cookie will help the kiss melt slightly, creating that iconic witch hat look. If you’re feeling festive, sprinkle some orange or purple sprinkles on top while they’re still warm!
Step 9: Cool and Serve
Allow the cookies to cool completely on a wire rack. This step is crucial for achieving the perfect texture. Once cooled, they’re ready to be served! These Witch Hat Chocolate Cookies are perfect for sharing at Halloween parties or enjoying with a cozy cup of hot cocoa.
Tips for Success
- Make sure your butter is softened to room temperature for easy mixing.
- Use a cookie scoop for uniform cookie sizes, ensuring even baking.
- Don’t skip the cooling step; it helps the cookies set perfectly.
- Experiment with different flavored kisses for a fun twist!
- Store cookies in an airtight container to keep them fresh longer.
Equipment Needed
- Baking sheet: A standard baking sheet works well, but you can use a stoneware pan for even heat distribution.
- Parchment paper: This helps prevent sticking; aluminum foil can be a substitute if needed.
- Mixing bowls: Use any size, but a large bowl is ideal for creaming ingredients.
- Whisk: A whisk is great for mixing dry ingredients; a fork can work in a pinch.
- Cookie scoop: This ensures uniform cookie sizes; a tablespoon can also do the trick!
Variations
- Gluten-Free: Substitute all-purpose flour with a gluten-free flour blend to make these cookies gluten-free. Just ensure the blend contains xanthan gum for the right texture.
- Nutty Twist: Add 1/2 cup of finely chopped nuts, like walnuts or pecans, to the dough for a delightful crunch and flavor.
- Minty Surprise: Use mint chocolate kisses instead of regular ones for a refreshing minty flavor that pairs beautifully with chocolate.
- Spicy Kick: Add a teaspoon of cinnamon or a pinch of cayenne pepper to the dry ingredients for a warm, spicy twist that will surprise your taste buds.
- Vegan Option: Replace the eggs with flaxseed meal (1 tablespoon flaxseed meal + 2.5 tablespoons water = 1 egg) and use vegan butter for a delicious vegan treat.
Serving Suggestions
- Pair these Witch Hat Chocolate Cookies with a warm cup of apple cider for a cozy fall treat.
- Serve them alongside a scoop of vanilla ice cream for a delightful dessert experience.
- For a festive touch, arrange the cookies on a Halloween-themed platter with spooky decorations.
- Offer a side of whipped cream for dipping to elevate the chocolate experience.
- These cookies also make great party favors when packaged in cute bags!
FAQs about Witch Hat Chocolate Cookies
As you embark on your baking adventure with these Witch Hat Chocolate Cookies, you might have a few questions. Here are some common queries that can help you along the way!
Can I make these cookies ahead of time?
Absolutely! You can prepare the dough in advance and store it in the fridge for up to three days. Just roll the dough into balls and bake when you’re ready for fresh cookies. They’re perfect for last-minute Halloween gatherings!
What can I use instead of chocolate kisses?
If you want to switch things up, try using caramel-filled chocolates or even peanut butter cups. They’ll still give you that fun “hat” look while adding a unique flavor twist to your Witch Hat Chocolate Cookies.
How should I store the cookies?
To keep your cookies fresh, store them in an airtight container at room temperature. They’ll stay delicious for about a week. If you want to keep them longer, consider freezing them for up to three months!
Can I use different types of sprinkles?
Of course! Feel free to get creative with your sprinkles. Whether you choose festive Halloween colors or even a mix of your favorite shades, they’ll add a fun touch to your Witch Hat Chocolate Cookies.
What’s the best way to serve these cookies?
These cookies shine at Halloween parties! Serve them on a spooky platter or alongside a warm drink like hot cocoa or apple cider. They’re sure to be a hit with both kids and adults alike!
Final Thoughts
As I reflect on these Witch Hat Chocolate Cookies, I can’t help but smile at the joy they bring. They’re not just cookies; they’re little moments of magic that create lasting memories with family and friends. Baking them together can turn a busy day into a delightful adventure, filled with laughter and creativity. Plus, the smiles on my loved ones’ faces when they take that first bite? Absolutely priceless! So, gather your ingredients, roll up your sleeves, and let the Halloween spirit inspire you. These cookies are sure to become a cherished tradition in your home!
Print
Witch Hat Chocolate Cookies that Will Delight Every Bite!
- Total Time: 32 minutes
- Yield: 24 cookies 1x
- Diet: Vegetarian
Description
These Witch Hat Chocolate Cookies are a delightful treat perfect for Halloween, featuring a chocolate cookie base topped with a chocolate kiss to resemble a witch’s hat.
Ingredients
- 1 cup unsalted butter, softened
- 1 cup granulated sugar
- 1 cup brown sugar, packed
- 2 large eggs
- 1 teaspoon vanilla extract
- 3 cups all-purpose flour
- 1 cup unsweetened cocoa powder
- 1 teaspoon baking soda
- 1/2 teaspoon salt
- 1 package chocolate kisses
- 1 cup orange or purple sprinkles (optional)
Instructions
- Preheat your oven to 350°F (175°C).
- In a large bowl, cream together the softened butter, granulated sugar, and brown sugar until smooth.
- Add the eggs and vanilla extract, mixing until well combined.
- In another bowl, whisk together the flour, cocoa powder, baking soda, and salt.
- Gradually add the dry ingredients to the wet ingredients, mixing until just combined.
- Roll the dough into small balls and place them on a baking sheet lined with parchment paper.
- Bake for 10-12 minutes, or until the edges are set.
- Remove from the oven and immediately press a chocolate kiss into the center of each cookie.
- If desired, sprinkle with orange or purple sprinkles while the cookies are still warm.
- Allow to cool completely on a wire rack before serving.
Notes
- For a fun twist, you can use different colored sprinkles to match your Halloween theme.
- Store cookies in an airtight container to keep them fresh.
- These cookies can be made ahead of time and frozen for later use.
- Prep Time: 20 minutes
- Cook Time: 12 minutes
- Category: Dessert
- Method: Baking
- Cuisine: American
Nutrition
- Serving Size: 1 cookie
- Calories: 150
- Sugar: 10g
- Sodium: 50mg
- Fat: 7g
- Saturated Fat: 4g
- Unsaturated Fat: 2g
- Trans Fat: 0g
- Carbohydrates: 20g
- Fiber: 1g
- Protein: 2g
- Cholesterol: 20mg
Keywords: Witch Hat Chocolate Cookies, Halloween cookies, chocolate cookies, festive treats
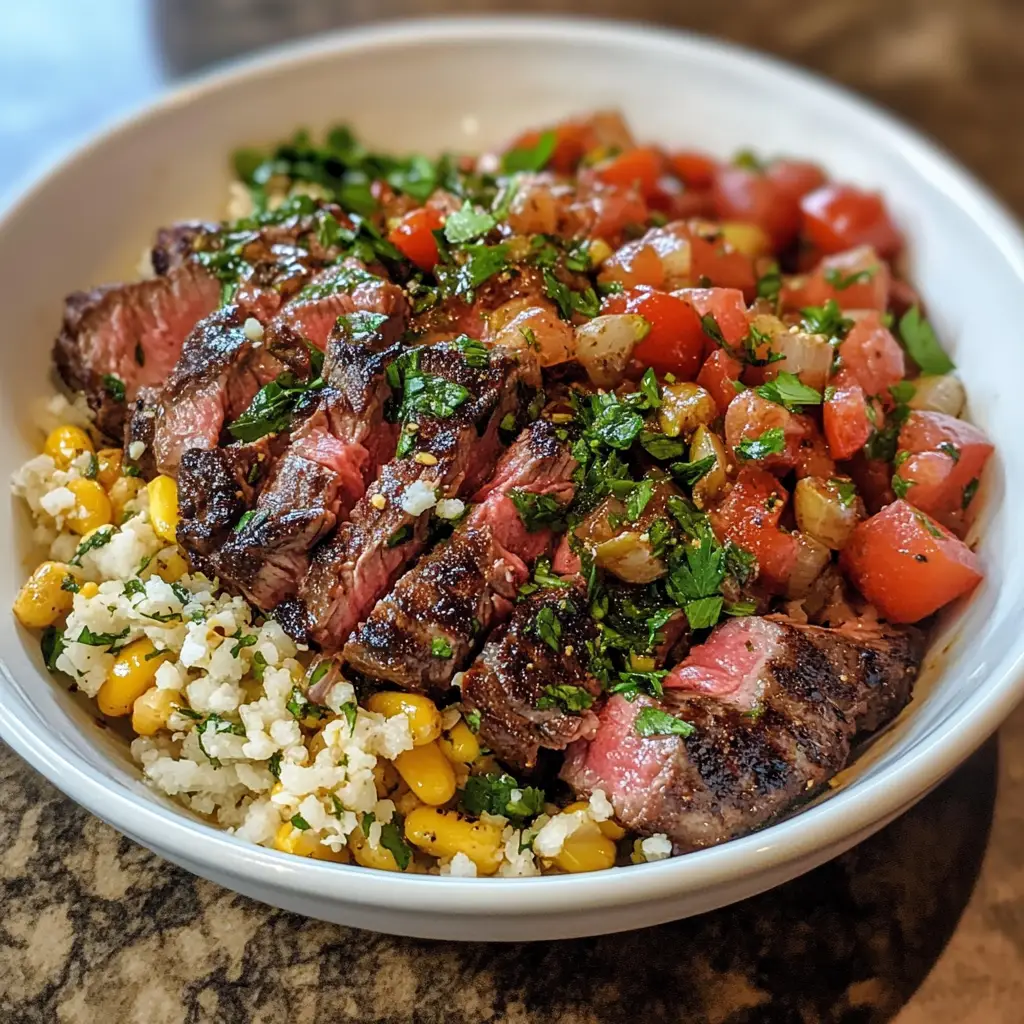
Introduction to Quick & Easy Mediterranean Steak Bowl Recipe
As a busy mom, I know how challenging it can be to whip up a delicious meal after a long day. That’s why I’m excited to share my Quick & Easy Mediterranean Steak Bowl Recipe with you! This dish is not only a feast for the eyes but also a quick solution for those hectic evenings. Imagine tender steak paired with vibrant veggies and a sprinkle of feta, all in one bowl. It’s a delightful way to impress your loved ones while keeping your kitchen time to a minimum. Let’s dive into this culinary adventure together!
Why You’ll Love This Quick & Easy Mediterranean Steak Bowl Recipe
This Quick & Easy Mediterranean Steak Bowl Recipe is a lifesaver for busy days. It’s not just about speed; it’s about flavor too! In just 25 minutes, you can create a wholesome meal that’s bursting with fresh ingredients. Plus, it’s versatile—perfect for picky eaters or those who love to experiment. You’ll find yourself making this dish again and again, as it’s sure to become a family favorite!
Ingredients for Quick & Easy Mediterranean Steak Bowl Recipe
Gathering the right ingredients is the first step to creating your Quick & Easy Mediterranean Steak Bowl Recipe. Here’s what you’ll need:
- Flank steak: This cut is tender and flavorful, perfect for quick cooking.
- Cooked quinoa: A nutritious base that adds protein and fiber, making your meal hearty.
- Cherry tomatoes: Their sweetness and juiciness brighten up the bowl.
- Cucumber: Adds a refreshing crunch, balancing the richness of the steak.
- Red onion: Thinly sliced for a mild, zesty kick that enhances the flavors.
- Feta cheese: Crumbled for a creamy, tangy touch that ties everything together.
- Olives: Sliced for a briny flavor that complements the other ingredients.
- Olive oil: A healthy fat that helps in cooking the steak and adds richness.
- Lemon juice: A splash of acidity that brightens the entire dish.
- Salt and pepper: Essential for seasoning, enhancing the natural flavors of the ingredients.
Feel free to get creative! You can add your favorite vegetables, like bell peppers or spinach, to make it your own. If you’re looking for a spicy kick, toss in some red pepper flakes. For exact measurements, check the bottom of the article where you can find them available for printing.
How to Make Quick & Easy Mediterranean Steak Bowl Recipe
Now that you have your ingredients ready, let’s dive into the steps for making this Quick & Easy Mediterranean Steak Bowl Recipe. Each step is simple, ensuring you can whip this up even on the busiest of nights. Let’s get cooking!
Step 1: Season the Steak
Seasoning is the secret to a flavorful steak. A sprinkle of salt and pepper enhances the natural taste of the meat. It’s like giving your steak a warm hug before it hits the skillet. This simple step makes all the difference in flavor!
Step 2: Heat the Olive Oil
Using olive oil is a great choice for cooking. It’s heart-healthy and adds a rich flavor to your steak. Heat it in a skillet over medium-high heat until it shimmers. This ensures a nice sear, locking in those delicious juices.
Step 3: Cook the Steak
Place the seasoned steak in the hot skillet. Cook for about 4-5 minutes on each side for medium-rare. Use tongs to flip it gently. If you prefer it more done, add a minute or two. The goal is a beautifully browned exterior with a juicy interior.
Step 4: Let the Steak Rest
After cooking, let the steak rest for a few minutes. This step is crucial! Resting allows the juices to redistribute, making every bite tender and juicy. Trust me, you don’t want to skip this part!
Step 5: Prepare the Quinoa Mixture
In a large bowl, combine the cooked quinoa, cherry tomatoes, cucumber, red onion, feta cheese, and olives. Drizzle with lemon juice and toss gently. This mixture is colorful and packed with flavor, creating a perfect base for your steak.
Step 6: Serve and Enjoy
To serve, spoon the quinoa mixture into bowls and top with sliced steak. For a beautiful presentation, arrange the steak slices artfully on top. A sprinkle of extra feta or olives can add a lovely finishing touch!
Tips for Success
- Always let your steak rest after cooking for maximum juiciness.
- Use a meat thermometer to check doneness—130°F for medium-rare.
- Prep your veggies ahead of time to save on cooking time.
- Experiment with different toppings like avocado or hummus for variety.
- Store leftovers in an airtight container for a quick lunch option.
Equipment Needed
- Skillet: A non-stick or cast-iron skillet works best for searing the steak.
- Cutting board: Essential for slicing the steak and prepping veggies.
- Knife: A sharp chef’s knife makes cutting easier and safer.
- Mixing bowl: Use a large bowl for combining the quinoa and veggies.
- Tongs: Perfect for flipping the steak without piercing it.
Variations
- Grilled Vegetables: Add grilled zucchini, bell peppers, or asparagus for a smoky flavor.
- Swap the Protein: Try chicken, shrimp, or tofu for a different protein option.
- Herb Infusion: Mix in fresh herbs like parsley, basil, or mint for an aromatic twist.
- Spicy Kick: Incorporate jalapeños or a drizzle of sriracha for heat lovers.
- Vegan Option: Replace steak with marinated tempeh or chickpeas for a plant-based meal.
Serving Suggestions
- Pair your steak bowl with a light cucumber salad for extra crunch.
- Serve with a glass of chilled white wine, like Sauvignon Blanc, to complement the flavors.
- Garnish with fresh herbs like parsley or mint for a pop of color.
- Consider pita bread on the side for a delightful scoop!
FAQs about Quick & Easy Mediterranean Steak Bowl Recipe
Can I make this Mediterranean steak bowl ahead of time?
Absolutely! This Quick & Easy Mediterranean Steak Bowl Recipe is perfect for meal prep. You can prepare the quinoa and chop the veggies in advance. Just cook the steak fresh when you’re ready to serve for the best flavor.
What can I substitute for quinoa?
If quinoa isn’t your thing, you can easily swap it for brown rice, couscous, or even cauliflower rice for a low-carb option. Each alternative brings its own unique flavor and texture to the dish!
How do I store leftovers?
Store any leftovers in an airtight container in the fridge. They’ll keep well for up to three days. Just reheat the steak gently to avoid drying it out, and enjoy a quick lunch!
Can I use a different cut of steak?
Yes! While flank steak is ideal, you can use sirloin, ribeye, or even skirt steak. Just adjust the cooking time based on the thickness of the cut to achieve your desired doneness.
Is this recipe gluten-free?
Yes! This Quick & Easy Mediterranean Steak Bowl Recipe is naturally gluten-free, making it a great option for those with dietary restrictions. Enjoy without worry!
Final Thoughts
Cooking should be a joyful experience, and my Quick & Easy Mediterranean Steak Bowl Recipe embodies that spirit. It’s not just a meal; it’s a celebration of flavors and colors that brings the family together. The ease of preparation means you can spend more time enjoying the company of your loved ones rather than stressing in the kitchen. Plus, the versatility allows you to make it your own, ensuring everyone leaves the table satisfied. I hope this recipe becomes a cherished part of your culinary repertoire, just as it has in mine!
PrintQuick & Easy Mediterranean Steak Bowl Recipe You’ll Love
- Total Time: 25 minutes
- Yield: 4 servings 1x
- Diet: Gluten Free
Description
A delicious and simple Mediterranean steak bowl recipe that combines tender steak with fresh vegetables and flavorful toppings.
Ingredients
- 1 lb flank steak
- 2 cups cooked quinoa
- 1 cup cherry tomatoes, halved
- 1 cucumber, diced
- 1/2 red onion, thinly sliced
- 1/2 cup feta cheese, crumbled
- 1/4 cup olives, sliced
- 2 tablespoons olive oil
- 1 tablespoon lemon juice
- Salt and pepper to taste
Instructions
- Season the flank steak with salt and pepper.
- Heat olive oil in a skillet over medium-high heat.
- Cook the steak for about 4-5 minutes on each side for medium-rare.
- Remove the steak from the skillet and let it rest for a few minutes before slicing.
- In a large bowl, combine cooked quinoa, cherry tomatoes, cucumber, red onion, feta cheese, and olives.
- Drizzle with lemon juice and toss to combine.
- Serve the quinoa mixture in bowls topped with sliced steak.
Notes
- Feel free to add your favorite vegetables.
- This recipe can be made ahead of time and stored in the fridge.
- For a spicier kick, add some red pepper flakes.
- Prep Time: 15 minutes
- Cook Time: 10 minutes
- Category: Main Course
- Method: Stovetop
- Cuisine: Mediterranean
Nutrition
- Serving Size: 1 bowl
- Calories: 450
- Sugar: 3g
- Sodium: 600mg
- Fat: 20g
- Saturated Fat: 6g
- Unsaturated Fat: 12g
- Trans Fat: 0g
- Carbohydrates: 40g
- Fiber: 5g
- Protein: 30g
- Cholesterol: 70mg
Keywords: Mediterranean, Steak Bowl, Quick Recipe, Easy Dinner


