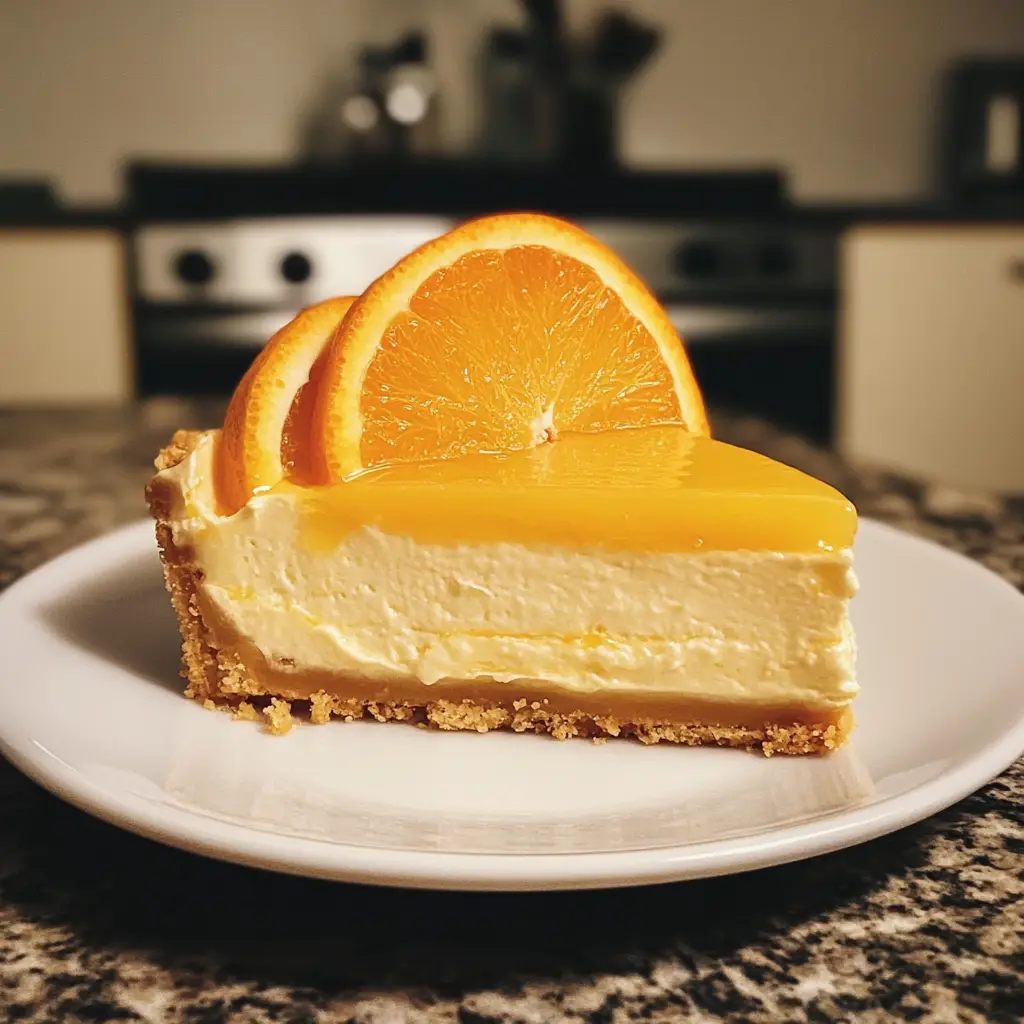
Introduction to No-Bake Vanilla Orange Cheesecake
As a passionate home cook, I find joy in creating desserts that not only taste divine but also bring a smile to the faces of my loved ones. One of my all-time favorites is the No-Bake Vanilla Orange Cheesecake. This delightful treat is like a burst of sunshine on a plate, perfect for any occasion. The creamy texture combined with the zesty orange flavor makes it a refreshing dessert that dances on your taste buds.
Let me take you back to a sunny afternoon when I first stumbled upon this recipe. I was hosting a small gathering for friends, and I wanted to impress them with something special. After rummaging through my recipe box, I found a handwritten note from my grandmother. It was her version of a cheesecake, but with a twist of orange! I decided to give it a modern spin by making it a no-bake version. The result? A creamy, dreamy cheesecake that was a hit!
What I love most about this No-Bake Vanilla Orange Cheesecake is how easy it is to whip up. You don’t need to turn on the oven, which is a blessing during those hot summer days. Plus, it’s a versatile dessert that can be dressed up or down, depending on the occasion. Whether it’s a birthday party, a family gathering, or just a cozy night in, this cheesecake fits right in.
In this article, I’ll share my secrets to making this delightful dessert, from the ingredients to the step-by-step preparation. So, grab your mixing bowl and let’s embark on this culinary adventure together!
Ingredients for No-Bake Vanilla Orange Cheesecake
Before we dive into the delightful world of making this No-Bake Vanilla Orange Cheesecake, let’s gather our ingredients. I always believe that quality ingredients make a world of difference in any recipe. So, let’s make sure we have everything we need to create this creamy masterpiece!
Main Ingredients
- 1 ½ cups of graham cracker crumbs
- ½ cup of unsalted butter, melted
- 2 cups of cream cheese, softened
- 1 cup of powdered sugar
- 1 teaspoon of pure vanilla extract
- 1 cup of heavy whipping cream
- 1 tablespoon of freshly grated orange zest
- ½ cup of fresh orange juice
When selecting your ingredients, I recommend using high-quality cream cheese for that rich, creamy texture. I often opt for organic butter, as it adds a lovely depth of flavor. And don’t skimp on the fresh oranges! The zest and juice are what give this cheesecake its vibrant taste.
Optional Add-ons
- Fresh orange slices for garnish
- Chocolate shavings for a decadent touch
- Whipped cream for extra fluffiness
- A sprinkle of crushed nuts for added crunch
These optional add-ons can elevate your cheesecake to new heights. I love adding fresh orange slices on top for a pop of color and freshness. If you’re feeling adventurous, a drizzle of chocolate can create a delightful contrast with the orange flavor. The possibilities are endless!
How to Prepare No-Bake Vanilla Orange Cheesecake
Now that we have our ingredients ready, it’s time to roll up our sleeves and dive into the fun part—preparing the No-Bake Vanilla Orange Cheesecake! I find that following each step carefully makes all the difference in achieving that perfect creamy texture. Let’s get started!
Step 1: Prepare the Crust
First things first, we need to create a delicious crust that will hold our cheesecake together. In a mixing bowl, combine the graham cracker crumbs and melted butter. Stir until the crumbs are evenly coated and resemble wet sand.
Tips for Step 1
- For an extra flavor boost, try adding a pinch of cinnamon to the graham cracker mixture.
- Press the mixture firmly into the bottom of a springform pan. I like to use the bottom of a measuring cup to get an even layer.
- Don’t forget to chill the crust for about 10 minutes in the fridge. This helps it set nicely!
Step 2: Make the Cheesecake Filling
Next up, let’s whip up that creamy filling! In a large mixing bowl, beat the softened cream cheese until it’s smooth and fluffy. Gradually add in the powdered sugar, vanilla extract, orange zest, and fresh orange juice. Mix until everything is well combined.
Tips for Step 2
- Make sure your cream cheese is at room temperature. This helps it blend smoothly without lumps.
- For a lighter texture, whip the heavy cream in a separate bowl until soft peaks form, then gently fold it into the cream cheese mixture.
- Don’t rush this step! Take your time to ensure all ingredients are well incorporated.
Step 3: Assemble the Cheesecake
Now comes the exciting part—assembling our cheesecake! Pour the cheesecake filling over the chilled crust, spreading it evenly with a spatula. I love to create a little swirl on top for a decorative touch.
Tips for Step 3
- For a smooth finish, use an offset spatula to spread the filling evenly.
- If you want to get creative, you can add a layer of orange slices or chocolate shavings between the crust and filling.
- Don’t be afraid to taste the filling! Adjust the sweetness or orange flavor to your liking.
Step 4: Chill the Cheesecake
Finally, it’s time to let our cheesecake chill! Cover the springform pan with plastic wrap and place it in the refrigerator for at least 4 hours, or overnight if you can wait that long. This allows the flavors to meld beautifully.
Tips for Step 4
- For best results, let the cheesecake chill overnight. The longer it sits, the better the flavors develop!
- When ready to serve, run a knife around the edge of the pan before releasing the springform. This helps prevent any sticking.
- Consider freezing the cheesecake for a couple of hours if you want a firmer texture.
And there you have it! With these simple steps, you’ll create a No-Bake Vanilla Orange Cheesecake that’s sure to impress. I can already picture the smiles on my friends’ faces as they take their first bites. Let’s move on to the next section where we’ll discuss the equipment needed for this delightful dessert!
Equipment Needed for No-Bake Vanilla Orange Cheesecake
Before we dive into the deliciousness of our No-Bake Vanilla Orange Cheesecake, let’s make sure we have the right tools at hand. Having the right equipment can make the process smoother and more enjoyable. Here’s what you’ll need:
- Springform Pan: This is essential for easy removal of the cheesecake. If you don’t have one, a regular pie dish will work, but it might be a bit trickier to serve.
- Mixing Bowls: A couple of medium to large mixing bowls will help you keep things organized while preparing the crust and filling.
- Electric Mixer: A hand mixer or stand mixer is perfect for whipping the cream cheese and heavy cream. If you don’t have one, a whisk can work, but it’ll take a bit more elbow grease!
- Spatula: A rubber spatula is great for folding in the whipped cream and spreading the filling evenly.
- Measuring Cups and Spoons: Accurate measurements are key to a successful cheesecake, so don’t forget these!
- Plastic Wrap: This will help cover the cheesecake while it chills in the fridge, keeping it fresh and preventing any odors from seeping in.
With these tools in your kitchen arsenal, you’re all set to create a stunning No-Bake Vanilla Orange Cheesecake. I remember the first time I made this dessert; I was so excited to use my grandmother’s old mixing bowl. It felt like I was carrying on a sweet tradition! Now, let’s move on to the fun part—exploring variations of this delightful cheesecake!
Variations of No-Bake Vanilla Orange Cheesecake
While the classic No-Bake Vanilla Orange Cheesecake is a showstopper on its own, I love to experiment with different flavors and textures to keep things exciting. Here are a few variations that I’ve tried and absolutely adore:
- Chocolate Orange Cheesecake: Add a layer of melted dark chocolate to the filling for a rich, decadent twist. The combination of chocolate and orange is simply divine!
- Berry Bliss Cheesecake: Swirl in some fresh berry puree, like raspberry or blueberry, into the cheesecake filling. The tartness of the berries complements the sweetness of the orange beautifully.
- Nutty Delight Cheesecake: Incorporate crushed nuts, such as almonds or pecans, into the crust for added crunch. You can also sprinkle some on top for a lovely garnish.
- Coconut Cream Cheesecake: Replace half of the cream cheese with coconut cream for a tropical vibe. Add shredded coconut to the filling for extra texture and flavor.
These variations not only add a fun twist to the original recipe but also allow you to cater to different tastes and preferences. I remember hosting a potluck where I made the Chocolate Orange Cheesecake variation, and it was gone in minutes! The key is to have fun and let your creativity shine. Now, let’s move on to some cooking notes that will help you perfect your cheesecake!
Cooking Notes for No-Bake Vanilla Orange Cheesecake
As I’ve learned through my culinary adventures, a few cooking notes can make all the difference when preparing a No-Bake Vanilla Orange Cheesecake. Here are some tips that I’ve gathered over the years to ensure your cheesecake turns out perfectly every time:
- Room Temperature Ingredients: Always make sure your cream cheese and heavy cream are at room temperature before mixing. This helps achieve a smooth and creamy filling without any lumps.
- Chill Time is Key: Patience is a virtue! Allowing the cheesecake to chill for at least 4 hours, or preferably overnight, enhances the flavors and gives it the right texture.
- Don’t Overmix: When folding in the whipped cream, be gentle. Overmixing can deflate the airiness, resulting in a denser cheesecake.
- Flavor Adjustments: Feel free to taste the filling before chilling. If you want a bolder orange flavor, add a bit more zest or juice. It’s your cheesecake, after all!
- Storage Tips: If you have leftovers (which is rare!), store the cheesecake in the fridge, covered with plastic wrap. It should stay fresh for up to 3 days.
These cooking notes have helped me refine my cheesecake-making skills, and I hope they do the same for you! Each time I make this dessert, I’m reminded of the joy it brings to my family and friends. Now, let’s explore some serving suggestions that will make your No-Bake Vanilla Orange Cheesecake even more delightful!
Serving Suggestions for No-Bake Vanilla Orange Cheesecake
When it comes to serving my No-Bake Vanilla Orange Cheesecake, I love to get a little creative! Presentation can elevate the experience, making it even more special for my guests. Here are some of my favorite serving suggestions that add a touch of flair:
- Garnish with Fresh Fruit: A few slices of fresh orange or a handful of berries on top not only look beautiful but also enhance the flavor. The vibrant colors make the cheesecake pop!
- Drizzle with Sauce: A light drizzle of chocolate or caramel sauce can add a decadent touch. I often use a homemade orange syrup for an extra burst of citrus flavor.
- Serve with Whipped Cream: A dollop of freshly whipped cream on each slice adds a fluffy texture that complements the creamy cheesecake. You can even sprinkle some orange zest on top for a lovely finish.
- Pair with Tea or Coffee: This cheesecake pairs wonderfully with a cup of herbal tea or a rich coffee. The warm beverage balances the cool, creamy dessert perfectly.
- Use Decorative Plates: Serving the cheesecake on colorful or patterned plates can make a simple dessert feel like a gourmet treat. It’s all about the little details!
These serving suggestions not only enhance the visual appeal but also create a delightful experience for everyone at the table. I remember serving this cheesecake at a family gathering, and the smiles on my loved ones’ faces as they took their first bites were priceless. Now, let’s move on to some tips for perfecting your No-Bake Vanilla Orange Cheesecake!
Tips for Perfecting No-Bake Vanilla Orange Cheesecake
As I’ve journeyed through the world of baking, I’ve picked up a few golden nuggets of wisdom that can truly elevate your No-Bake Vanilla Orange Cheesecake. Here are my top tips to ensure your cheesecake turns out perfectly every time:
- Use High-Quality Ingredients: The better the ingredients, the better the cheesecake! Opt for fresh oranges, real vanilla extract, and full-fat cream cheese for a rich flavor.
- Don’t Rush the Chilling: I know it’s tempting to dig in right away, but allowing the cheesecake to chill overnight makes a world of difference. The flavors meld beautifully, creating a harmonious taste.
- Experiment with Flavors: Don’t hesitate to play around with the recipe! Add a splash of orange liqueur for an adult twist or mix in some spices like nutmeg for warmth.
- Check for Doneness: Before serving, gently shake the cheesecake. If it wobbles slightly in the center, it’s ready! If it’s too jiggly, give it more time in the fridge.
- Presentation Matters: A well-presented cheesecake can impress anyone. Use a sharp knife to slice clean pieces, and don’t forget to wipe the knife between cuts for a polished look.
These tips have helped me refine my cheesecake-making skills, and I hope they inspire you to create your own masterpiece. Each time I make this dessert, I’m reminded of the joy it brings to my family and friends. Now, let’s take a look at the breakdown of time for making this delightful No-Bake Vanilla Orange Cheesecake!
Breakdown of Time for No-Bake Vanilla Orange Cheesecake
As a home cook, I know that time management is key in the kitchen. When it comes to making my No-Bake Vanilla Orange Cheesecake, I like to keep track of the time to ensure everything goes smoothly. Here’s a quick breakdown of the time you’ll need for each step:
- Prep Time: 20 minutes
- Chilling Time: 4 hours (or overnight for best results)
- Total Time: 4 hours and 20 minutes (or overnight if you choose to chill it longer)
It’s important to note that while the prep time is relatively short, the chilling time is where the magic happens. I often find myself eagerly waiting for the cheesecake to set, but trust me, it’s worth the wait! The longer it chills, the more the flavors develop, creating that creamy, dreamy texture we all love. So, grab your ingredients, set your timer, and let’s get started on this delicious journey!
Nutritional Information for No-Bake Vanilla Orange Cheesecake
As a passionate home cook, I always find it helpful to know the nutritional information of the dishes I prepare. It allows me to enjoy my creations while being mindful of what I’m serving to my family and friends. Here’s a general breakdown of the nutritional content for a slice of No-Bake Vanilla Orange Cheesecake, assuming the recipe yields 12 slices:
- Calories: Approximately 320 calories
- Fat: 22 grams
- Saturated Fat: 12 grams
- Cholesterol: 70 milligrams
- Sodium: 150 milligrams
- Carbohydrates: 30 grams
- Fiber: 1 gram
- Sugar: 18 grams
- Protein: 4 grams
Keep in mind that these values can vary based on the specific brands of ingredients you use and any optional add-ons you choose to include. For instance, using low-fat cream cheese or a sugar substitute can help reduce calories and fat content. I always encourage my friends to enjoy desserts in moderation, and this cheesecake is no exception. It’s a delightful treat that’s perfect for special occasions or a sweet ending to a lovely meal!
Frequently Asked Questions about No-Bake Vanilla Orange Cheesecake
As I’ve shared my love for No-Bake Vanilla Orange Cheesecake, I often get questions from fellow home cooks eager to try their hand at this delightful dessert. I love answering these queries because it shows just how much excitement there is around this creamy treat! Here are some of the most frequently asked questions I encounter:
Can I use low-fat cream cheese?
Absolutely! While I prefer full-fat cream cheese for its rich flavor and creamy texture, low-fat cream cheese can be a great alternative. Just keep in mind that it may alter the texture slightly, making it a bit less creamy. But hey, it’s still delicious!
How long can I store the cheesecake?
If you have any leftovers (which is rare in my house!), you can store the cheesecake in the refrigerator for up to 3 days. Just make sure to cover it with plastic wrap to keep it fresh. I always find that the flavors get even better after a day or two!
Can I freeze the cheesecake?
Yes, you can freeze the No-Bake Vanilla Orange Cheesecake! Just make sure to wrap it tightly in plastic wrap and then in aluminum foil. It can be stored in the freezer for up to 2 months. When you’re ready to enjoy it, let it thaw in the refrigerator overnight for the best texture.
What can I substitute for graham cracker crumbs?
If you’re looking for a different crust option, you can use crushed cookies like Oreos or digestive biscuits. For a gluten-free version, almond flour or gluten-free graham crackers work wonderfully. The key is to find something that will hold together nicely when mixed with butter.
Can I add other flavors to the cheesecake?
Definitely! This cheesecake is a blank canvas for your creativity. You can add flavors like lemon, lime, or even a splash of almond extract. I’ve tried adding a bit of coconut and it was a hit! Just remember to adjust the sweetness accordingly.
These questions reflect the curiosity and enthusiasm that surrounds this No-Bake Vanilla Orange Cheesecake. I love sharing my experiences and tips, and I hope these answers inspire you to create your own version of this delightful dessert. Now, let’s wrap up our culinary journey with a sweet conclusion!
Conclusion on No-Bake Vanilla Orange Cheesecake
As I reflect on my journey with the No-Bake Vanilla Orange Cheesecake, I can’t help but smile. This dessert is more than just a recipe; it’s a celebration of flavors, memories, and the joy of sharing with loved ones. The creamy texture, combined with the bright notes of orange, creates a delightful experience that lingers long after the last bite.
What I adore most about this cheesecake is its simplicity. With no baking required, it’s a stress-free option for any occasion, whether it’s a summer picnic or a cozy family dinner. Plus, the versatility of the recipe allows you to customize it to your heart’s content, making it a true reflection of your culinary creativity.
So, whether you’re a seasoned home cook or just starting your culinary adventure, I encourage you to give this No-Bake Vanilla Orange Cheesecake a try. It’s a dessert that not only satisfies your sweet tooth but also brings people together. I can’t wait for you to experience the joy it brings, just as it has for me. Happy baking, and may your kitchen be filled with laughter and love!


