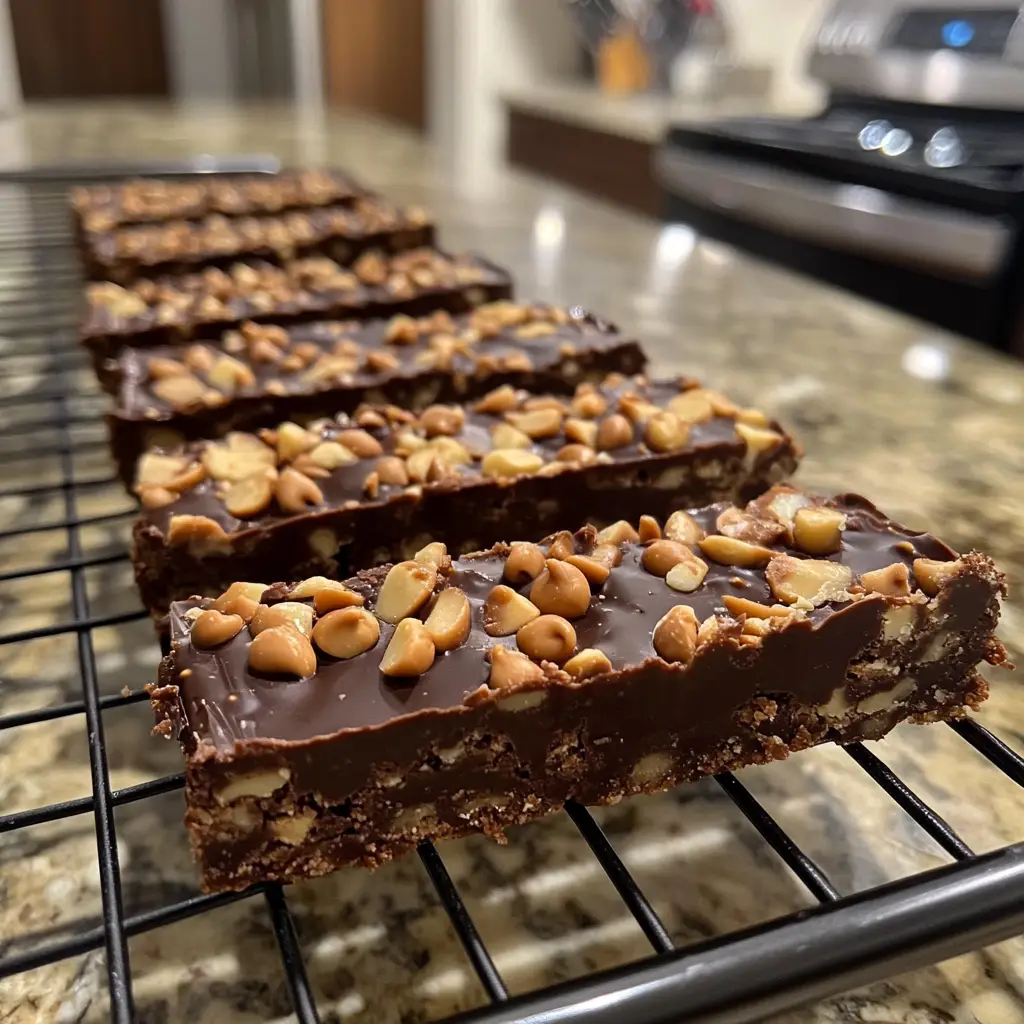
Introduction to No-Bake Chocolate Peanut Butter Bars Recipe
As a passionate home cook, I often find myself on a quest for the perfect dessert that combines simplicity and indulgence. One day, while rummaging through my pantry, I stumbled upon a jar of creamy peanut butter and a bag of rich chocolate chips. It was like a light bulb moment! I knew I had to create something delicious without turning on the oven. That’s when I decided to whip up my favorite No-Bake Chocolate Peanut Butter Bars.
These bars are not just a treat; they are a delightful journey into the world of flavors. The creamy peanut butter layer, paired with a luscious chocolate topping, creates a symphony of taste that dances on your palate. Plus, the best part? You don’t need to bake a single thing! Just mix, layer, and chill. It’s as easy as pie—well, easier, actually!
Every time I make these bars, I’m reminded of the joy of sharing sweet moments with family and friends. Whether it’s a cozy movie night or a summer picnic, these bars are the perfect companion. They’re quick to prepare, and the smiles they bring are worth every minute spent in the kitchen. So, grab your ingredients, and let’s dive into this delightful no-bake adventure together!
Ingredients for No-Bake Chocolate Peanut Butter Bars Recipe
Before we dive into the delightful process of making these No-Bake Chocolate Peanut Butter Bars, let’s gather our ingredients. I always believe that quality matters, so I recommend using the best ingredients you can find. Trust me, it makes a world of difference in flavor!
Main Ingredients
- 1 cup of creamy peanut butter (natural is best for a rich flavor)
- 1 cup of graham cracker crumbs (you can crush them yourself for a fresher taste)
- 1/2 cup of powdered sugar (this adds sweetness and helps bind the bars)
- 1/2 cup of unsweetened cocoa powder (for that deep chocolate flavor)
- 1/2 cup of melted coconut oil (this helps the bars hold together and adds a hint of tropical flavor)
- 1 cup of semi-sweet chocolate chips (for the luscious topping)
Optional Add-ons
- 1/4 cup of chopped nuts (like almonds or walnuts for a crunchy texture)
- 1/4 cup of shredded coconut (for a tropical twist)
- 1 teaspoon of vanilla extract (to enhance the flavors)
- Sea salt (a sprinkle on top can elevate the taste)
Feel free to get creative! I often experiment with different nut butters, like almond or cashew, and they work beautifully too. The beauty of this recipe is its flexibility. You can adjust the sweetness or add your favorite mix-ins. Just remember, the key is to enjoy the process and make it your own!
How to Prepare No-Bake Chocolate Peanut Butter Bars Recipe
Now that we have our ingredients ready, it’s time to roll up our sleeves and get to the fun part—preparing these scrumptious No-Bake Chocolate Peanut Butter Bars! I promise, the process is as enjoyable as the final product. Let’s dive into the steps together!
Step 1: Prepare the Base
First things first, we need to create a solid foundation for our bars. In a large mixing bowl, combine the graham cracker crumbs, powdered sugar, cocoa powder, and melted coconut oil. Mix everything together until it resembles a crumbly dough. It should hold together when pressed.
Tips for Step 1
- For a smoother texture, you can blend the graham crackers in a food processor before mixing.
- Make sure the coconut oil is melted but not too hot; otherwise, it can melt the sugar.
Step 2: Make the Peanut Butter Layer
Next, it’s time to bring in the star of the show—peanut butter! In a separate bowl, mix the creamy peanut butter with a bit of melted coconut oil. This will make it easier to spread. Once combined, fold in any optional add-ons like chopped nuts or vanilla extract for an extra flavor boost.
Tips for Step 2
- If your peanut butter is too thick, warming it slightly in the microwave can help.
- Don’t be shy about tasting the mixture; it’s a great way to ensure it’s just right!
Step 3: Prepare the Chocolate Topping
Now, let’s create that luscious chocolate topping! In a microwave-safe bowl, melt the semi-sweet chocolate chips with a splash of coconut oil. Stir until smooth and glossy. This topping is what makes these bars truly irresistible!
Tips for Step 3
- Be careful not to overheat the chocolate; it can seize up. Heat in short bursts, stirring in between.
- If you want a richer chocolate flavor, consider adding a pinch of sea salt to the melted chocolate.
Step 4: Assemble the Bars
It’s time to bring everything together! In a lined baking dish, press the graham cracker base evenly into the bottom. Then, spread the peanut butter layer on top, smoothing it out with a spatula. Finally, pour the melted chocolate over the peanut butter layer, spreading it evenly to cover.
Tips for Step 4
- Use parchment paper to line your baking dish for easy removal later.
- For a decorative touch, sprinkle some chopped nuts or sea salt on top of the chocolate before it sets.
Step 5: Chill and Set
Now comes the hardest part—waiting! Place the assembled bars in the refrigerator for at least 2 hours, or until they are firm. This chilling time allows all the layers to meld together beautifully.
Tips for Step 5
- If you’re in a hurry, you can pop them in the freezer for about 30 minutes instead.
- Once set, use a sharp knife to cut them into squares or rectangles for serving.
And there you have it! Each step brings you closer to a delightful treat that’s sure to impress. I can’t wait for you to experience the joy of making these No-Bake Chocolate Peanut Butter Bars!
Equipment Needed for No-Bake Chocolate Peanut Butter Bars Recipe
Before we dive into the kitchen, let’s gather the essential tools for making these No-Bake Chocolate Peanut Butter Bars. Having the right equipment can make the process smoother and more enjoyable. Here’s what you’ll need:
- Mixing Bowls: A couple of medium-sized mixing bowls will do the trick. I love using glass bowls because they’re easy to clean and you can see the ingredients mixing together.
- Measuring Cups and Spoons: Accurate measurements are key to achieving the perfect balance of flavors. A set of measuring cups and spoons will ensure you get it just right!
- Spatula: A rubber spatula is perfect for mixing and spreading the layers. It helps you scrape every last bit of that delicious peanut butter mixture!
- Baking Dish: A 9×9 inch square baking dish works best for this recipe. If you don’t have one, any similar-sized dish will work. Just make sure to line it with parchment paper for easy removal.
- Microwave-Safe Bowl: You’ll need this for melting the chocolate. If you prefer, you can also use a double boiler on the stovetop.
- Knife: A sharp knife is essential for cutting the bars into perfect squares once they’re set. A warm knife (run it under hot water) can help make cleaner cuts.
And there you have it! With these simple tools, you’re all set to create your No-Bake Chocolate Peanut Butter Bars. If you’re missing any of these items, don’t worry! You can often find alternatives around the house. Just remember, the most important ingredient is your enthusiasm for cooking!
Variations of No-Bake Chocolate Peanut Butter Bars Recipe
One of the things I love most about my No-Bake Chocolate Peanut Butter Bars is their versatility. You can easily switch things up to suit your taste or to use what you have on hand. Here are a few fun variations that I’ve tried and absolutely adored:
- Nutty Delight: Swap out the creamy peanut butter for crunchy peanut butter or even almond butter. The added texture gives a delightful crunch that pairs beautifully with the chocolate.
- Minty Fresh: Add a few drops of peppermint extract to the peanut butter layer for a refreshing twist. It’s like a chocolate mint dream!
- Fruit Fusion: Mix in some dried fruits like cranberries or raisins into the peanut butter layer. The sweetness of the fruit complements the rich chocolate perfectly.
- Protein Power: For a healthier option, add a scoop of your favorite protein powder to the peanut butter mixture. It’s a great way to sneak in some extra nutrition!
- Spicy Kick: If you’re feeling adventurous, sprinkle a pinch of cayenne pepper into the chocolate topping. It adds a surprising kick that balances the sweetness.
These variations not only keep things exciting but also allow you to personalize the bars to your liking. I encourage you to experiment and find your favorite combination. After all, cooking is all about creativity and having fun in the kitchen!
Cooking Notes for No-Bake Chocolate Peanut Butter Bars Recipe
As I’ve journeyed through the delightful process of making No-Bake Chocolate Peanut Butter Bars, I’ve picked up a few cooking notes that can help you achieve the best results. These little tips can make a big difference in your final product!
- Ingredient Temperature: Make sure your ingredients are at room temperature before mixing. This helps them blend together smoothly, especially the peanut butter and coconut oil.
- Chilling Time: Patience is key! Allowing the bars to chill for the full recommended time ensures they set properly. If you cut them too soon, they might crumble.
- Storage: Store your bars in an airtight container in the refrigerator. They can last up to a week, but I doubt they’ll last that long—they’re just too delicious!
- Serving Size: These bars are rich, so I recommend cutting them into smaller squares. A little goes a long way, and it makes sharing easier!
- Clean-Up: To make clean-up a breeze, soak your mixing bowls and utensils in warm, soapy water right after use. This way, any sticky residue will come off easily.
With these cooking notes in mind, you’ll be well on your way to creating the most scrumptious No-Bake Chocolate Peanut Butter Bars. Enjoy the process, and don’t forget to savor every bite!
Serving Suggestions for No-Bake Chocolate Peanut Butter Bars Recipe
Now that you’ve crafted these delightful No-Bake Chocolate Peanut Butter Bars, it’s time to think about how to serve them! Presentation can elevate your dessert experience, and I love to get a little creative when it comes to serving. Here are some of my favorite serving suggestions:
- Chilled Delight: Serve the bars straight from the refrigerator for a refreshing treat. The coolness enhances the flavors and makes each bite even more satisfying.
- Garnish Galore: Top each bar with a sprinkle of chopped nuts, a drizzle of melted chocolate, or a dusting of cocoa powder. It adds a beautiful touch and makes them look extra tempting!
- Pair with Fresh Fruit: Serve alongside fresh berries or banana slices. The fruity freshness balances the richness of the bars and adds a pop of color to your plate.
- Ice Cream Indulgence: For a decadent dessert, serve a bar on top of a scoop of vanilla or chocolate ice cream. The combination of creamy ice cream and rich chocolate is simply heavenly!
- Perfect for Sharing: Cut the bars into bite-sized pieces and arrange them on a platter for parties or gatherings. They make for a delightful finger food that everyone will love!
These serving suggestions not only enhance the visual appeal but also add layers of flavor to your No-Bake Chocolate Peanut Butter Bars. Whether it’s a cozy night in or a festive celebration, these bars are sure to impress your guests and leave them wanting more!
Tips for Making No-Bake Chocolate Peanut Butter Bars Recipe
As I’ve whipped up countless batches of my No-Bake Chocolate Peanut Butter Bars, I’ve gathered a treasure trove of tips that can help you achieve the best results. These little nuggets of wisdom can make your experience smoother and your bars even more delicious!
- Use Quality Ingredients: The better the ingredients, the better the bars! Opt for high-quality peanut butter and chocolate for a richer flavor.
- Don’t Rush the Chilling: Allow the bars to chill for the full time recommended. This ensures they set properly and hold their shape when cut.
- Experiment with Flavors: Don’t hesitate to try different nut butters or add-ins. Each variation can bring a new twist to your bars!
- Keep It Clean: Use a wet knife to cut the bars for cleaner edges. It makes a world of difference in presentation!
- Store Wisely: Keep your bars in an airtight container in the fridge. They’ll stay fresh and delicious for up to a week—if they last that long!
With these tips in your back pocket, you’re all set to create the most scrumptious No-Bake Chocolate Peanut Butter Bars. Enjoy the process, and remember to have fun in the kitchen!
Breakdown of Time for No-Bake Chocolate Peanut Butter Bars Recipe
As a home cook, I know that time is often of the essence, especially when it comes to preparing desserts. That’s why I love my No-Bake Chocolate Peanut Butter Bars—they’re quick to whip up and perfect for those busy days! Here’s a simple breakdown of the time you’ll need to create these delicious treats:
- Prep Time: 15 minutes – This includes gathering your ingredients, mixing the layers, and assembling the bars. It’s a breeze!
- Chilling Time: 2 hours – This is the hardest part, as you’ll need to wait for the bars to set in the refrigerator. But trust me, it’s worth the wait!
- Total Time: 2 hours and 15 minutes – In just a little over two hours, you’ll have a delightful dessert ready to enjoy!
With such a quick prep time, these No-Bake Chocolate Peanut Butter Bars are perfect for last-minute gatherings or a sweet treat after dinner. I can’t wait for you to experience the joy of making and sharing them!
Nutritional Information for No-Bake Chocolate Peanut Butter Bars Recipe
As a passionate home cook, I always find it helpful to know the nutritional value of the treats I whip up. My No-Bake Chocolate Peanut Butter Bars are not only delicious but also packed with nutrients that can satisfy your sweet tooth without the guilt. Here’s a quick overview of the nutritional information per serving (assuming you cut the bars into 16 pieces):
- Calories: Approximately 180 calories
- Protein: 4 grams
- Carbohydrates: 18 grams
- Fat: 10 grams
- Saturated Fat: 5 grams
- Fiber: 2 grams
- Sugar: 6 grams
These bars provide a good balance of healthy fats from the peanut butter and coconut oil, along with a touch of sweetness from the powdered sugar and chocolate. They can be a great energy boost, especially when you need a quick pick-me-up during the day. Just remember, moderation is key! Enjoy these bars as a delightful treat, and feel good about the wholesome ingredients you’ve used.
Frequently Asked Questions about No-Bake Chocolate Peanut Butter Bars Recipe
As I’ve shared my No-Bake Chocolate Peanut Butter Bars with friends and family, I’ve received quite a few questions about this delightful treat. I love answering these queries because it shows just how much people enjoy this recipe! Here are some of the most frequently asked questions, along with my personal insights:
Can I use natural peanut butter?
Absolutely! In fact, I highly recommend using natural peanut butter. It has a richer flavor and a creamier texture that works beautifully in this recipe. Just make sure to stir it well before using, as natural peanut butter can separate.
How long do these bars last?
When stored in an airtight container in the refrigerator, these bars can last up to a week. However, I doubt they’ll stick around that long—they’re just too delicious! If you want to keep them longer, you can freeze them for up to three months.
Can I make these bars vegan?
Yes, you can easily make these bars vegan! Just ensure that you use dairy-free chocolate chips and check that your peanut butter doesn’t contain any added ingredients that aren’t vegan-friendly. It’s a simple swap that doesn’t compromise on taste!
What can I substitute for graham cracker crumbs?
If you don’t have graham cracker crumbs on hand, don’t worry! You can use crushed digestive biscuits, vanilla wafers, or even oats for a different texture. Each option brings its own unique flavor, so feel free to experiment!
Can I add protein powder to the recipe?
Definitely! Adding a scoop of your favorite protein powder to the peanut butter layer is a fantastic way to boost the nutritional value. It’s a great option for those looking to add some extra protein to their snacks.
How do I cut the bars neatly?
To achieve clean cuts, I recommend using a sharp knife. For an even better result, run the knife under hot water before cutting. This helps the knife glide through the bars without sticking, giving you those perfect squares!
These questions reflect the curiosity and excitement surrounding my No-Bake Chocolate Peanut Butter Bars. I hope my answers inspire you to try making them yourself and enjoy the delightful experience they bring. If you have any more questions, feel free to reach out—I love sharing my culinary adventures!
Conclusion on No-Bake Chocolate Peanut Butter Bars Recipe
In conclusion, my No-Bake Chocolate Peanut Butter Bars are more than just a dessert; they are a celebration of flavors and creativity. With their rich, creamy layers and the delightful crunch of graham crackers, these bars are a perfect treat for any occasion. The best part? They come together in a flash without the need for an oven, making them an ideal choice for busy days or spontaneous gatherings.
Whether you’re sharing them with friends at a picnic or enjoying a quiet evening at home, these bars are sure to bring smiles and satisfaction. Plus, with the flexibility to customize ingredients and flavors, you can make them uniquely yours. So, gather your ingredients, embrace the joy of cooking, and dive into this delicious no-bake adventure. I can’t wait for you to experience the happiness these bars bring—happy cooking!
Frequently Asked Questions about No-Bake Chocolate Peanut Butter Bars Recipe
As I’ve shared my No-Bake Chocolate Peanut Butter Bars with friends and family, I’ve received quite a few questions about this delightful treat. I love answering these queries because it shows just how much people enjoy this recipe! Here are some of the most frequently asked questions, along with my personal insights:
Can I use natural peanut butter?
Absolutely! In fact, I highly recommend using natural peanut butter. It has a richer flavor and a creamier texture that works beautifully in this recipe. Just make sure to stir it well before using, as natural peanut butter can separate.
How long do these bars last?
When stored in an airtight container in the refrigerator, these bars can last up to a week. However, I doubt they’ll stick around that long—they’re just too delicious! If you want to keep them longer, you can freeze them for up to three months.
Can I make these bars vegan?
Yes, you can easily make these bars vegan! Just ensure that you use dairy-free chocolate chips and check that your peanut butter doesn’t contain any added ingredients that aren’t vegan-friendly. It’s a simple swap that doesn’t compromise on taste!
What can I substitute for graham cracker crumbs?
If you don’t have graham cracker crumbs on hand, don’t worry! You can use crushed digestive biscuits, vanilla wafers, or even oats for a different texture. Each option brings its own unique flavor, so feel free to experiment!
Can I add protein powder to the recipe?
Definitely! Adding a scoop of your favorite protein powder to the peanut butter layer is a fantastic way to boost the nutritional value. It’s a great option for those looking to add some extra protein to their snacks.
How do I cut the bars neatly?
To achieve clean cuts, I recommend using a sharp knife. For an even better result, run the knife under hot water before cutting. This helps the knife glide through the bars without sticking, giving you those perfect squares!
These questions reflect the curiosity and excitement surrounding my No-Bake Chocolate Peanut Butter Bars. I hope my answers inspire you to try making them yourself and enjoy the delightful experience they bring. If you have any more questions, feel free to reach out—I love sharing my culinary adventures!
Conclusion on No-Bake Chocolate Peanut Butter Bars Recipe
In wrapping up my journey with No-Bake Chocolate Peanut Butter Bars, I can’t help but feel a sense of joy and satisfaction. These bars are not just a dessert; they are a delightful blend of flavors and textures that come together effortlessly. The creamy peanut butter, rich chocolate, and crunchy graham cracker base create a symphony of taste that is hard to resist.
What truly makes this recipe special is its simplicity. With no baking required, you can whip up these bars in no time, making them perfect for busy days or spontaneous gatherings. Plus, the flexibility to customize ingredients means you can make them uniquely yours, whether you prefer a nutty twist or a fruity addition.
So, whether you’re treating yourself after a long day or sharing them with loved ones, these No-Bake Chocolate Peanut Butter Bars are sure to bring smiles and satisfaction. I encourage you to embrace the joy of cooking and dive into this delicious adventure. Happy baking—well, no-baking!


