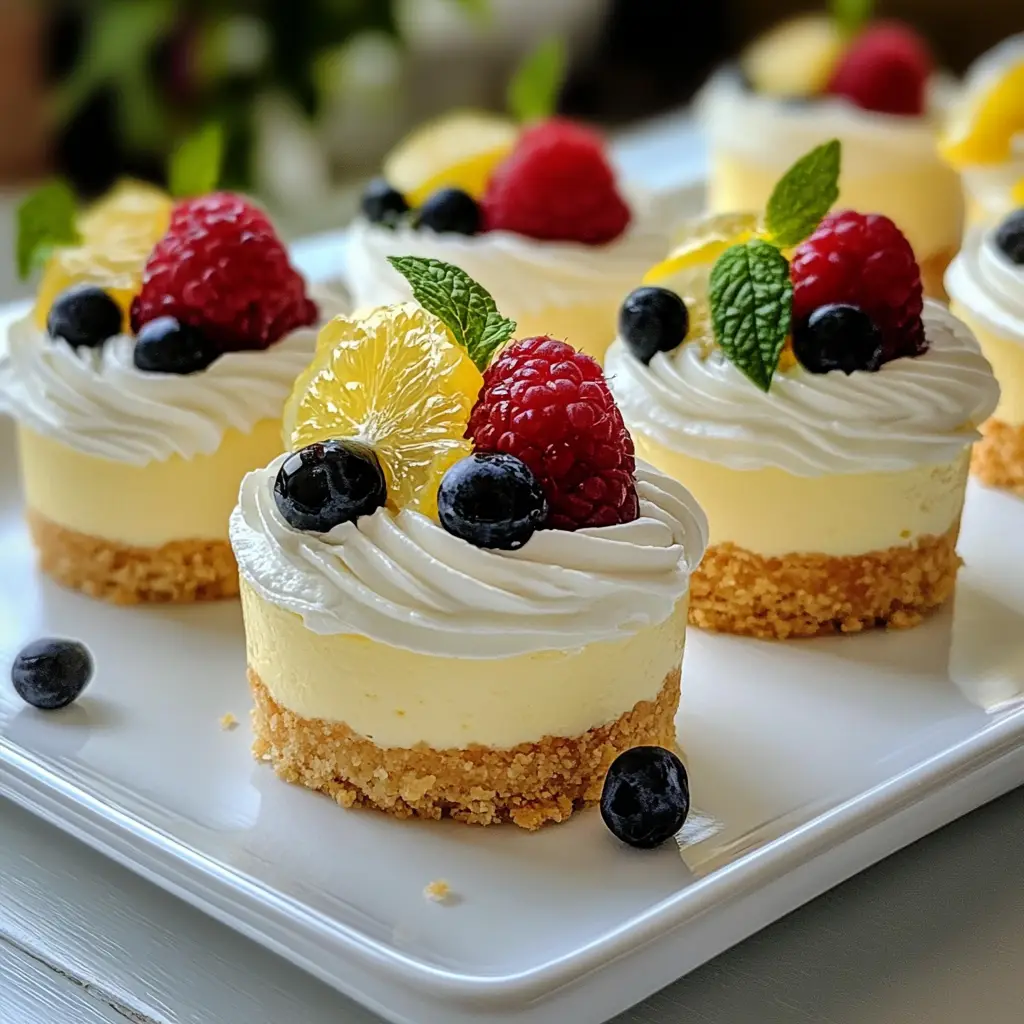
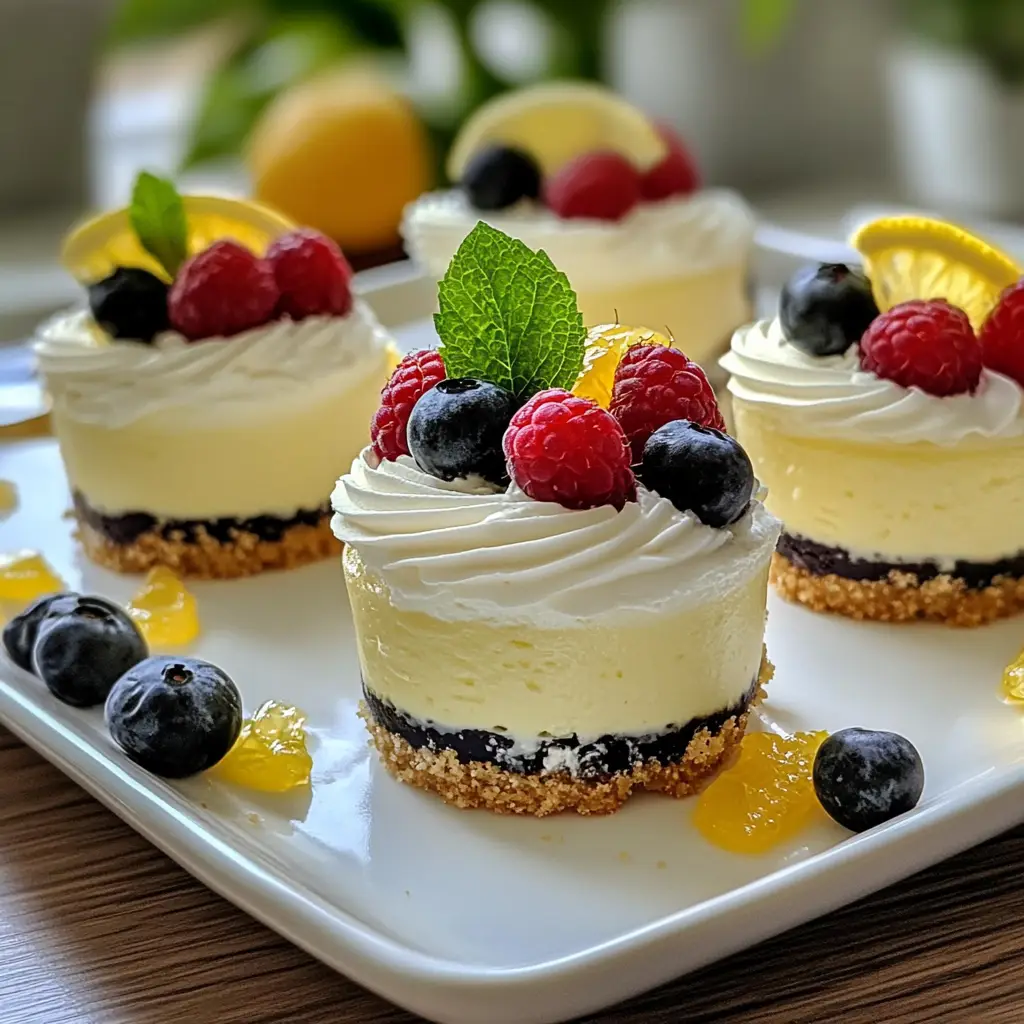
Introduction to Lemon Cheesecake Mousse Cups
As a busy mom, I know how precious time can be, especially when it comes to whipping up a delightful dessert. That’s why I adore these Lemon Cheesecake Mousse Cups! They’re a quick solution for those hectic days when you want to impress your loved ones without spending hours in the kitchen. The creamy texture of cheesecake combined with the zesty brightness of lemon creates a refreshing treat that feels indulgent yet light. Plus, they’re served in individual cups, making them perfect for sharing or enjoying all by yourself. Trust me, these little cups of joy will brighten your day!
Why You’ll Love This Lemon Cheesecake Mousse Cups
These Lemon Cheesecake Mousse Cups are a dream come true for anyone craving a delicious dessert without the fuss. They come together in just 20 minutes, making them perfect for busy evenings or last-minute gatherings. The light, airy texture paired with the tangy lemon flavor is simply irresistible. Plus, they’re no-bake, so you can skip the oven and enjoy a refreshing treat that feels like a special occasion!
Ingredients for Lemon Cheesecake Mousse Cups
Gathering the right ingredients is key to creating these delightful Lemon Cheesecake Mousse Cups. Here’s what you’ll need:
- Cream Cheese: This is the star of the show! Softened cream cheese gives the mousse its rich and creamy texture.
- Heavy Whipping Cream: Whipping cream adds lightness and volume, making the mousse airy and delightful.
- Powdered Sugar: This sweetener dissolves easily, ensuring a smooth and sweet flavor without any graininess.
- Fresh Lemon Juice: The zesty kick! Fresh lemon juice brightens the mousse and balances the sweetness.
- Lemon Zest: This adds an extra layer of lemony goodness, enhancing the flavor profile with its aromatic oils.
- Vanilla Extract: A splash of vanilla rounds out the flavors, adding warmth and depth to the mousse.
- Graham Cracker Crumbs: These are optional but highly recommended for a crunchy topping that mimics traditional cheesecake crust.
For those looking to customize, you can swap out the cream cheese for a dairy-free alternative or use a sugar substitute if you’re watching your sugar intake. The exact quantities for each ingredient are listed at the bottom of the article, ready for you to print and take to the kitchen!
How to Make Lemon Cheesecake Mousse Cups
Now that you have your ingredients ready, let’s dive into the fun part—making these delightful Lemon Cheesecake Mousse Cups! Follow these simple steps, and you’ll have a refreshing dessert that’s sure to impress.
Step 1: Prepare the Cream Cheese Mixture
Start by placing your softened cream cheese in a mixing bowl. Using an electric mixer, beat it until it’s smooth and creamy. This step is crucial because a well-beaten cream cheese ensures a velvety texture in your mousse. No one wants a lumpy dessert, right?
Step 2: Combine Ingredients
Next, add the powdered sugar, fresh lemon juice, lemon zest, and vanilla extract to the cream cheese. Mix everything together until it’s well combined. The mixture should be smooth and creamy, with a lovely lemony aroma wafting through your kitchen. This is where the magic begins!
Step 3: Whip the Cream
In a separate bowl, pour in the heavy whipping cream. Using a clean mixer, whip the cream until stiff peaks form. This is key for achieving that light and airy texture in your mousse. When you lift the beaters, the cream should hold its shape beautifully. It’s like a fluffy cloud waiting to be folded into your mixture!
Step 4: Fold the Mixtures Together
Now comes the gentle part. Carefully fold the whipped cream into the cream cheese mixture. Use a spatula and be gentle to avoid deflating the whipped cream. You want to keep that lightness! The goal is to create a harmonious blend of flavors and textures that will make your mousse irresistible.
Step 5: Chill the Mousse
Once everything is combined, it’s time to divide the mousse into individual cups. Cover them with plastic wrap and pop them in the refrigerator for at least 2 hours. Chilling is essential, as it allows the mousse to set and develop its flavors. Patience is a virtue, my friends!
Step 6: Serve and Enjoy
When you’re ready to serve, take the cups out of the fridge. Top each one with a sprinkle of graham cracker crumbs and a bit of extra lemon zest for that finishing touch. It’s like a little party on top of your mousse! Now, dig in and enjoy every creamy, zesty bite of your Lemon Cheesecake Mousse Cups!
Tips for Success
- Make sure your cream cheese is at room temperature for easy mixing.
- Use fresh lemon juice and zest for the best flavor—bottled versions just don’t compare!
- Don’t rush the chilling process; it’s crucial for the mousse to set properly.
- For a fun twist, try adding a splash of limoncello to the mixture.
- Feel free to experiment with toppings like fresh berries or whipped cream!
Equipment Needed
- Mixing Bowls: Use medium and large bowls; glass or stainless steel works great.
- Electric Mixer: A hand mixer is perfect, but a whisk can work if you’re feeling strong!
- Spatula: A silicone spatula is ideal for folding ingredients without deflating the whipped cream.
- Measuring Cups and Spoons: Essential for accurate ingredient measurements.
- Individual Cups: Any small cups or jars will do; get creative with what you have!
Variations
- Berry Bliss: Add a layer of fresh berries like strawberries or blueberries between the mousse layers for a fruity twist.
- Chocolate Lovers: Swirl in some melted dark chocolate into the mousse for a rich chocolate-lemon combination.
- Gluten-Free Option: Use gluten-free graham crackers or crushed nuts for the topping to keep it gluten-free.
- Vegan Version: Substitute cream cheese with a vegan cream cheese alternative and use coconut cream instead of heavy cream.
- Herbal Infusion: Experiment with adding a hint of fresh mint or basil to the mousse for a refreshing herbal note.
Serving Suggestions
- Pair your Lemon Cheesecake Mousse Cups with a refreshing iced tea or lemonade for a delightful summer treat.
- Serve alongside fresh fruit like strawberries or raspberries to enhance the flavors.
- For a beautiful presentation, garnish with mint leaves or edible flowers.
- Consider serving on a colorful platter for a festive touch at gatherings.
FAQs about Lemon Cheesecake Mousse Cups
Can I make Lemon Cheesecake Mousse Cups in advance?
Absolutely! These mousse cups can be made a day in advance. Just store them in the refrigerator until you’re ready to serve. This makes them a perfect dessert for busy days or gatherings!
How long do leftovers last?
If you have any leftovers, they can be stored in the refrigerator for up to 3 days. Just make sure to cover them well to keep them fresh and delicious!
Can I use bottled lemon juice instead of fresh?
While you can use bottled lemon juice, I highly recommend fresh lemon juice for the best flavor. The brightness and zestiness of fresh lemons truly elevate the taste of your Lemon Cheesecake Mousse Cups!
What can I use instead of graham cracker crumbs?
If you’re looking for alternatives, crushed cookies like digestive biscuits or even crushed nuts can work beautifully as a topping. They add a nice crunch and flavor to your mousse cups!
Is this recipe suitable for gluten-free diets?
Yes! Simply use gluten-free graham crackers or skip the crust altogether. The mousse itself is naturally gluten-free, making it a delightful treat for everyone!
Final Thoughts
Creating these Lemon Cheesecake Mousse Cups is more than just making a dessert; it’s about bringing joy to your table. The light, creamy texture and zesty flavor make every bite a celebration. Whether you’re sharing them with family or enjoying a quiet moment to yourself, these cups are sure to brighten your day. Plus, the ease of preparation means you can whip them up even on the busiest of days. So, gather your ingredients, embrace the process, and let the delightful flavors of lemon and cheesecake bring a smile to your face. Happy cooking!
PrintLemon Cheesecake Mousse Cups: A Chill Dessert Delight!
- Total Time: 2 hours 20 minutes
- Yield: 4 servings 1x
- Diet: Vegetarian
Description
Lemon Cheesecake Mousse Cups are a light and refreshing dessert that combines the creamy texture of cheesecake with the zesty flavor of lemon, served in individual cups for a delightful treat.
Ingredients
- 8 oz cream cheese, softened
- 1 cup heavy whipping cream
- 1/2 cup powdered sugar
- 1/4 cup fresh lemon juice
- 1 tablespoon lemon zest
- 1 teaspoon vanilla extract
- Graham cracker crumbs (for topping)
Instructions
- In a mixing bowl, beat the softened cream cheese until smooth.
- Add the powdered sugar, lemon juice, lemon zest, and vanilla extract, and mix until well combined.
- In a separate bowl, whip the heavy cream until stiff peaks form.
- Gently fold the whipped cream into the cream cheese mixture until fully incorporated.
- Divide the mousse into individual cups and refrigerate for at least 2 hours to set.
- Before serving, top with graham cracker crumbs and additional lemon zest if desired.
Notes
- For a stronger lemon flavor, increase the amount of lemon juice and zest.
- This dessert can be made a day in advance for convenience.
- Store any leftovers in the refrigerator for up to 3 days.
- Prep Time: 20 minutes
- Cook Time: 0 minutes
- Category: Dessert
- Method: No-Bake
- Cuisine: American
Nutrition
- Serving Size: 1 cup
- Calories: 320
- Sugar: 18g
- Sodium: 150mg
- Fat: 25g
- Saturated Fat: 15g
- Unsaturated Fat: 8g
- Trans Fat: 0g
- Carbohydrates: 30g
- Fiber: 1g
- Protein: 4g
- Cholesterol: 80mg
Keywords: Lemon Cheesecake Mousse Cups, dessert, no-bake cheesecake, lemon dessert