Introduction to Island Charcuterie Platter
As a passionate home cook, I find joy in creating dishes that not only taste amazing but also tell a story. The Island Charcuterie Platter is one of those delightful creations that brings a slice of paradise right to your dining table. Picture this: a vibrant spread of colorful fruits, savory meats, and creamy cheeses, all artfully arranged to resemble a tropical getaway. It’s like a mini-vacation for your taste buds!
My love for charcuterie began during a family trip to a quaint little island. We stumbled upon a charming café that served the most exquisite platter I had ever seen. The combination of local cheeses, fresh fruits, and artisanal meats was a feast for the eyes and the palate. I remember savoring each bite while the gentle ocean breeze danced around us. That experience ignited my passion for creating my own charcuterie boards at home, and the Island Charcuterie Platter became my signature dish.
What I adore about this platter is its versatility. You can customize it to suit any occasion, whether it’s a casual get-together with friends or a festive holiday gathering. Plus, it’s a fantastic way to showcase seasonal ingredients. I often find myself wandering through local farmers’ markets, searching for the freshest produce to include. The vibrant colors and textures of the ingredients make the platter not just a meal, but a work of art.
In this article, I’ll guide you through the process of creating your very own Island Charcuterie Platter. From selecting the perfect base to arranging the ingredients, I’ll share my tips and tricks to help you craft a stunning display that will impress your guests. So, roll up your sleeves, and let’s embark on this culinary adventure together!
Ingredients for Island Charcuterie Platter
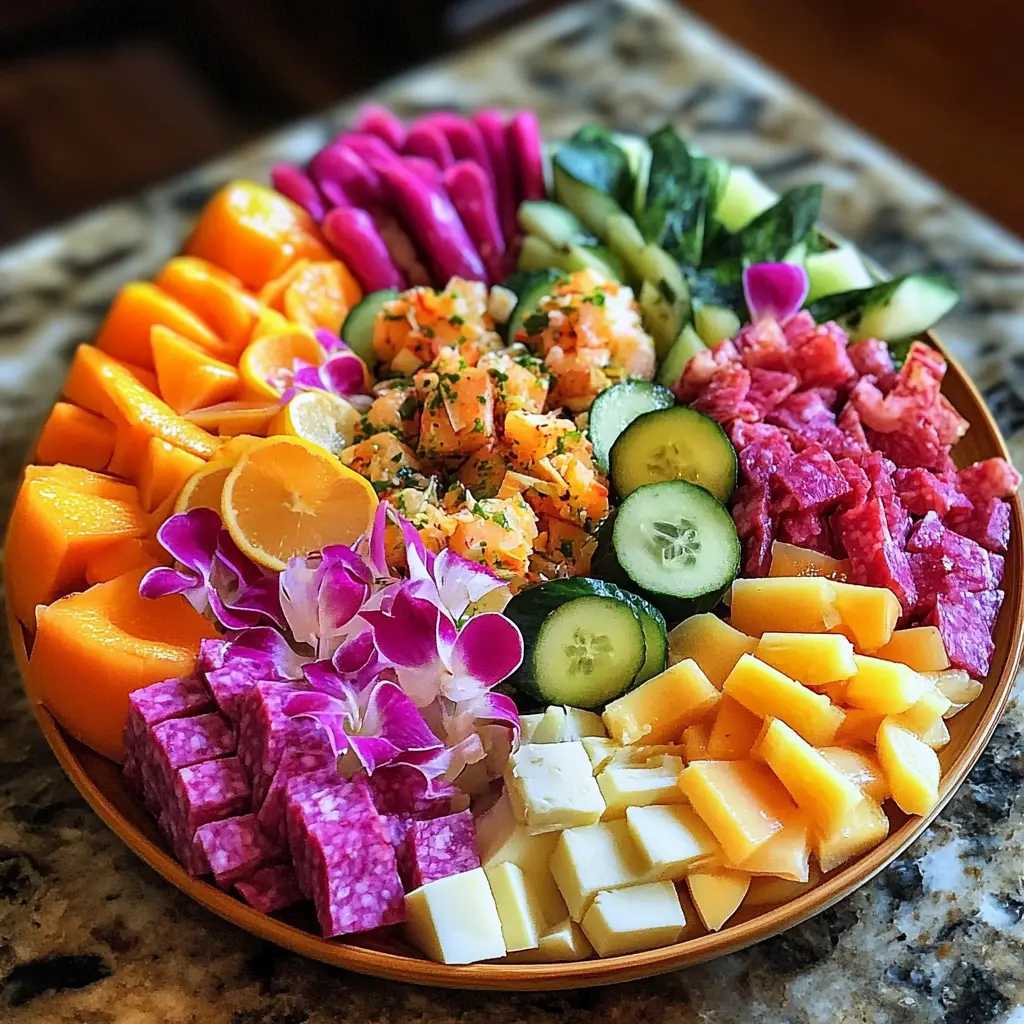
Creating the perfect Island Charcuterie Platter starts with selecting the right ingredients. I always believe that quality matters, so I make it a point to source fresh, local produce whenever possible. Here’s a detailed list of what you’ll need to bring this tropical delight to life.
Main Ingredients
- Assorted Meats: 200g each of prosciutto, salami, and smoked turkey. These meats add a savory depth to your platter.
- Cheeses: 150g each of aged cheddar, creamy brie, and tangy goat cheese. The variety of textures and flavors will keep your guests coming back for more.
- Fresh Fruits: 1 cup of sliced mango, 1 cup of pineapple chunks, and 1 cup of strawberries. These fruits not only add sweetness but also a burst of color.
- Nuts: 100g of mixed nuts, such as almonds and cashews. They provide a delightful crunch and a nutty flavor.
- Crackers: 1 box of assorted crackers. Choose a mix of flavors to complement the cheeses and meats.
- Olives: 100g of mixed olives for a briny contrast. They add a Mediterranean flair to your platter.
Optional Add-ons
- Spreads: Consider adding a small bowl of honey or fig jam for a sweet touch. These spreads can elevate the flavors of your cheeses.
- Herbs: Fresh mint or basil leaves can be used as garnishes. They not only look beautiful but also add a refreshing aroma.
- Vegetables: Sliced cucumbers or cherry tomatoes can be a great addition for a crunchy texture.
- Seasonal Fruits: Depending on the time of year, you might want to include seasonal fruits like figs or pomegranates for a unique twist.
When selecting your ingredients, I recommend visiting local farmers’ markets or specialty stores. The freshness of the produce can make a world of difference in flavor. Plus, supporting local vendors is always a win-win! Now that we have our ingredients ready, let’s move on to the fun part—preparing the Island Charcuterie Platter!
How to Prepare Island Charcuterie Platter
Now that we have our ingredients ready, it’s time to dive into the fun part—preparing the Island Charcuterie Platter! I love this stage because it allows me to unleash my creativity. Each step is like painting a canvas, and I can’t wait to share my process with you. Let’s get started!
Step 1: Selecting the Base
The first step in creating your Island Charcuterie Platter is choosing the right base. This is where all your delicious ingredients will come together. I often use a large wooden cutting board or a beautiful serving platter. The natural wood adds a rustic charm that complements the vibrant colors of the food.
Tips for Choosing the Right Board
- Opt for a board that’s big enough to hold all your ingredients without feeling cramped. You want to create a spacious layout.
- Consider using a round board for a more casual feel or a rectangular one for a more formal presentation.
- If you don’t have a wooden board, a large ceramic or glass platter works just as well!
Step 2: Arranging the Meats
Next up, it’s time to arrange the meats. I like to start with the meats because they often serve as the foundation of the platter. Lay them out in a way that invites your guests to dig in. I usually fold the slices of prosciutto and salami into elegant shapes, which adds a touch of flair.
Tips for Meat Presentation
- Try to create a variety of shapes and sizes. This adds visual interest and makes the platter more inviting.
- Group similar meats together, but don’t be afraid to mix them up a bit for a more casual look.
- Leave some space between the meats for the other ingredients to shine!
Step 3: Adding Cheeses
Now, let’s bring in the cheeses! I love how the creamy textures and rich flavors of the cheeses complement the savory meats. I usually cut the cheeses into wedges or cubes, making them easy for guests to grab. I like to place the cheeses near the meats to create a harmonious pairing.
Tips for Cheese Pairing
- Consider the flavor profiles. Pair a strong cheese like aged cheddar with a milder meat like smoked turkey.
- Don’t forget to include a soft cheese like brie, which adds a creamy contrast to the platter.
- Label the cheeses if you have a variety, so your guests know what they’re enjoying!
Step 4: Incorporating Fruits and Nuts
Fruits and nuts are the stars of the show when it comes to adding color and texture. I love to scatter the fruits around the meats and cheeses, creating a vibrant rainbow effect. The sweetness of the fruits balances the savory flavors beautifully.
Tips for Seasonal Selections
- Choose fruits that are in season for the best flavor. Fresh berries in summer or apples in fall can elevate your platter.
- Mix different textures—juicy fruits like mango and crunchy nuts like almonds create a delightful contrast.
- Don’t be afraid to get creative! Use cookie cutters to shape fruits into fun designs.
Step 5: Final Touches with Spreads and Garnishes
Finally, it’s time for the finishing touches! Adding spreads and garnishes can take your Island Charcuterie Platter to the next level. I love to include a small bowl of honey or fig jam for a sweet dip. Fresh herbs like mint or basil can also add a pop of color and aroma.
Tips for Flavor Enhancements
- Place spreads in small bowls to keep things tidy and organized.
- Use herbs not just for decoration, but also to enhance the flavors of the cheeses and meats.
- Consider adding a sprinkle of sea salt or a drizzle of olive oil for an extra touch of flavor.
And there you have it! Your Island Charcuterie Platter is now ready to impress. I can’t wait for you to experience the joy of creating this beautiful spread. It’s not just about the food; it’s about the memories you’ll make while sharing it with loved ones.
Equipment Needed for Island Charcuterie Platter
Creating an Island Charcuterie Platter is a delightful experience, and having the right equipment can make the process even smoother. Here’s a quick rundown of the essentials I use when crafting my platter, along with some alternatives if you don’t have the exact items on hand.
- Cutting Board or Serving Platter: A large wooden cutting board is my go-to. It adds a rustic charm and provides ample space. If you don’t have one, a ceramic or glass platter works just as well!
- Cheese Knives: A set of cheese knives is handy for slicing and serving different types of cheese. If you’re in a pinch, a regular butter knife can do the trick.
- Small Bowls: I like to use small bowls for spreads like honey or fig jam. If you don’t have bowls, you can use ramekins or even small cups.
- Serving Utensils: Tongs or small forks are great for serving meats and cheeses. If you’re short on utensils, just use toothpicks for easy grabbing!
- Cookie Cutters (Optional): If you want to get creative with your fruits, cookie cutters can help you shape them into fun designs. But don’t worry if you don’t have any; simply slicing the fruits works perfectly fine!
With these tools at your disposal, you’ll be well-equipped to create a stunning Island Charcuterie Platter. Remember, it’s all about enjoying the process and having fun while you create something beautiful for your friends and family!
Variations of Island Charcuterie Platter
One of the things I love most about the Island Charcuterie Platter is its incredible versatility. You can easily switch things up to suit your taste or the season. Here are a few variations that I’ve tried and absolutely adored!
- Seafood Charcuterie: For a coastal twist, consider adding smoked salmon, shrimp cocktail, or even crab dip. Pair these with cream cheese and capers for a refreshing ocean-inspired platter.
- Vegetarian Delight: If you’re catering to vegetarians, load up on a variety of cheeses, roasted vegetables, and a selection of dips like hummus or baba ganoush. Fresh herbs and edible flowers can add a beautiful touch!
- Sweet and Savory: Create a dessert charcuterie by including dark chocolate, assorted nuts, and dried fruits. Add some honey drizzles and a selection of cheeses for a delightful balance of flavors.
- Global Flavors: Explore international ingredients! Incorporate Spanish chorizo, French brie, Italian olives, and Greek feta. This variation can take your guests on a culinary journey around the world.
These variations not only keep things exciting but also allow you to cater to different dietary preferences. I love experimenting with new combinations, and I encourage you to do the same! The possibilities are endless, and that’s what makes the Island Charcuterie Platter such a fun and creative dish to prepare.
Cooking Notes for Island Charcuterie Platter
When it comes to crafting the perfect Island Charcuterie Platter, a few cooking notes can make all the difference. I’ve learned some valuable tips along the way that I’d love to share with you!
- Temperature Matters: Always serve your cheeses at room temperature. This allows their flavors to shine. I usually take them out of the fridge about 30 minutes before serving.
- Balance is Key: Aim for a balance of flavors and textures. Combine salty meats with sweet fruits and creamy cheeses for a delightful experience. It’s like a symphony of tastes!
- Prep Ahead: You can prepare many components in advance. Slice your cheeses and meats the day before, and store them in airtight containers. This saves time on the day of your gathering.
- Keep It Fresh: If you’re using fresh herbs or fruits, add them just before serving to maintain their vibrant colors and flavors. This little touch can elevate your platter’s presentation.
- Don’t Overcrowd: While it’s tempting to fill every inch of your board, leaving some space allows each ingredient to stand out. It also makes it easier for guests to serve themselves.
These cooking notes have helped me create stunning platters that not only look beautiful but also taste incredible. Remember, the joy of cooking comes from experimenting and finding what works best for you. Happy plating!
Serving Suggestions for Island Charcuterie Platter
When it comes to serving your Island Charcuterie Platter, presentation is everything! I love to create an inviting atmosphere that encourages guests to dig in and enjoy. Here are some of my favorite serving suggestions that can elevate your platter experience:
- Pair with Refreshing Beverages: A chilled glass of white wine or a tropical cocktail complements the flavors beautifully. I often serve a fruity sangria or a light spritzer to enhance the island vibe.
- Include Small Plates and Napkins: Providing small plates and napkins makes it easy for guests to serve themselves. I like to use colorful napkins that match the vibrant colors of the platter.
- Set Up a Tasting Station: If you’re hosting a gathering, consider setting up a tasting station where guests can sample different combinations of meats, cheeses, and fruits. It adds an interactive element to the experience!
- Garnish with Fresh Herbs: A sprinkle of fresh herbs like mint or basil not only adds a pop of color but also enhances the aroma. I love to place a few sprigs around the platter for that extra touch.
- Encourage Pairing Adventures: Invite your guests to experiment with different pairings. For example, they can try a slice of brie with a piece of mango or a piece of salami with a drizzle of honey. It’s all about exploring flavors!
These serving suggestions can transform your Island Charcuterie Platter into a delightful centerpiece for any gathering. Remember, it’s all about creating a warm and inviting atmosphere where everyone can enjoy the delicious flavors together. Happy serving!
Tips for Creating the Perfect Island Charcuterie Platter
Creating the perfect Island Charcuterie Platter is an art, and I’ve gathered some tips over the years that can help you elevate your presentation and flavor combinations. Here’s what I’ve learned through my culinary adventures:
- Color is Key: Aim for a vibrant mix of colors. The more colorful your platter, the more inviting it will be. Think bright fruits, rich cheeses, and deep-hued meats. It’s like painting a beautiful picture!
- Texture Variety: Combine different textures for a delightful experience. Pair creamy cheeses with crunchy nuts and juicy fruits. This contrast keeps every bite exciting!
- Seasonal Ingredients: Use seasonal ingredients for the freshest flavors. I love to change my platter based on what’s available at the farmers’ market. It keeps things interesting and supports local farmers!
- Personal Touch: Add a personal touch by including your favorite ingredients or family recipes. Maybe a special dip or a unique cheese that holds a memory for you. It makes the platter even more special.
- Don’t Stress! Remember, the goal is to enjoy the process. If things don’t look perfect, that’s okay! The joy of sharing good food with loved ones is what truly matters.
With these tips in mind, you’ll be well on your way to creating a stunning Island Charcuterie Platter that will impress your guests and make your gatherings unforgettable. Happy plating!
Breakdown of Time for Island Charcuterie Platter
When it comes to preparing the Island Charcuterie Platter, time management is key. I’ve found that knowing how long each step takes can help you plan better and enjoy the process even more. Here’s a quick breakdown of the time you’ll need:
- Prep Time: Approximately 30 minutes. This includes gathering your ingredients, slicing meats and cheeses, and arranging everything on your board.
- Cooking Time: None! The beauty of a charcuterie platter is that it requires no cooking. It’s all about assembling fresh ingredients.
- Total Time: About 30 minutes. With a little organization, you can have your stunning platter ready in no time!
With this time breakdown, you can easily fit the preparation of your Island Charcuterie Platter into your schedule. Whether it’s for a casual gathering or a special occasion, you’ll be ready to impress your guests with minimal fuss. Happy assembling!
Nutritional Information for Island Charcuterie Platter
As a passionate home cook, I always keep an eye on the nutritional aspects of my dishes, even when they’re as delightful as an Island Charcuterie Platter. While this platter is a feast for the eyes and taste buds, it’s also important to consider what we’re putting on our plates. Here’s a general overview of the nutritional information for a serving of this vibrant platter:
- Calories: Approximately 350-450 calories per serving, depending on the specific ingredients and portion sizes.
- Protein: Around 15-20 grams, thanks to the assorted meats and cheeses, which provide a satisfying protein boost.
- Fat: Approximately 25-30 grams, primarily from the cheeses, nuts, and meats. While some of this is healthy fat, moderation is key.
- Carbohydrates: About 30-40 grams, mainly from the fruits and crackers. These provide a nice balance of energy and sweetness.
- Fiber: Roughly 3-5 grams, thanks to the fruits, nuts, and any vegetables you might include. Fiber is essential for digestion!
- Vitamins and Minerals: A good source of vitamins A and C from the fruits, along with calcium from the cheeses and healthy fats from the nuts.
Keep in mind that these values can vary based on the specific ingredients you choose and how you arrange your platter. I love to mix and match to create a balance that suits my taste and dietary preferences. Enjoying this platter in moderation can be a delicious and nutritious addition to your gatherings!
Frequently Asked Questions about Island Charcuterie Platter
As I’ve shared my love for the Island Charcuterie Platter, I often get questions from fellow home cooks eager to create their own stunning displays. Here are some of the most frequently asked questions, along with my personal insights to help you on your culinary journey!
What types of meats work best for a charcuterie platter?
When it comes to meats, I love using a mix of flavors and textures. Prosciutto, salami, and smoked turkey are my go-to choices. They offer a delightful balance of savory and rich flavors. You can also experiment with other options like chorizo or pepperoni for a spicy kick!
Can I make a charcuterie platter ahead of time?
Absolutely! I often prepare my meats and cheeses a day in advance. Just store them in airtight containers in the fridge. However, I recommend adding fresh fruits and herbs right before serving to keep them vibrant and fresh. This way, you can enjoy the process without feeling rushed!
How do I choose the right cheeses for my platter?
Choosing cheeses is one of my favorite parts! I like to include a variety of textures and flavors. Aged cheddar, creamy brie, and tangy goat cheese create a delightful mix. Aim for a balance of soft, hard, and blue cheeses to keep things interesting. Don’t forget to consider your guests’ preferences too!
What can I use instead of crackers?
If you want to switch things up, there are plenty of alternatives to crackers! Sliced baguette, breadsticks, or even vegetable sticks like cucumber and bell peppers can be great options. They add a nice crunch and can be paired beautifully with cheeses and spreads.
How can I make my platter more visually appealing?
Presentation is key! I love to arrange my ingredients in a way that creates a colorful and inviting display. Use a variety of shapes and sizes, and don’t be afraid to leave some space between items. Adding fresh herbs or edible flowers can also enhance the visual appeal. Remember, it’s all about creating a feast for the eyes!
Can I cater to dietary restrictions with my charcuterie platter?
Definitely! I often create variations to accommodate different dietary needs. For vegetarians, I load up on cheeses, nuts, and roasted vegetables. For gluten-free options, I skip the crackers and focus on fruits, nuts, and meats. It’s all about being creative and thoughtful in your selections!
These FAQs reflect some of the common queries I encounter while sharing my passion for the Island Charcuterie Platter. I hope these answers inspire you to create your own beautiful spread and enjoy the process of bringing people together through food!
Conclusion on Island Charcuterie Platter
Creating an Island Charcuterie Platter is more than just assembling food; it’s about crafting an experience that brings people together. The vibrant colors, diverse flavors, and delightful textures make it a feast for both the eyes and the palate. I love how this platter can be tailored to suit any occasion, whether it’s a casual gathering with friends or a festive celebration with family.
What truly makes the Island Charcuterie Platter special is its versatility. You can mix and match ingredients based on the season or your guests’ preferences, ensuring that every platter is unique. Plus, it’s a fantastic way to showcase local produce and artisanal products, supporting your community while enjoying delicious food.
As you embark on your own culinary adventure, remember that the joy of cooking lies in the creativity and love you pour into each dish. So, gather your favorite ingredients, invite your loved ones, and let the Island Charcuterie Platter be the centerpiece of your next gathering. I can’t wait for you to experience the joy and satisfaction that comes from sharing this beautiful creation with those you cherish!


