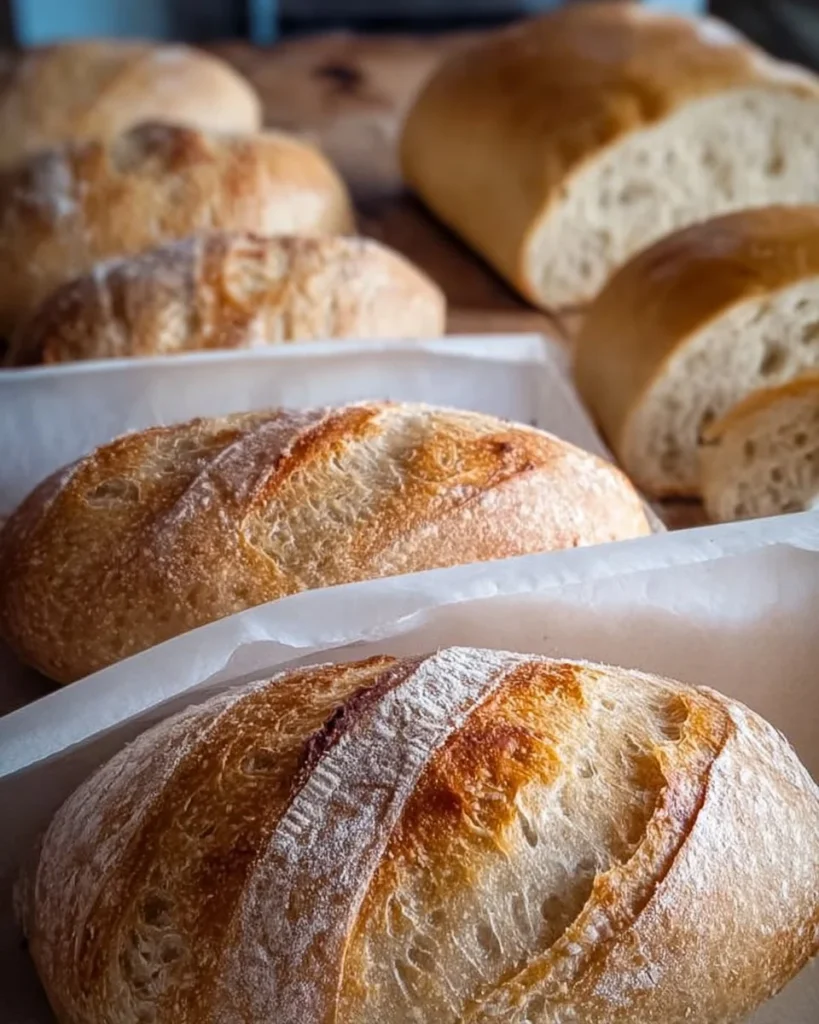
As you open the oven door, a tide of warm air envelops you, carrying the irresistible scent of freshly baked bread. The golden-brown crust of mini sourdough loaves crackles lightly as they cool on the countertop, beckoning with a promise of flavor and comfort. The tender crumb inside reveals an airy texture that whispers to be slathered in butter or dipped into savory olive oil. Each bite delivers a symphony of tangy notes from the sourdough starter, harmonizing beautifully with the slight sweetness embedded in the dough. You can almost taste the love and patience woven into each miniature creation.
Imagine slicing into these adorable loaves, revealing a chewy crust that gives way to a soft, pillow-like interior. The crust crumbles lightly, and the wonderful aroma permeates your kitchen, wrapping around you like a warm hug. Whether you’re enjoying them for breakfast, lunch, or dinner, homemade mini sourdough loaves elevate any meal from ordinary to extraordinary. Each loaf captures the spirit of artisanal baking right in your home, allowing you to experience the joy of crafting this timeless favorite.
Why You’ll Love This Homemade Mini Sourdough Loaves
Homemade mini sourdough loaves are a celebration of simplicity and flavor. The tartness of the sourdough balances perfectly with the hint of sweetness from the sugar, creating a taste that feels both rustic and refined. These little beauties stand out on any dining table, making them the ideal accompaniment for gatherings with friends, cozy family dinners, or solo moments of indulgence.
The beauty of these loaves lies not only in their delightful taste but also in their versatility. Serve them alongside soups and stews, toast them for breakfast, or enjoy them straight out of the oven with a smear of butter. Their adorable size makes them perfect for sharing, allowing everyone to savor their own personal loaf, bursting with flavor. Plus, the satisfaction of creating something so wonderful from scratch is an experience that fuels your spirit long after the last crumb has been savored.
Preparation Phase & Tools to Use
Before embarking on this sourdough adventure, gather a few essential tools that will help you achieve baking perfection:
- Mixing Bowl: A large bowl allows ample room for mixing your ingredients and brings life to your dough as it develops.
- Dough Scraper: This handy tool assists in kneading and dividing your dough, ensuring shape integrity without ruining your beautiful creations.
- Kitchen Towel: Keep your dough covered with a towel for optimal rising. The warmth it retains helps encourage fermentation.
- Baking Sheet: Line your baking sheet with parchment paper for effortless removal of your baked loaves without loss of that glorious crust.
- Instant Read Thermometer: Ensures that your loaves have reached the perfect internal temperature.
Preparation tips to keep in mind:
- Ensure your sourdough starter is bubbly and active. This will give your loaves their signature tang and airy structure.
- Warm water is key; it helps activate the yeast and encourages fermentation.
Ingredients for Homemade Mini Sourdough Loaves
- 1 cup sourdough starter: This healthy mix of flour and water is the heart of your loaf, providing necessary acidity and flavor. Make sure it’s fed and bubbly for the best results.
- 1 cup warm water: The warmth gently nurtures your starter, facilitating a successful rise.
- 3 cups all-purpose flour: This provides structure and strength. You can substitute whole wheat flour for a nuttier flavor profile.
- 1 teaspoon salt: Enhances flavor and controls yeast activity, ensuring you don’t rise too quickly.
- 1 tablespoon sugar: Adds a touch of sweetness that balances the tang of the sourdough ethos.
How to Make Homemade Mini Sourdough Loaves
-
In a large bowl, mix the sourdough starter and warm water until combined and bubbly. This mixture acts like a dance floor where the flavors come alive.
-
Gradually add flour, salt, and sugar to the bowl. Using a wooden spoon or your hands, stir until the dough begins to take shape, feeling the texture transform as you combine the ingredients.
-
Knead the dough on a lightly floured surface for about 10 minutes. Working the dough builds gluten, giving it that desirable elasticity and strength.
-
Place the kneaded dough in a lightly greased bowl. Cover it with a kitchen towel and let it rise in a warm space for about 4–6 hours, or until it doubles in size. Patience is key, as the dough works its magic.
-
Preheat your oven to 450°F (230°C), preparing the perfect environment for those mini loaves to rise and brown beautifully.
-
Divide the dough into small portions, shaping each into a mini loaf. Feel the warmth and pliability of the dough as you mold it, making it truly yours.
-
Arrange the loaves on a baking sheet lined with parchment paper, granting them enough space to grow as they bake.
-
Let the mini loaves rest for about 30 minutes while you set the stage for their grand performance in the oven.
-
Bake in the preheated oven for 20–25 minutes, until they turn a gorgeous golden brown and sound hollow when tapped on the bottom. The aroma will have you salivating in anticipation.
-
Allow the loaves to cool on a wire rack before slicing. This helps the texture set, ensuring you enjoy every bit of that inviting crumb.
Chef’s Notes & Helpful Tips
- Make-ahead Tips: You can prepare your sourdough starter a day in advance for peak performance, and store the dough in the refrigerator after the bulk rise. Simply bring it back to room temperature before shaping.
- Cooking Alternatives: If you want to save time, consider using an air fryer for baking; just adjust the temperature down to 400°F (200°C) and monitor the time carefully.
- Customization Ideas: Make these loaves your own by adding herbs, grated cheese, or even olives for a Mediterranean twist.
Common Mistakes to Avoid
Achieving perfect mini sourdough loaves requires attention and care. Avoid these common pitfalls:
- Using an inactive starter: Always ensure your starter is bubbly and active; an underperforming starter leads to dense loaves.
- Skipping the kneading: Don’t rush through the kneading process; sufficient kneading develops gluten, which is essential for rising.
- Not letting the dough rise fully: Remember, patience is your ally! A half-rise will yield compact loaves that can’t trap air.
What to Serve With Homemade Mini Sourdough Loaves
- Soups: Pair these loaves with hearty tomato bisque or a rustic minestrone for a cozy meal.
- Salads: Serve alongside a mixed greens salad topped with feta and a tangy vinaigrette.
- Cheese Board: Feature them in a cheese platter with a selection of artisan cheeses and cured meats for delightful snacking.
- Dips: Try them with a fresh olive tapenade or creamy hummus for a flavorful appetizer.
- Breakfast Spreads: Enjoy with avocado toast, scrambled eggs, or sweet jams for a hearty breakfast.
- Grilled meats: These sturdy loaves soak up sauces beautifully, matching well with grilled chicken or steak.
Storage & Reheating Instructions
To store your delightful mini loaves:
- Room Temperature: Keep them wrapped in a kitchen towel in a cool, dry place for up to two days.
- Refrigerator: Wrap tightly to preserve moisture for up to a week.
- Freezer: Place cooled loaves in airtight bags or containers for up to three months. Thaw at room temperature or warm them in the oven for 10 minutes at 350°F (175°C) before serving.
Estimated Nutrition Information
- Calories: Approximately 120 per loaf
- Total Fat: 0.5g
- Carbohydrates: 25g
- Dietary Fiber: 1g
- Protein: 3g
Nutrition values may vary based on specific ingredients used and preparation methods.
FAQs
1. Can I use whole wheat flour instead of all-purpose flour?
Absolutely! Whole wheat flour will impart a nuttier flavor and denser texture. Aim to substitute only half the amount for best results.
2. What is the best way to know if my sourdough starter is ready to use?
Your starter should be bubbly and have doubled in size. Conduct a “float test” by dropping a spoonful into a glass of water; if it floats, it’s ready.
3. Can I bake these loaves without a stand mixer?
Yes! While a stand mixer can ease the kneading process, your hands work just as well—embrace the tactile experience of dough making!
4. How long do these loaves take to cool properly?
Let your loaves cool for about 30 minutes on a wire rack to ensure the texture has set before slicing into them.
5. Can I add different flavors to the dough?
Absolutely! Fresh herbs, garlic bits, or even cheese can be kneaded into the dough. Customize to fit your palate!
Conclusion
Embracing the process of making homemade mini sourdough loaves becomes a joyous journey of flavor and tradition. Each bite offers a comforting embrace, making them the ideal addition to any meal or gathering. Share them with loved ones or savor them solo; either way, the experience of crafting these delightful loaves brings a sense of warmth to your kitchen. Go ahead, dive into this recipe and let the aroma and joy of freshly baked bread fill your home! The days ahead will surely taste that much better with a basket of these beauties by your side.
Print
Homemade Mini Sourdough Loaves
- Total Time: 180 minutes
- Yield: 8 servings 1x
- Diet: Vegetarian
Description
Delicious homemade mini sourdough loaves that are perfect for any meal, featuring a tender crumb and a flavorful crust.
Ingredients
- 1 cup sourdough starter
- 1 cup warm water
- 3 cups all-purpose flour
- 1 teaspoon salt
- 1 tablespoon sugar
Instructions
- Mix the sourdough starter and warm water until combined and bubbly.
- Gradually add flour, salt, and sugar to the bowl, stirring until the dough begins to take shape.
- Knead the dough on a lightly floured surface for about 10 minutes.
- Place the kneaded dough in a lightly greased bowl and cover with a kitchen towel. Let it rise in a warm space for about 4–6 hours, or until doubled in size.
- Preheat your oven to 450°F (230°C).
- Divide the dough into small portions and shape each into a mini loaf.
- Arrange the loaves on a baking sheet lined with parchment paper.
- Let the mini loaves rest for about 30 minutes.
- Bake in the preheated oven for 20–25 minutes until golden brown and hollow-sounding when tapped.
- Allow the loaves to cool on a wire rack before slicing.
Notes
Ensure your sourdough starter is bubbly and active for best results. Consider using an air fryer for baking as an alternative.
- Prep Time: 15 minutes
- Cook Time: 25 minutes
- Category: Bread
- Method: Baking
- Cuisine: American
Nutrition
- Serving Size: 1 loaf
- Calories: 120
- Sugar: 1g
- Sodium: 400mg
- Fat: 0.5g
- Saturated Fat: 0g
- Unsaturated Fat: 0.5g
- Trans Fat: 0g
- Carbohydrates: 25g
- Fiber: 1g
- Protein: 3g
- Cholesterol: 0mg
Keywords: sourdough bread, homemade bread, mini loaves