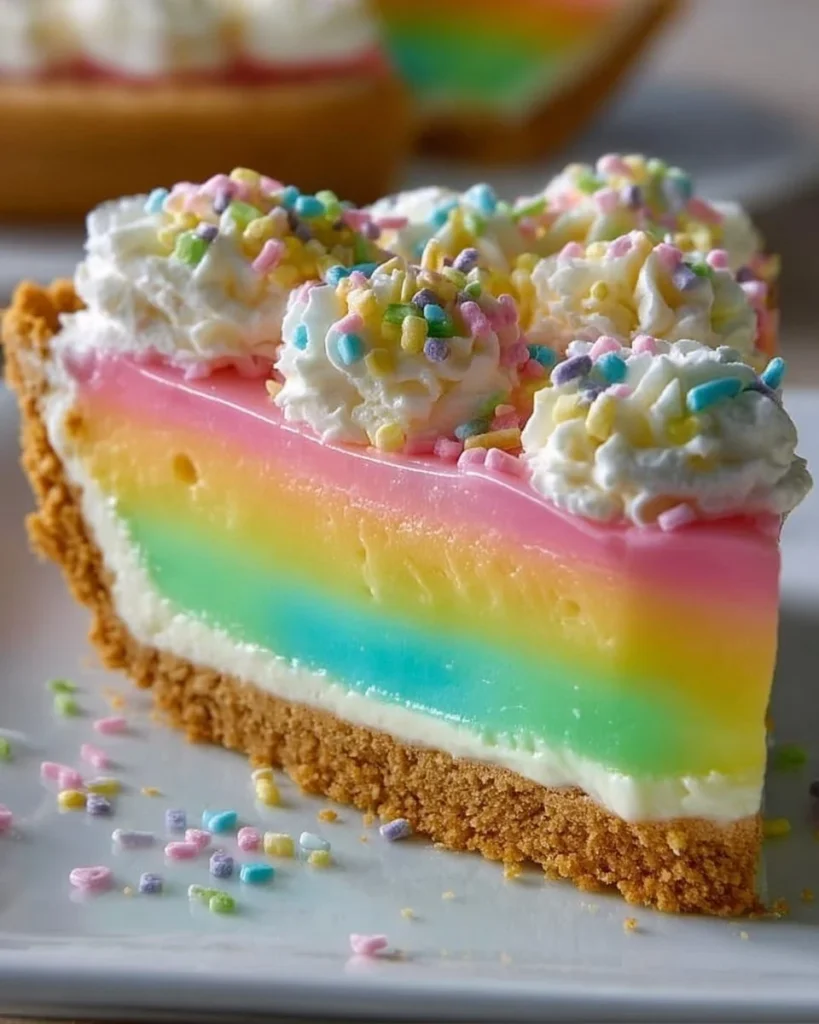
Indulging in the vibrant delight of an Easter No-Bake Jello Pie is like taking a joyful leap into spring itself. Imagine slicing through a perfectly crafted crust, only to reveal layers that glimpse at the sun-kissed colors of a freshly bloomed garden. Each mouthful encapsulates the essence of festive celebrations, with the contrasting textures of creamy, velvety filling and the delightful, bouncy jiggle of brightly colored gelatin. As you savor this delightful dessert, the fruity notes of each layered Jello dance on your palate, making it impossible not to smile. The pie refreshes and nourishes the spirit, inviting you to linger just a moment longer as you absorb the sweet aroma wafting through the room.
With Easter just around the corner, this no-bake marvel promises to be the centerpiece of your dessert table. Not only does it captivate with its visual appeal, but the combination of creamy filling and fruity gelatin creates an irresistible harmony. The playful nature of colorful Jello layers invites laughter and chatter among gathered friends and family. Each slice of this enticing pie embodies a slice of pure nostalgia, evoking cherished memories of past gatherings and creating new ones that will last a lifetime.
Why You’ll Love This Easter No-Bake Jello Pie
This Easter No-Bake Jello Pie stands out not only for its vibrant appearance but also for its bright, refreshing taste. The creamy layer balances the juicy sweetness of the Jello, making each bite a delightful experience that dances along the tongue. The easy preparation allows for more time spent with loved ones and less time fretting in the kitchen, making it perfect for the busy Easter holiday. The simple yet luscious ingredients invite everyone to enjoy a slice of joy at the end of a festive meal.
Creating this pie guarantees smiles and happy taste buds all around. Its vibrant colors and playful textures make it ideal for Easter celebrations, birthdays, or any spring gathering. Best of all, the no-bake aspect means you won’t heat up the kitchen. The flavor variations allow for customization according to your group’s favorites, making it a versatile dessert that can adapt to those who are serving it.
Preparation Phase & Tools to Use
Creating your Easter No-Bake Jello Pie requires only a few essential tools, each playing a vital role in its creation:
- Mixing Bowls: Use one large bowl for the cream cheese mixture and another medium bowl for dissolving the Jello. This separation makes it easier to manage each layer.
- Electric Mixer: This saves time and ensures a smooth texture for your cream cheese layer. It whips the ingredients to a light fluffiness that guarantees a delightful mouthfeel.
- Spatula: An essential tool for gently spreading your layers evenly without mixing them up. A silicone spatula works particularly well for scraping down the sides of bowls.
- Measuring Cups: Precision matters when it comes to achieving the right consistency and flavor. Measure your liquids and dry ingredients carefully.
- Refrigerator: The most crucial tool of all, as patience is key. Chilling the layers allows each one to set perfectly, creating a stunning and stable pie.
Before you start whipping up this beauty, make sure to prepare your work area. Gather all ingredients and tools in advance to create a seamless cooking experience.
Ingredients for Easter No-Bake Jello Pie
-
Graham Cracker Crust: (1 pre-made 9-inch crust or ingredients to make your own)
- Provides the perfect base for the creamy filling and jello layers, offering delightful textural contrast.
-
Cream Cheese: (8 ounces, softened)
- Forms the rich and tangy creamy layer, adding depth of flavor and a smooth, melt-in-your-mouth texture to the pie.
-
Granulated Sugar: (1/2 cup)
- Sweetens the cream cheese layer, balancing the tartness and enhancing the overall flavor profile of the pie.
-
Vanilla Extract: (1 teaspoon)
- Enhances the sweetness of the cream cheese layer and adds a subtle, warm aroma to the pie.
-
Boiling Water: (1 cup)
- Used to dissolve the Jello powder, ensuring it sets properly and creates a vibrant, jiggly layer.
-
Cold Water: (1 cup)
- Added to the dissolved Jello to cool it down and help it set faster, contributing to the pie’s signature texture.
-
Jello (Various Flavors and Colors): (2 small boxes, 3 ounces each, assorted flavors like lemon, lime, raspberry, or strawberry)
- The star of the show, providing vibrant color, fruity flavor, and that iconic jiggly texture that makes this pie so fun and festive.
-
Whipped Topping: (8 ounces, thawed)
- Adds a light, airy, and slightly sweet finish to the pie, complementing the layers beautifully and making it visually appealing.
-
Optional Easter Candies or Sprinkles: For decoration
- To add extra Easter flair and visual appeal, making the pie even more festive and celebratory.
If you’re in a pinch or have dietary restrictions, you can easily customize this pie. For a gluten-free option, use crushed gluten-free cookies for the crust. Alternatively, replace the cream cheese with a non-dairy cream cheese for those with lactose sensitivities.
How to Make Easter No-Bake Jello Pie
Prepare the Cream Cheese Layer
- In a large mixing bowl, beat the softened cream cheese with an electric mixer until smooth and creamy. This ensures there are no lumps for a flawless foundation.
Sweeten and Flavor the Cream Cheese
- Gradually add the granulated sugar to the cream cheese, continuing to beat until the mixture is light and fluffy. Then, mix in the vanilla extract until evenly distributed for consistent flavor.
Prepare the First Jello Layer
- In a medium bowl, empty one box of Jello powder (choose your first color/flavor). Pour in 1 cup of boiling water and stir continuously until completely dissolved. Ensuring no granules remain guarantees a smooth texture.
Cool the First Jello Layer
- Add 1 cup of cold water to the dissolved Jello and stir gently to combine. This crucial step cools the mixture, initiating the setting process.
Pour the First Jello Layer
- Carefully pour half of the prepared Jello mixture into the graham cracker crust. Pour slowly to maintain the layers, preventing the cream cheese from mixing in.
Chill the First Jello Layer
- Place the pie in the refrigerator and chill for about 30-45 minutes, until the first Jello layer is partially set but still slightly jiggly. This partial setting ensures the cream cheese layer can adhere without sinking.
Spread the Cream Cheese Layer
- Once the first layer is ready, gently spread the cream cheese mixture evenly over the top. Use a spatula to ensure a smooth finish.
Chill the Cream Cheese Layer
- Return the pie to the fridge for another 30-45 minutes, allowing the cream cheese layer to firm up enough to support the next layer.
Prepare the Second Jello Layer
- While the cream cheese layer is setting, repeat the steps for the second Jello layer using the second box of Jello powder. Choose a different flavor/color for visual appeal and flavor variety.
Pour the Second Jello Layer
- Once the cream cheese layer is firm, carefully pour the remaining Jello mixture over it. Pour slowly to maintain the structural integrity of the layers.
Chill the Pie Completely
- Refrigerate the pie for at least 4-6 hours, preferably overnight. This extended chilling time allows the flavors to meld and achieves that perfectly set texture.
Decorate and Serve
- Just before serving, spread the thawed whipped topping evenly over the pie. Decorate with optional Easter candies or sprinkles for a festive touch. Slice and serve chilled, savoring the bright layers and refreshing flavors of this lovely pie!
Chef’s Notes & Helpful Tips
-
Make-ahead Tips: Feel free to make this pie a day in advance. The flavors intensify, and it provides extra chilling time for all layers.
-
Cooking Alternatives: There’s no need for an oven, making this dessert perfect for hot days when you want something refreshing without heating up the kitchen.
-
Customization Ideas: Mix flavors of Jello for a tie-dye effect or use flavored whipped topping for added deliciousness. You can also introduce fresh fruit like sliced strawberries or blueberries between layers for an extra layer of texture and flavor.
Common Mistakes to Avoid
-
Not Cooling the Jello Enough: Ensure the gelatin is at least partially cooled before pouring it over the cream cheese layer. If too hot, it can melt the cream cheese layer, resulting in a mixed-up mess.
-
Inadequate Chilling Times: Patience pays off! Allow sufficient time for each layer to set. Rushing these steps can lead to a pie that doesn’t hold its shape when sliced.
-
Ignoring the Measurements: Always measure liquids and dry ingredients carefully. Imbalances can affect texture and flavor.
What to Serve With Easter No-Bake Jello Pie
Pairing this delightful pie with complementary dishes enhances your festive spread. Here are a few ideas:
-
Fresh Fruit Salad: The lightness of seasonal fruits provides a refreshing contrast to the richness of the pie.
-
Chocolate Dipped Strawberries: Juicy, sweet, and slightly decadent, these pair beautifully with the pie’s tartness.
-
Pineapple Upside-Down Cake: For those who love cake, this classic dessert adds a delightful twist and further enhances the tropical flavors of the Jello.
-
Vanilla Ice Cream: Serve a scoop of smooth vanilla alongside to balance the vibrant flavors of the pie.
-
Mimosas: Celebrate with some light and bubbly drinks that match the festive spirit of Easter.
-
Lemonade or Iced Tea: Refreshing beverages that keep the mood bright and cheerful alongside the pie.
Storage & Reheating Instructions
Store any leftovers in an airtight container in the refrigerator for up to 4 days. Due to its delicate nature, this pie is best enjoyed cold and does not reheat well. Freezing the pie is not recommended, as it can alter the texture of the filling and Jello layers.
Estimated Nutrition Information
Each slice of this Easter No-Bake Jello Pie contains approximately:
- Calories: 245
- Fat: 10g
- Carbohydrates: 36g
- Protein: 3g
These values might vary based on specific ingredients used, so enjoy with consideration of your dietary needs!
FAQs
1. Can I make this pie vegan?
Absolutely! Substitute the cream cheese for a vegan cream cheese alternative and use non-dairy whipped topping. Ensure that the Jello you choose is gelatin-free.
2. What if I can’t find a pre-made crust?
Making your own crumb crust is simple! Just crush graham crackers or any cookie of choice, mix them with melted butter, and press into a pie dish.
3. How do I know when the Jello layers have set properly?
The Jello should be firm yet slightly jiggly. A good indication of readiness is to gently touch the top with a finger; it should not stick!
4. Can I use other flavors for the Jello?
Yes! Feel free to experiment with your favorite Jello flavors. Just keep in mind that you’ll want to maintain a balance of complementary tastes.
5. What makes this pie special for Easter?
The bright colors of the Jello layers and the playful nature of the dessert embody the spirit of spring and celebration, making it a perfect treat for Easter gatherings with family and friends.
As you dive into crafting this whimsical and delicious Easter No-Bake Jello Pie, relish the joy that it brings to your table. You’re not just creating a dessert; you’re making memories, celebrating the season, and sharing a slice of happiness with your loved ones. Gather your ingredients, roll up your sleeves, and indulge in the simple pleasures of this delightful treat. Each creamy, fruity bite promises to make your Easter celebrations all the more vibrant and festive. Happy baking!
Print
Easter No-Bake Jello Pie
- Total Time: 360 minutes
- Yield: 8 servings 1x
- Diet: Vegetarian
Description
A vibrant and refreshing no-bake pie with creamy layers and fruity gelatin that captures the essence of spring celebrations.
Ingredients
- 1 pre-made 9-inch Graham Cracker Crust
- 8 ounces Cream Cheese, softened
- 1/2 cup Granulated Sugar
- 1 teaspoon Vanilla Extract
- 1 cup Boiling Water
- 1 cup Cold Water
- 2 small boxes (3 ounces each) Jello (various flavors)
- 8 ounces Whipped Topping, thawed
- Optional Easter Candies or Sprinkles for decoration
Instructions
- In a large mixing bowl, beat the softened cream cheese until smooth.
- Gradually add granulated sugar and mix until fluffy. Add vanilla extract.
- Dissolve one box of Jello powder in 1 cup of boiling water. Add 1 cup of cold water to cool.
- Pour half of the Jello mixture into the crust and chill until partially set (30-45 minutes).
- Spread the cream cheese layer evenly over the Jello layer.
- Chill the cream cheese layer until firm (30-45 minutes).
- Repeat the process for the second Jello layer using the second box of Jello.
- Pour the remaining Jello mixture over the cream cheese layer and refrigerate for at least 4-6 hours or overnight.
- Before serving, spread whipped topping over the pie and decorate as desired.
Notes
Customize with your favorite Jello flavors. Make-ahead for better flavor integration.
- Prep Time: 30 minutes
- Cook Time: 0 minutes
- Category: Dessert
- Method: No-Bake
- Cuisine: American
Nutrition
- Serving Size: 1 slice
- Calories: 245
- Sugar: 22g
- Sodium: 200mg
- Fat: 10g
- Saturated Fat: 5g
- Unsaturated Fat: 3g
- Trans Fat: 0g
- Carbohydrates: 36g
- Fiber: 0g
- Protein: 3g
- Cholesterol: 30mg
Keywords: no-bake, jello pie, Easter dessert, colorful dessert, spring celebration