The moment you take your first bite of Dreamy Peanut Butter Pie, a wave of nostalgia washes over you. You sink your fork into the luscious, creamy filling that’s a harmonious blend of rich peanut butter and velvety cream cheese. A tender crunch of Oreo crust provides the perfect contrast to the smoothness, as your taste buds dance to the rhythm of sweet and salty sensations. Each mouthful envelops you in a delightful embrace, and it’s nearly impossible to resist coming back for more.
As you savor every bit of this treat, the tantalizing aroma wafts through the air, pulling family and friends into the kitchen. The moment you unveil this pie, a chorus of ‘oohs’ and ‘aahs’ fills the room. Every slice reveals layers of indulgence—deep, nutty flavors embraced by a light, airy texture. You realize that this is not merely a dessert; it’s an experience, one that invites togetherness and joyous laughter with every forkful shared.
Why You’ll Love This Dreamy Peanut Butter Pie
This Dreamy Peanut Butter Pie stands out for several reasons. First, the exquisite balance between decadence and comfort makes it the quintessential dessert for any occasion. Picture this: a cozy family gathering, a festive holiday celebration, or even a laid-back movie night. No matter the reason, this dessert lights up the room and warms hearts, offering a nostalgic taste of childhood treats.
Imagine the thrill of breaking through the chocolatey crust, the rich peanut butter filling melting in your mouth, and the lightness of whipped cream softening each bite. Each layer tells a story. The combination of creamy, crunchy, and sweet provides an experience that leaves a lasting impression. And don’t worry about dietary restrictions; this versatile dessert can easily accommodate substitutions, ensuring that everyone can indulge in this creamy dream.
Preparation Phase & Tools to Use
Before diving into creating this masterpiece, gather the following essential tools:
- Mixing Bowl: A medium-sized bowl allows you to comfortably blend the peanut butter, cream cheese, and powdered sugar without any fuss.
- Electric Mixer: To achieve that luscious creamy consistency, an electric mixer works wonders. You want to beat the filling until it’s smooth and dreamy, and nothing gets the job done quite like an electric whip.
- Spatula: When you’re ready to fold in the whipped cream, a spatula will help you gently incorporate it without deflating that airy texture you crave.
- Pie Plate: A 9-inch pie plate not only holds your creation but also adds a touch of charm when presenting to your guests.
Preparation tips: Always ensure your cream cheese is softened to room temperature for easy mixing, and use a rubber spatula for folding the whipped cream. This helps maintain that heavenly light texture.
Ingredients for Dreamy Peanut Butter Pie
- 1 Oreo cookie crust: This rich, chocolatey crust provides a great contrast to the creamy filling. You can substitute with a graham cracker crust if you’re in the mood for something different.
- 1 cup creamy peanut butter: Choose freshly ground or your favorite brand for a true peanut flavor. Consider using crunchy peanut butter for extra texture!
- 1 cup cream cheese, softened: Cream cheese adds richness and that classic cheesecake flavor. Make sure it’s truly softened for the best blending.
- 1 cup powdered sugar: Adding just the right touch of sweetness, powdered sugar melts seamlessly into the mixture.
- 1 cup whipped cream: This brings lightness and an airy quality to the filling. You can whip your own or use store-bought.
- Chocolate shavings or drizzles for topping: These final touches elevate your pie and offer an elegant finish.
How to Make Dreamy Peanut Butter Pie
-
Begin by grabbing a mixing bowl. In it, beat together the creamy peanut butter, softened cream cheese, and powdered sugar using an electric mixer until smooth and creamy.
-
Once you have a luscious filling, gently fold in the whipped cream with a spatula. You’ll want the two mixtures to combine beautifully without losing that airy volume we all love.
-
Now, pour the dreamy peanut butter mixture into your prepared Oreo crust. Use the spatula to spread it evenly. Just imagine how good this is going to taste!
-
Chill your pie in the refrigerator for at least 4 hours or overnight. This step ensures your pie sets perfectly, allowing those fantastic flavors to meld together.
-
When you’re ready to serve, garnish with chocolate shavings or a luscious drizzle of chocolate. Slice into that dreamy goodness and prepare to be amazed!
Chef’s Notes & Helpful Tips
- Make-ahead tips: This pie shines as a make-ahead dessert. Prepare it a day in advance and let it chill overnight. This allows the flavors to mature and enhances that rich taste.
- Cooking alternatives: Although this recipe is designed for refrigeration, you can also experiment with other no-bake options by using your air fryer as a crust maker!
- Customization ideas: Feel free to fold in crushed peanuts, caramel swirls, or even a hint of sea salt for added flavor variations.
Common Mistakes to Avoid
- Not softening cream cheese: This small step is crucial! Hard cream cheese results in lumps that are hard to blend. Always allow it to reach room temperature.
- Overmixing the whipped cream: You want to fold the whipped cream gently. Overmixing can deflate its light texture, leading to a denser filling than desired.
- Skipping the chilling time: This pie requires adequate chilling. Patience is key; without it, you risk a filling that won’t hold its shape when sliced.
What to Serve With Dreamy Peanut Butter Pie
Pairing this delicious pie with complementary flavors can elevate your dessert experience. Here are some delightful ideas:
- Coffee: The richness of coffee beautifully contrasts the sweetness of the pie, making for a perfect after-dinner treat.
- Vanilla ice cream: A scoop of vanilla ice cream alongside your slice adds a creamy counterpart that enhances every bite.
- Fresh berries: The tartness of strawberries or raspberries cuts through the richness of the pie and adds a bright pop of color.
- Caramel sauce: Drizzling some homemade or store-bought caramel brings an extra layer of indulgence that speaks to pure decadence.
- Whipped cream dollops: A fresh cloud of whipped cream on top can add an extra touch of elegance and creaminess.
- Chocolate-covered pretzels: The crunch and saltiness of these snacks harmonize wonderfully with the pie’s richness, providing texture and taste balance.
- Banana slices: The mellow sweetness of bananas can complement the nutty flavor of peanut butter perfectly.
- Chopped nuts: A sprinkle of chopped salted peanuts or pecans gives a nice crunch and added flavor contrast.
Storage & Reheating Instructions
Store any leftovers in an airtight container in the refrigerator, where the pie will remain fresh for about 3 to 5 days. If you’ve made it ahead of time, don’t freeze it unless you’re prepared for a change in texture, as frozen and thawed whipped cream can lose its lightness. Reheating isn’t necessary, but feel free to let it gradually come back to room temperature if desired.
Estimated Nutrition Information
As with all desserts, moderation is key! Here’s a rough estimate for one slice (based on 8 servings):
- Calories: 350
- Total Fat: 22g
- Saturated Fat: 10g
- Cholesterol: 45mg
- Sodium: 270mg
- Total Carbohydrate: 32g
- Dietary Fiber: 1g
- Sugars: 20g
- Protein: 6g
Note: Values may vary based on specific ingredient brands and measurements.
FAQs
1. Can I make this pie vegan?
Absolutely! Substitute regular cream cheese with a dairy-free version, use vegan whipped cream, and opt for a vegan cookie crust. It turns out just as delightful!
2. How can I tell when the pie is properly chilled?
Once it’s solidified and holds its shape when sliced, it’s ready! A good rule of thumb is to let it chill for at least 4 hours, but an overnight rest works best.
3. Can I double the recipe?
Yes! If you’re hosting a bigger gathering, simply double the ingredients and use a larger pie dish or make two pies. Everyone will want a slice!
4. What’s the best way to slice the pie?
Dipping your knife in warm water before slicing helps make clean cuts. The warmth creates a smooth edge, giving each slice that picture-perfect look.
5. How do I balance the flavors if it’s too sweet?
If you find the pie too sweet for your taste, add a pinch of sea salt to the filling or serve it with fresh fruit to counterbalance the sweetness!
The Dreamy Peanut Butter Pie takes the art of dessert-making to a whole new level. Every layer brings forth a cacophony of sweetness, creaminess, and nostalgia. This pie doesn’t just satisfy the sweet tooth; it also creates memories that linger long after the last bite. So, roll up your sleeves, gather your loved ones, and treat them to slices of pure happiness—they will thank you, and you may just become the dessert hero in your kitchen!
Print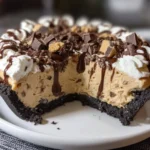
Dreamy Peanut Butter Pie
- Total Time: 240 minutes
- Yield: 8 servings 1x
- Diet: Vegetarian
Description
A nostalgic dessert that combines creamy peanut butter and rich cream cheese, all set in a crunchy Oreo crust.
Ingredients
- 1 Oreo cookie crust
- 1 cup creamy peanut butter
- 1 cup cream cheese, softened
- 1 cup powdered sugar
- 1 cup whipped cream
- Chocolate shavings or drizzles for topping
Instructions
- Begin by grabbing a mixing bowl. In it, beat together the creamy peanut butter, softened cream cheese, and powdered sugar using an electric mixer until smooth and creamy.
- Once you have a luscious filling, gently fold in the whipped cream with a spatula.
- Now, pour the dreamy peanut butter mixture into your prepared Oreo crust.
- Chill your pie in the refrigerator for at least 4 hours or overnight.
- When you’re ready to serve, garnish with chocolate shavings or a luscious drizzle of chocolate.
Notes
Make-ahead tips: This pie shines as a make-ahead dessert; prepare it a day in advance for the best results.
- Prep Time: 15 minutes
- Cook Time: 0 minutes
- Category: Dessert
- Method: No-Bake
- Cuisine: American
Nutrition
- Serving Size: 1 slice
- Calories: 350
- Sugar: 20g
- Sodium: 270mg
- Fat: 22g
- Saturated Fat: 10g
- Unsaturated Fat: 8g
- Trans Fat: 0g
- Carbohydrates: 32g
- Fiber: 1g
- Protein: 6g
- Cholesterol: 45mg
Keywords: peanut butter pie, no-bake dessert, easy dessert, creamy dessert, nostalgic dessert