Introduction to Crispy Ciabatta Rolls Recipe
Ah, the aroma of freshly baked bread wafting through the kitchen! There’s something magical about it, isn’t there? I remember the first time I tried making ciabatta rolls. It was a rainy afternoon, and I was looking for a cozy project to lift my spirits. As I mixed the dough, I felt like a mad scientist, experimenting with flour and water, hoping for that perfect crust. The anticipation was almost unbearable!
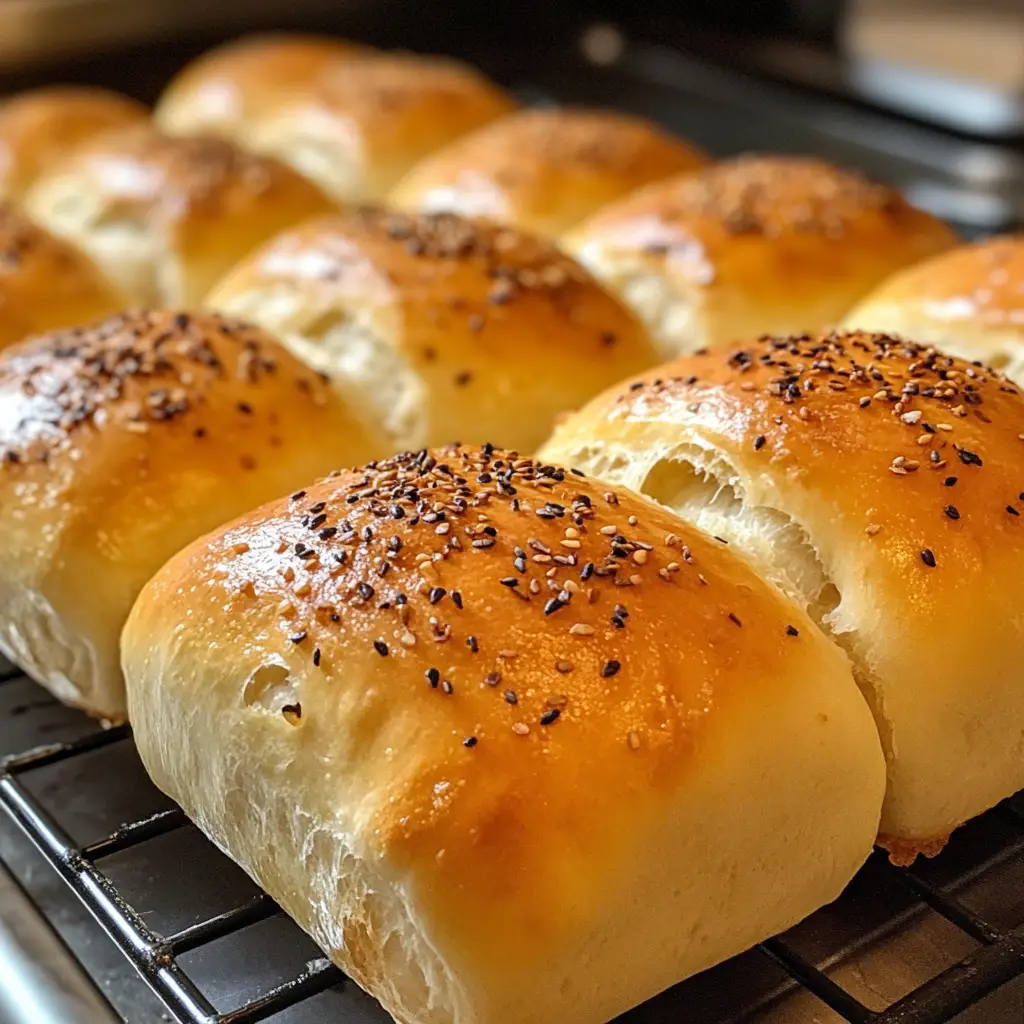
Crispy ciabatta rolls are not just any bread; they are a delightful blend of a crunchy exterior and a soft, airy interior. Each bite is like a little hug for your taste buds. I often find myself daydreaming about these rolls, imagining them paired with a warm bowl of soup or as the base for a gourmet sandwich. They are versatile, easy to make, and oh-so-satisfying!
In this recipe, I’ll share my secrets to achieving that perfect crispy crust and fluffy inside. Whether you’re a seasoned baker or a curious beginner, I promise you’ll find joy in this process. So, roll up your sleeves, and let’s embark on this delicious adventure together. Trust me, your kitchen will thank you, and so will your family and friends when they take that first bite!
Ingredients for Crispy Ciabatta Rolls Recipe
Before we dive into the baking process, let’s gather our ingredients. Having everything ready makes the experience smoother and more enjoyable. I always find that when I have my ingredients prepped, it feels like I’m setting the stage for a beautiful performance in the kitchen. Here’s what you’ll need to create those delightful crispy ciabatta rolls!
Main Ingredients
- 3 ½ cups all-purpose flour (plus extra for dusting)
- 1 ½ cups warm water (about 110°F or 43°C)
- 2 teaspoons active dry yeast
- 1 teaspoon salt
- 1 tablespoon olive oil (for added flavor)
When choosing your flour, I recommend going for high-quality all-purpose flour. It makes a noticeable difference in texture and flavor. If you can find bread flour, it can also work wonders for that chewy interior we all love!
Optional Add-ons
- 1 tablespoon honey or sugar (for a hint of sweetness)
- Herbs like rosemary or thyme (for a fragrant twist)
- Cheese (like grated Parmesan or mozzarella) for a cheesy delight
- Olives or sun-dried tomatoes for a Mediterranean flair
These optional ingredients can elevate your ciabatta rolls to a whole new level. I often toss in some fresh herbs or a sprinkle of cheese, and it transforms the rolls into something truly special. Feel free to get creative and make this recipe your own!
How to Prepare Crispy Ciabatta Rolls Recipe
Now that we have our ingredients ready, it’s time to roll up our sleeves and get our hands a little floury! Making ciabatta rolls is a delightful journey, and I can’t wait to share each step with you. Trust me, the process is just as rewarding as the final product. Let’s dive in!
Step 1: Mixing the Dough
First things first, let’s mix our dough! In a large mixing bowl, combine the warm water and yeast. I like to let it sit for about 5 minutes until it gets all frothy. It’s like a little magic show! Then, add the flour, salt, and olive oil. Using a wooden spoon or your hands, mix until everything is combined. The dough will be sticky, and that’s perfectly okay!
Tips for Mixing the Dough
- Don’t be afraid to get your hands in there! It’s the best way to feel the dough’s texture.
- If the dough feels too dry, add a splash more water. If it’s too wet, sprinkle in a bit more flour.
- Mix until there are no dry bits left. A well-mixed dough is the foundation of great ciabatta rolls!
Step 2: First Rise
Once your dough is mixed, it’s time for the first rise. Cover the bowl with a damp cloth or plastic wrap and let it sit in a warm place for about 1 to 2 hours. You want it to double in size, which is always a thrilling sight!
Tips for the First Rise
- Find a cozy spot in your kitchen, like near the oven or on a sunny windowsill.
- Patience is key! Don’t rush this step; the longer it rises, the better the flavor.
- If your kitchen is cool, you can preheat the oven to the lowest setting for a minute, then turn it off and place the dough inside.
Step 3: Shaping the Rolls
After the dough has risen, it’s time to shape those rolls! Dust your work surface with flour and gently turn the dough out. Be careful not to deflate it too much. Using a bench scraper or your hands, divide the dough into equal portions. I usually aim for about 8 rolls. Shape each piece into a rough rectangle, then fold it over itself a couple of times to create that lovely ciabatta shape.
Tips for Shaping
- Keep your hands floured to prevent sticking.
- Don’t worry about making them perfect; rustic shapes add charm!
- Try to handle the dough gently to maintain those air pockets inside.
Step 4: Second Rise
Now that your rolls are shaped, it’s time for the second rise. Place them on a baking sheet lined with parchment paper, leaving space between each roll. Cover them with a cloth and let them rise for another 30 to 45 minutes. This is when they’ll puff up beautifully!
Tips for the Second Rise
- Make sure they’re in a warm spot again; warmth is your friend!
- Keep an eye on them; they should look puffy and ready to bake.
- If you want a little extra flavor, you can brush them with olive oil before the rise.
Step 5: Baking the Rolls
Finally, it’s time to bake! Preheat your oven to 450°F (230°C). Just before placing the rolls in, you can add a small pan of water to the bottom of the oven. This creates steam, which helps achieve that crispy crust we all love. Bake the rolls for about 20-25 minutes, or until they’re golden brown and sound hollow when tapped on the bottom.
Tips for Baking
- Keep an eye on them towards the end; ovens can vary, and you don’t want them to burn!
- Let them cool on a wire rack for a few minutes before diving in. I know it’s hard to resist, but trust me!
- For an extra crispy crust, you can turn off the oven and leave the rolls inside for a few minutes after baking.
Equipment Needed for Crispy Ciabatta Rolls Recipe
Before we embark on our baking adventure, let’s gather the essential tools that will help us create those delightful crispy ciabatta rolls. Having the right equipment makes the process smoother and more enjoyable. Here’s what you’ll need:
- Large Mixing Bowl: A sturdy bowl is perfect for mixing your dough. If you don’t have one, any large bowl will do!
- Wooden Spoon or Dough Scraper: These tools are great for mixing and shaping the dough. A spatula can also work in a pinch.
- Measuring Cups and Spoons: Accurate measurements are key to baking success. If you don’t have these, you can use a kitchen scale for precision.
- Parchment Paper: This helps prevent sticking when baking. If you’re out, a lightly greased baking sheet can work just as well.
- Wire Rack: A cooling rack is ideal for letting your rolls cool down after baking. If you don’t have one, a plate will suffice.
- Oven: Of course, you’ll need an oven to bake those rolls! If you don’t have one, a toaster oven can be a fun alternative for smaller batches.
With these tools in hand, you’re all set to create your crispy ciabatta rolls. Remember, it’s not about having fancy equipment; it’s about the love and care you put into your baking. Let’s get started!
Variations of Crispy Ciabatta Rolls Recipe
As a passionate home cook, I love experimenting with flavors and textures. Ciabatta rolls are incredibly versatile, and you can easily customize them to suit your taste or the occasion. Here are a few delightful variations that I’ve tried and absolutely adore:
- Herbed Ciabatta Rolls: Add a tablespoon of dried herbs like oregano, basil, or thyme to the dough for a fragrant twist. The aroma while baking is simply heavenly!
- Cheesy Ciabatta Rolls: Mix in some grated cheese, like sharp cheddar or mozzarella, into the dough. The melted cheese creates a gooey surprise inside each roll.
- Olive and Sun-Dried Tomato Ciabatta Rolls: Fold in chopped olives or sun-dried tomatoes for a Mediterranean flair. These add a burst of flavor that pairs beautifully with soups or salads.
- Sweet Ciabatta Rolls: For a sweeter version, incorporate a tablespoon of honey or sugar into the dough. You can also sprinkle cinnamon and sugar on top before baking for a delightful treat.
These variations not only add excitement to your baking but also allow you to showcase your creativity. I often find that trying new flavors keeps the joy of baking alive. So, don’t hesitate to mix and match ingredients to create your own signature ciabatta rolls!
Cooking Notes for Crispy Ciabatta Rolls Recipe
As I’ve journeyed through the world of baking, I’ve gathered a few cooking notes that can make your experience with ciabatta rolls even more enjoyable. These little tips and tricks can help you navigate any bumps along the way and ensure your rolls turn out perfectly every time.
- Hydration is Key: Ciabatta dough is known for its high hydration, which contributes to that airy texture. Don’t be alarmed if your dough feels sticky; it’s supposed to! Just embrace the stickiness, and remember that a well-hydrated dough leads to a lighter roll.
- Temperature Matters: The temperature of your ingredients can affect the dough’s rise. Make sure your water is warm but not too hot, as it can kill the yeast. A good rule of thumb is to aim for around 110°F (43°C).
- Don’t Rush the Rises: Allowing the dough to rise properly is crucial for flavor and texture. If you’re in a hurry, resist the temptation to shorten the rising times. Patience pays off in the end!
- Experiment with Flour: While all-purpose flour works beautifully, don’t hesitate to try different types of flour. Mixing in some whole wheat flour can add a nutty flavor and extra nutrition.
- Store Properly: If you have leftover rolls, store them in a paper bag at room temperature. This keeps the crust crispy. For longer storage, freeze them in an airtight container, and reheat in the oven for that fresh-baked taste.
These cooking notes are like little nuggets of wisdom I’ve picked up along the way. They can help you navigate the baking process with confidence and joy. Remember, every baking adventure is a chance to learn and grow, so don’t be afraid to make it your own!
Serving Suggestions for Crispy Ciabatta Rolls Recipe
Now that we’ve baked our crispy ciabatta rolls, it’s time to enjoy them! The beauty of these rolls lies in their versatility. I love to serve them in various ways, and each option brings a unique experience to the table. Here are some of my favorite serving suggestions that I think you’ll adore:
- With Soups: There’s nothing quite like dipping a warm ciabatta roll into a hearty bowl of soup. Whether it’s a creamy tomato basil or a chunky vegetable soup, the rolls soak up the flavors beautifully.
- As Sandwiches: Use these rolls as the base for gourmet sandwiches. Layer them with your favorite meats, cheeses, and fresh veggies. I often make a classic Italian sandwich with salami, provolone, and a drizzle of balsamic glaze.
- With Dips: Serve your ciabatta rolls alongside a selection of dips. A rich olive tapenade or a zesty hummus pairs perfectly with the crispy crust. It’s a delightful appetizer for gatherings!
- Bruschetta Style: Slice the rolls in half, toast them lightly, and top with fresh tomatoes, basil, and a drizzle of olive oil. This makes for a refreshing and vibrant starter.
- As a Side: Serve them warm alongside your favorite pasta dishes or salads. They add a lovely crunch and are perfect for mopping up sauces.
These serving suggestions are just the tip of the iceberg! I encourage you to get creative and find your own favorite ways to enjoy these delightful ciabatta rolls. Each bite is a celebration of flavor and texture, and I can’t wait for you to experience it all!
Tips for Perfecting Your Crispy Ciabatta Rolls Recipe
As I’ve baked my fair share of ciabatta rolls, I’ve gathered a treasure trove of tips that can help you achieve that perfect balance of crispy crust and fluffy interior. These little nuggets of wisdom can make all the difference in your baking journey. Here are my top tips for perfecting your crispy ciabatta rolls:
- Use a Kitchen Scale: For the most accurate measurements, consider using a kitchen scale. It ensures consistency in your dough, leading to better results every time.
- Let the Dough Rest: After mixing, let the dough rest for about 10 minutes before kneading. This allows the flour to fully hydrate, making it easier to work with.
- Practice Patience: Don’t rush the rising times. The longer the dough rises, the more flavor it develops. Trust the process; good things take time!
- Steam is Your Friend: Remember to add that pan of water to the oven while baking. The steam helps create that beautiful, crispy crust we all crave.
- Cool Before Slicing: Allow your rolls to cool completely on a wire rack before slicing. This helps maintain their structure and prevents them from becoming gummy inside.
These tips are like little guiding stars on your baking journey. Each one is a step toward creating ciabatta rolls that will impress your family and friends. So, embrace the process, enjoy the journey, and happy baking!
Breakdown of Time for Crispy Ciabatta Rolls Recipe
As a passionate home cook, I know that time management is key in the kitchen. When it comes to making crispy ciabatta rolls, understanding the time commitment can help you plan your baking adventure. Here’s a simple breakdown of the time you’ll need:
- Prep Time: Approximately 20 minutes. This includes gathering your ingredients, mixing the dough, and shaping the rolls.
- First Rise: 1 to 2 hours. This is when the dough doubles in size, so take a moment to relax or tidy up your kitchen while you wait!
- Second Rise: 30 to 45 minutes. After shaping, let the rolls puff up beautifully before baking.
- Cooking Time: 20 to 25 minutes. This is when the magic happens, and your kitchen fills with that irresistible aroma of freshly baked bread.
- Total Time: Approximately 2 to 3 hours. While it may seem like a long time, most of it is hands-off, allowing you to enjoy the process.
With this time breakdown, you can easily fit your ciabatta roll-making into your day. Just remember, the wait is worth it! Each step brings you closer to that delightful moment when you take your first bite of warm, crispy ciabatta. Happy baking!
Nutritional Information for Crispy Ciabatta Rolls Recipe
As a passionate home cook, I believe that enjoying delicious food should also come with a bit of awareness about what we’re eating. While crispy ciabatta rolls are a treat, it’s good to know their nutritional profile. Here’s a general breakdown of the nutritional information for one ciabatta roll, based on the ingredients listed in the recipe:
- Calories: Approximately 180 calories
- Protein: 6 grams
- Carbohydrates: 36 grams
- Fat: 2.5 grams
- Saturated Fat: 0.5 grams
- Sodium: 200 milligrams
- Fiber: 1 gram
Keep in mind that these values can vary based on the specific ingredients you use and any optional add-ons you choose to include. For instance, adding cheese or olives will increase the calorie count and fat content. However, ciabatta rolls can be a delightful part of a balanced diet when enjoyed in moderation. Pair them with fresh veggies or a hearty soup, and you’ve got a satisfying meal that’s both delicious and nourishing!
Frequently Asked Questions about Crispy Ciabatta Rolls Recipe
As I’ve shared my crispy ciabatta rolls recipe, I often get questions from fellow home cooks eager to try their hand at this delightful bread. I love the enthusiasm! Here are some of the most frequently asked questions I’ve encountered, along with my answers to help you on your baking journey.
Can I use whole wheat flour instead of all-purpose flour?
Absolutely! Whole wheat flour can add a nutty flavor and extra nutrition to your ciabatta rolls. However, keep in mind that it may change the texture slightly. I recommend mixing half whole wheat and half all-purpose flour for a balanced result.
What if my dough doesn’t rise?
If your dough isn’t rising, it could be due to inactive yeast. Make sure your yeast is fresh and that your water is warm but not too hot. If it’s too cool, the yeast won’t activate. If you’re unsure, you can test the yeast by mixing it with warm water and a pinch of sugar. If it bubbles after a few minutes, it’s good to go!
How do I store leftover ciabatta rolls?
To keep your ciabatta rolls fresh, store them in a paper bag at room temperature. This helps maintain their crispy crust. If you have leftovers, you can freeze them in an airtight container. When you’re ready to enjoy them again, simply reheat in the oven for that fresh-baked taste!
Can I make the dough ahead of time?
Yes, you can! If you want to prepare the dough in advance, mix it and let it rise in the fridge overnight. Just remember to bring it back to room temperature before shaping and proceeding with the second rise. This can save you time on a busy day!
What can I serve with ciabatta rolls?
The possibilities are endless! I love serving them with soups, salads, or as the base for gourmet sandwiches. They also pair wonderfully with dips like hummus or olive tapenade. Get creative and find your favorite combinations!
These FAQs are just a glimpse into the wonderful world of baking ciabatta rolls. I hope they help you feel more confident as you embark on your baking adventure. Remember, every question is a step toward mastering this delicious recipe. Happy baking!
Conclusion on Crispy Ciabatta Rolls Recipe
As I wrap up this delightful journey of baking crispy ciabatta rolls, I can’t help but feel a sense of joy and accomplishment. There’s something truly special about creating bread from scratch. The process is not just about mixing flour and water; it’s about the love and care you pour into each step. The crispy crust and airy interior of these rolls are a testament to that effort.
Whether you’re enjoying them with a warm bowl of soup, crafting a gourmet sandwich, or simply savoring them fresh out of the oven, these ciabatta rolls bring a touch of magic to any meal. They are versatile, easy to customize, and perfect for sharing with family and friends. Plus, the aroma that fills your kitchen while they bake is an experience in itself!
So, I encourage you to embrace the art of baking and give this crispy ciabatta rolls recipe a try. With a little patience and creativity, you’ll create something truly wonderful. Happy baking, and may your kitchen always be filled with the warmth of freshly baked bread!


