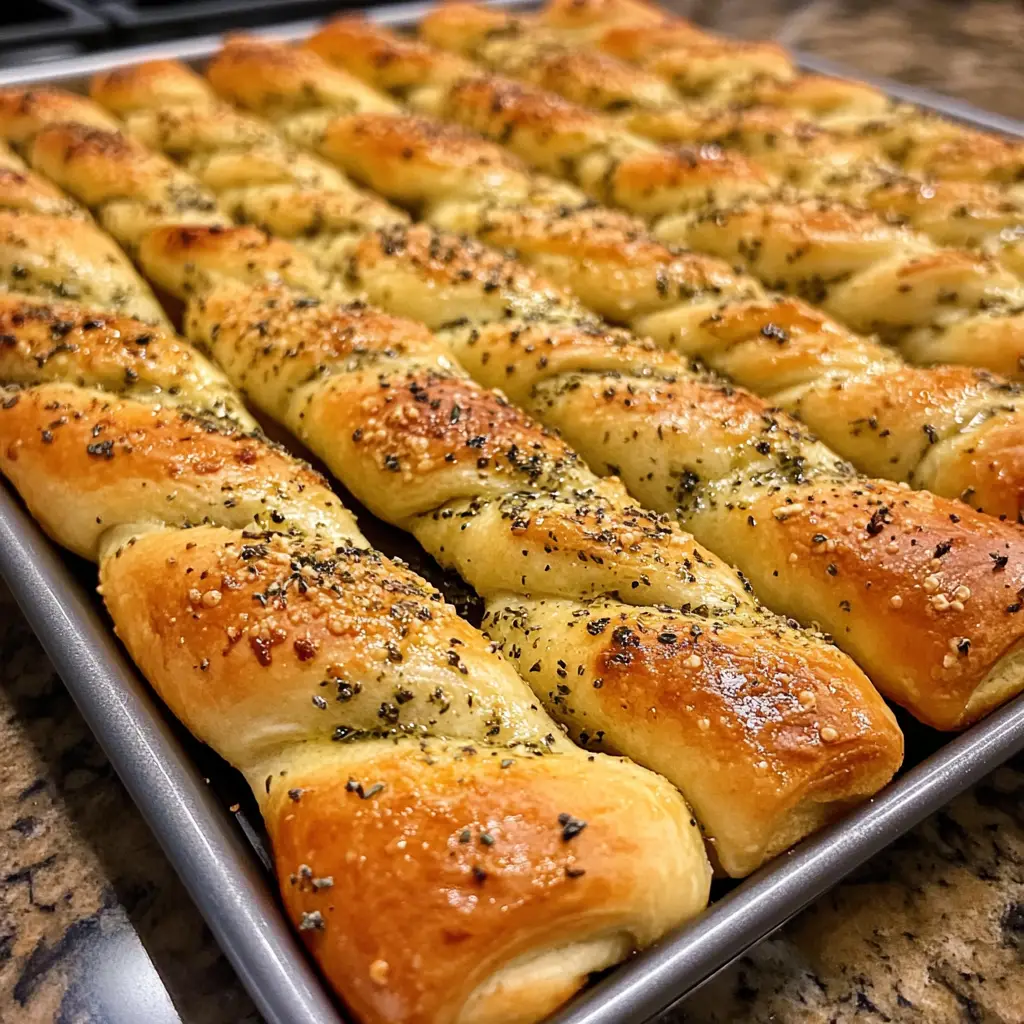
Introduction to Buttery Italian Herb Breadsticks
Ah, the aroma of freshly baked bread! It’s like a warm hug for the soul. I still remember the first time I tried Buttery Italian Herb Breadsticks. It was at a quaint little Italian restaurant tucked away in a bustling city. The moment I took a bite, I was transported to a sun-drenched terrace in Tuscany, surrounded by olive trees and laughter. Those breadsticks were soft, buttery, and infused with a medley of herbs that danced on my taste buds. I knew I had to recreate that magic in my own kitchen.
As a passionate home cook, I love sharing recipes that bring joy and comfort. These breadsticks are not just a side dish; they are a celebration of flavors and a perfect companion to any meal. Whether you’re serving them with a hearty pasta dish or enjoying them with a simple bowl of soup, they elevate the dining experience to a whole new level.
What I adore about making Buttery Italian Herb Breadsticks is how simple yet rewarding the process is. With just a handful of ingredients, you can create something that feels special. Plus, the best part? Your kitchen will smell divine! So, roll up your sleeves, and let’s embark on this culinary adventure together. I promise, these breadsticks will become a staple in your home, just like they have in mine.
Ingredients for Buttery Italian Herb Breadsticks
Before we dive into the delightful process of making Buttery Italian Herb Breadsticks, let’s gather our ingredients. I always believe that quality matters, so I recommend using the freshest ingredients you can find. Trust me, it makes a world of difference in flavor!
Main Ingredients
- 2 cups all-purpose flour
- 1 tablespoon sugar
- 1 teaspoon salt
- 1 packet (2 ¼ teaspoons) active dry yeast
- ¾ cup warm water (about 110°F or 43°C)
- 2 tablespoons unsalted butter, melted
- 1 tablespoon Italian seasoning (or a mix of dried basil, oregano, and thyme)
- 1 clove garlic, minced (optional, but highly recommended for flavor)
These ingredients come together to create a dough that’s soft and pliable, perfect for shaping into those irresistible breadsticks. The combination of butter and herbs is what truly makes them shine!
Optional Add-ons
- Parmesan cheese, grated (for a cheesy twist)
- Red pepper flakes (if you like a little heat)
- Fresh herbs like rosemary or parsley (for a burst of freshness)
- Olive oil (for brushing on top before baking)
Feel free to get creative! I often experiment with different herbs and spices based on what I have on hand. Sometimes, I’ll sprinkle a bit of sea salt on top before baking for that extra crunch. The beauty of these breadsticks is their versatility, so don’t hesitate to make them your own!
How to Prepare Buttery Italian Herb Breadsticks
Now that we have our ingredients ready, it’s time to roll up our sleeves and get our hands a little floury! Making Buttery Italian Herb Breadsticks is a delightful journey, and I can’t wait to share each step with you. Let’s dive in!
Step 1: Prepare the Dough
First things first, we need to create the dough. In a large mixing bowl, combine the warm water and sugar. Sprinkle the yeast on top and let it sit for about 5-10 minutes until it becomes frothy. This little magic moment is called “proofing” the yeast, and it’s crucial for fluffy breadsticks!
Tips for Step 1
- Make sure your water is warm, not hot! Too hot can kill the yeast, and we don’t want that.
- Use a whisk to mix the ingredients well. It helps to incorporate air, making the dough lighter.
Step 2: Let the Dough Rise
Once your yeast is frothy, add the flour, salt, melted butter, and Italian seasoning to the bowl. Mix until a dough forms. Now, it’s time to knead! On a floured surface, knead the dough for about 5-7 minutes until it’s smooth and elastic. Then, place it in a greased bowl, cover it with a clean kitchen towel, and let it rise in a warm spot for about an hour or until it doubles in size.
Tips for Step 2
- Find a cozy spot for your dough to rise. I often place it near a sunny window or in a slightly warmed oven.
- Patience is key! The longer you let it rise, the fluffier your breadsticks will be.
Step 3: Shape the Breadsticks
After the dough has risen, it’s time for the fun part—shaping! Punch down the dough to release the air, then turn it out onto a floured surface. Divide the dough into equal pieces, about 10-12, depending on how thick you want your breadsticks. Roll each piece into a long, thin stick, about 6-8 inches long. Place them on a baking sheet lined with parchment paper.
Tips for Step 3
- Don’t worry about making them perfect! Each breadstick has its own character.
- If you want a twist, try twisting the dough as you shape it for a fun look!
Step 4: Bake the Breadsticks
Now, let’s get these beauties in the oven! Preheat your oven to 375°F (190°C). Before baking, brush the tops of the breadsticks with melted butter and sprinkle with garlic (if using) and any optional toppings like Parmesan or sea salt. Bake for about 15-20 minutes, or until they are golden brown and your kitchen smells heavenly!
Tips for Step 4
- Keep an eye on them towards the end of baking. Ovens can be sneaky, and we want them perfectly golden, not burnt!
- For an extra buttery finish, brush them with more melted butter right after they come out of the oven.
And there you have it! Your Buttery Italian Herb Breadsticks are ready to be devoured. I can already imagine the smiles on your faces as you take that first bite. Enjoy the process, and remember, cooking is all about love and joy!
Equipment Needed for Buttery Italian Herb Breadsticks
Before we dive into the delightful world of baking, let’s gather our tools! Having the right equipment makes the process smoother and more enjoyable. Here’s what you’ll need to whip up those scrumptious Buttery Italian Herb Breadsticks:
- Mixing Bowl: A large bowl is essential for mixing your dough. If you don’t have one, any deep bowl will do!
- Measuring Cups and Spoons: Accurate measurements are key to success. If you’re in a pinch, you can use a regular cup, but be mindful of the proportions.
- Whisk: This handy tool helps mix the yeast and water. If you don’t have a whisk, a fork works just as well!
- Rolling Pin: While not mandatory, a rolling pin makes shaping the dough easier. If you don’t have one, you can use a clean bottle or your hands.
- Baking Sheet: A flat baking sheet is perfect for placing your breadsticks. If you don’t have one, a pizza stone or even a cast-iron skillet can work in a pinch.
- Parchment Paper: This is optional but highly recommended for easy cleanup and to prevent sticking. If you don’t have it, just grease your baking sheet well.
- Kitchen Towel: You’ll need this to cover your dough while it rises. Any clean cloth will do!
With these tools at your side, you’re all set to create your own batch of Buttery Italian Herb Breadsticks. Remember, cooking is about improvisation and creativity, so feel free to adapt as needed. Let’s get baking!
Variations of Buttery Italian Herb Breadsticks
As I’ve experimented with my Buttery Italian Herb Breadsticks, I’ve discovered that there are endless ways to put a personal twist on this classic recipe. Each variation brings its own unique flavor and flair, making it a fun adventure in the kitchen. Here are a few of my favorite variations that you might want to try:
- Cheesy Garlic Breadsticks: Add a generous sprinkle of shredded mozzarella or Parmesan cheese to the dough before shaping. You can also mix in some minced garlic for that extra punch of flavor.
- Herb-Infused Olive Oil: Instead of brushing with plain melted butter, try using herb-infused olive oil. Just warm some olive oil and steep fresh herbs like rosemary or thyme in it for a few minutes. Brush this aromatic oil on your breadsticks before baking.
- Spicy Breadsticks: If you love a little heat, mix in some red pepper flakes into the dough or sprinkle them on top before baking. It adds a delightful kick that pairs beautifully with the buttery goodness.
- Sweet Cinnamon Breadsticks: For a dessert twist, omit the herbs and add a tablespoon of cinnamon and sugar to the dough. After baking, brush with melted butter and sprinkle with a cinnamon-sugar mixture for a sweet treat!
These variations not only keep things exciting but also allow you to cater to different tastes and occasions. Whether you’re hosting a dinner party or just enjoying a cozy night in, there’s a version of Buttery Italian Herb Breadsticks for every moment. So, don’t hesitate to get creative and make these breadsticks your own!
Cooking Notes for Buttery Italian Herb Breadsticks
As I’ve baked my fair share of Buttery Italian Herb Breadsticks, I’ve picked up a few handy notes that can make your baking experience even smoother. Here are some tips to keep in mind:
- Room Temperature Ingredients: If you can, let your butter and any other dairy ingredients come to room temperature before using them. This helps them blend more easily into the dough.
- Don’t Rush the Rising: Allowing the dough to rise properly is crucial for achieving that fluffy texture. If your kitchen is cool, consider placing the dough in a slightly warmed oven (turned off) to help it rise.
- Experiment with Herbs: Feel free to mix and match herbs based on your preference. Fresh herbs can add a vibrant flavor, while dried herbs are convenient and still delicious.
- Storage Tips: If you have leftovers (which is rare!), store them in an airtight container at room temperature for up to two days. You can also freeze them for later enjoyment—just reheat in the oven for a few minutes to bring back that fresh-baked taste.
- Pairing Suggestions: These breadsticks are fantastic on their own, but they also shine when served with marinara sauce, garlic butter, or even a creamy dip. Get creative with your pairings!
With these cooking notes in your back pocket, you’re well on your way to mastering the art of Buttery Italian Herb Breadsticks. Remember, every baking adventure is a chance to learn and grow, so enjoy the process and have fun in the kitchen!
Serving Suggestions for Buttery Italian Herb Breadsticks
Now that your Buttery Italian Herb Breadsticks are golden and fragrant, it’s time to think about how to serve them! I love to get creative with my serving ideas, as these breadsticks can complement a variety of dishes and occasions. Here are some of my favorite ways to enjoy them:
- With Pasta Dishes: Serve your breadsticks alongside a hearty spaghetti or fettuccine dish. They’re perfect for soaking up that delicious sauce!
- As an Appetizer: Arrange them on a platter with a side of marinara sauce or garlic butter for dipping. It’s a crowd-pleaser at parties!
- With Soups and Salads: Pair your breadsticks with a warm bowl of minestrone or a fresh garden salad. They add a delightful crunch and flavor contrast.
- For a Snack: Enjoy them on their own as a tasty snack. I often find myself sneaking a few right off the baking sheet!
- With Cheese and Charcuterie: Create a beautiful cheese board and include your breadsticks as a crunchy element. They pair wonderfully with cheeses and cured meats.
These serving suggestions not only enhance the experience of enjoying Buttery Italian Herb Breadsticks but also allow you to share them in a way that brings people together. Whether it’s a cozy family dinner or a festive gathering, these breadsticks are sure to steal the show!
Tips for Making Buttery Italian Herb Breadsticks
As I’ve baked my fair share of Buttery Italian Herb Breadsticks, I’ve gathered a treasure trove of tips that can elevate your baking game. These little nuggets of wisdom can make all the difference in achieving that perfect batch. Here’s what I’ve learned along the way:
- Measure Accurately: Precision is key! Use measuring cups and spoons to ensure you get the right amounts. Too much flour can lead to dense breadsticks, while too little can make them too sticky.
- Warm Water is Essential: When proofing the yeast, make sure the water is warm but not hot. It should feel like a cozy bath for the yeast, around 110°F (43°C). This helps activate the yeast for that fluffy texture.
- Don’t Skip the Kneading: Kneading the dough is crucial for developing gluten, which gives the breadsticks their structure. Aim for a smooth and elastic dough—this is where the magic happens!
- Experiment with Toppings: Get creative with your toppings! Whether it’s a sprinkle of sea salt, a dash of garlic powder, or a handful of fresh herbs, these little additions can take your breadsticks to the next level.
- Let Them Cool: After baking, let your breadsticks cool for a few minutes before diving in. This helps them set and makes them easier to handle. Plus, it builds anticipation!
With these tips in your back pocket, you’re well on your way to mastering the art of Buttery Italian Herb Breadsticks. Remember, every baking adventure is a chance to learn and grow, so enjoy the process and have fun in the kitchen!
Breakdown of Time for Buttery Italian Herb Breadsticks
As a passionate home cook, I know that time management is key in the kitchen. When it comes to making Buttery Italian Herb Breadsticks, it’s all about balancing the prep and cooking times to create that perfect batch. Here’s a quick breakdown of the time you’ll need:
- Prep Time: Approximately 15-20 minutes. This includes gathering your ingredients, mixing the dough, and getting everything ready for the first rise.
- Rising Time: About 1 hour. This is when the dough works its magic, doubling in size and becoming fluffy. Patience is key here!
- Cooking Time: 15-20 minutes. Once shaped, your breadsticks will bake to golden perfection in no time.
- Total Time: Roughly 1 hour and 35-40 minutes. This includes all the prep, rising, and baking time. It’s a small investment for such delicious results!
With this time breakdown, you can plan your cooking session accordingly. I often find that the anticipation of waiting for the dough to rise only adds to the excitement of enjoying those warm, buttery breadsticks. So, gather your ingredients, set your timer, and let’s get baking!
Nutritional Information for Buttery Italian Herb Breadsticks
As a passionate home cook, I believe that enjoying delicious food doesn’t have to come at the expense of our health. While Buttery Italian Herb Breadsticks are a delightful treat, it’s always good to know what we’re putting into our bodies. Here’s a general breakdown of the nutritional information for one breadstick, assuming you make about 12 from the recipe:
- Calories: Approximately 120
- Protein: 3g
- Carbohydrates: 20g
- Fat: 4g
- Saturated Fat: 2.5g
- Sodium: 150mg
- Fiber: 1g
- Sugar: 1g
Keep in mind that these values can vary based on the specific ingredients you use and any optional add-ons you choose to include. For instance, adding cheese or using more butter will increase the calorie count. However, the beauty of making these breadsticks at home is that you can control the ingredients and make them fit your dietary preferences.
So, whether you’re enjoying them as a side dish or a snack, you can savor each bite of your Buttery Italian Herb Breadsticks with a little more peace of mind. After all, cooking is about balance, and these breadsticks are a delicious way to bring joy to your table!
Frequently Asked Questions about Buttery Italian Herb Breadsticks
As I’ve shared my love for Buttery Italian Herb Breadsticks, I’ve often received questions from fellow home cooks eager to try their hand at this delightful recipe. I love connecting with others through cooking, so I’ve compiled some of the most frequently asked questions to help you on your baking journey. Let’s dive in!
Can I use whole wheat flour instead of all-purpose flour?
Absolutely! Whole wheat flour can add a nutty flavor and extra fiber to your breadsticks. However, keep in mind that the texture may be denser. You might want to mix half all-purpose flour and half whole wheat for a lighter result.
What if I don’t have active dry yeast?
No worries! You can use instant yeast instead. Just sprinkle it directly into your dry ingredients without proofing it first. It’s a great time-saver and works just as well!
How do I store leftover breadsticks?
If you have any leftovers (which is rare in my house!), store them in an airtight container at room temperature for up to two days. You can also freeze them for later enjoyment. Just reheat in the oven for a few minutes to bring back that fresh-baked taste!
Can I make the dough ahead of time?
Yes! You can prepare the dough and let it rise, then punch it down and refrigerate it for up to 24 hours. When you’re ready to bake, let it come to room temperature before shaping and baking.
What can I serve with these breadsticks?
The possibilities are endless! I love serving them with pasta dishes, soups, or even as an appetizer with marinara sauce for dipping. They also pair wonderfully with cheese and charcuterie boards!
Can I add different herbs or spices?
Definitely! Feel free to experiment with your favorite herbs and spices. Fresh herbs like rosemary or thyme can add a lovely flavor, while spices like red pepper flakes can give them a nice kick. Get creative and make them your own!
With these answers in hand, I hope you feel more confident in your journey to create Buttery Italian Herb Breadsticks. Remember, cooking is all about exploration and joy, so don’t hesitate to ask questions and share your experiences. Happy baking!
Conclusion on Buttery Italian Herb Breadsticks
As I wrap up this delightful journey of making Buttery Italian Herb Breadsticks, I can’t help but feel a sense of warmth and satisfaction. These breadsticks are more than just a recipe; they are a celebration of flavors, a testament to the joy of cooking, and a way to bring loved ones together around the table. The buttery richness combined with the aromatic herbs creates a symphony of taste that elevates any meal.
What I love most about these breadsticks is their versatility. Whether you’re serving them at a family dinner, a cozy gathering with friends, or simply enjoying them as a snack, they never fail to impress. Plus, the process of making them is a wonderful way to connect with your kitchen and unleash your creativity. With just a few simple ingredients and a little love, you can create something truly special.
So, I encourage you to give these Buttery Italian Herb Breadsticks a try. Embrace the process, savor the aromas, and enjoy the smiles they bring. Cooking is an adventure, and every bite of these breadsticks is a reminder of the joy that comes from sharing good food with good company. Happy baking!