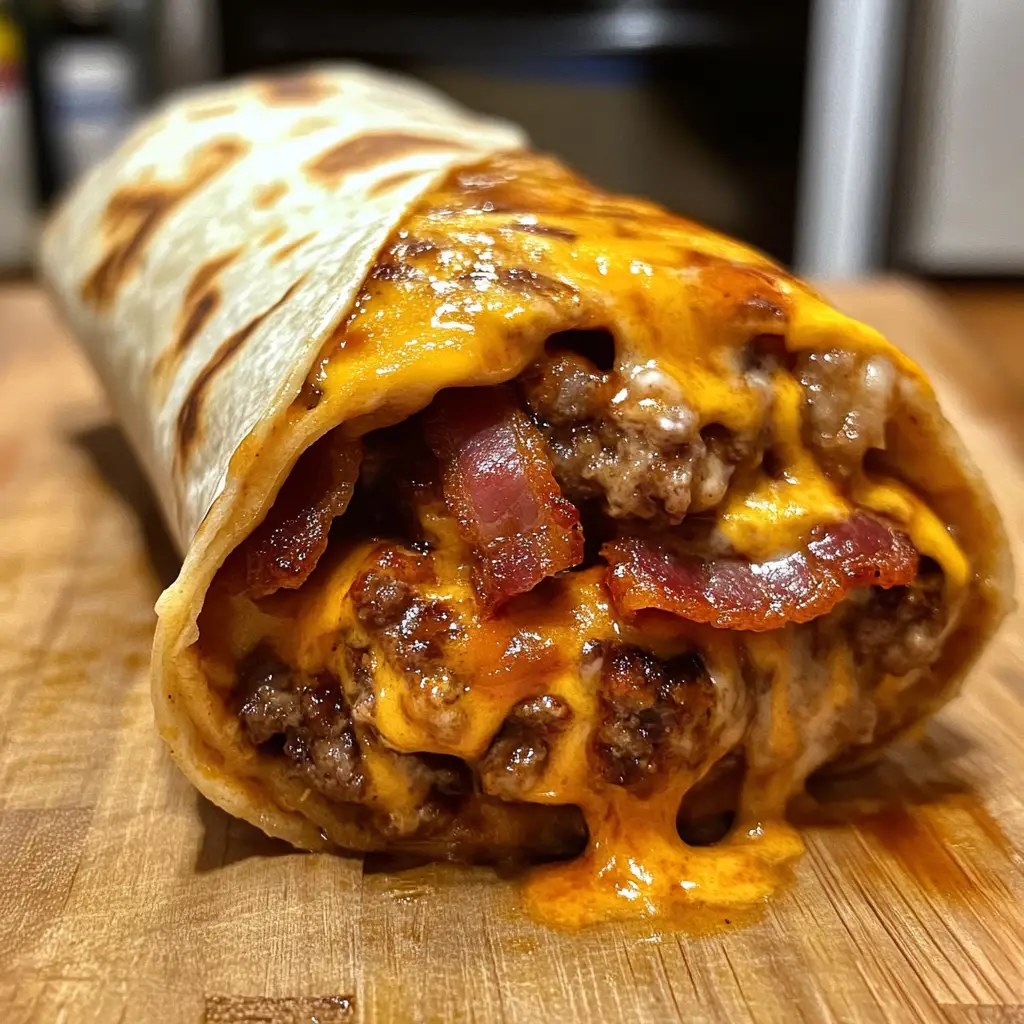
Introduction to BBQ Bacon Cheeseburger Wraps
As a passionate home cook, I often find myself dreaming up new ways to enjoy classic flavors. One sunny afternoon, while flipping through my favorite cookbooks, I stumbled upon the idea of BBQ Bacon Cheeseburger Wraps. Instantly, my taste buds tingled with excitement! The thought of juicy beef, crispy bacon, and tangy BBQ sauce all wrapped up in a warm tortilla was simply irresistible.
These wraps are not just a meal; they’re a culinary adventure! I remember the first time I made them for my family. The aroma of sizzling bacon filled the kitchen, and my kids couldn’t wait to dig in. As I assembled the wraps, I felt like a magician, transforming simple ingredients into a delicious feast. The best part? They’re perfect for any occasion—whether it’s a casual weeknight dinner or a backyard barbecue with friends.
What I love most about BBQ Bacon Cheeseburger Wraps is their versatility. You can customize them to suit your taste, adding your favorite toppings or even swapping out ingredients. Plus, they’re easy to make, which means you can whip them up in no time. So, grab your apron and let’s dive into this mouthwatering recipe that’s sure to become a family favorite!
Ingredients for BBQ Bacon Cheeseburger Wraps
Before we jump into the cooking process, let’s gather all the ingredients needed for these scrumptious BBQ Bacon Cheeseburger Wraps. I always believe that the quality of your ingredients can make or break a dish. So, let’s make sure we’re using the best!
Main Ingredients
- 1 pound ground beef (80/20 for the best flavor and juiciness)
- 8 slices of bacon (thick-cut for extra crunch)
- 1 cup shredded cheddar cheese (or your favorite cheese)
- 1/2 cup BBQ sauce (homemade or store-bought, but I recommend a smoky flavor)
- 4 large flour tortillas (burrito-sized for ample filling)
- Salt and pepper to taste
When selecting your ground beef, I always opt for grass-fed if possible. It adds a richer flavor and is often healthier. For the bacon, look for nitrate-free options if you’re concerned about additives. And don’t skimp on the cheese—go for a good quality cheddar that melts beautifully!
Optional Add-ons
- 1/2 cup diced onions (grilled or raw, depending on your preference)
- 1/2 cup sliced pickles (for that tangy crunch)
- 1/4 cup jalapeños (for a spicy kick)
- Fresh lettuce or spinach (for a refreshing crunch)
- Avocado slices (because who doesn’t love avocado?)
Feel free to get creative with your add-ons! I often throw in whatever I have on hand. Sometimes, I’ll add a dollop of sour cream or a sprinkle of fresh herbs. The beauty of these wraps is that they can be tailored to your taste buds. So, don’t hesitate to mix and match!
How to Prepare BBQ Bacon Cheeseburger Wraps
Now that we have all our ingredients ready, it’s time to roll up our sleeves and get cooking! The process of making BBQ Bacon Cheeseburger Wraps is as fun as it is delicious. I love how each step brings me closer to that first bite. Let’s dive into the preparation!
Step 1: Cook the Bacon
First things first, we need to get that bacon sizzling! I usually start by heating a large skillet over medium heat. Once it’s hot, I lay the bacon strips in a single layer. The sound of bacon hitting the pan is music to my ears!
Tips for Perfectly Crispy Bacon
- Don’t overcrowd the pan; cook in batches if necessary.
- Flip the bacon occasionally for even cooking.
- Once crispy, transfer the bacon to a paper towel-lined plate to drain excess grease.
Step 2: Prepare the Ground Beef
With the bacon cooked to perfection, it’s time to focus on the ground beef. In the same skillet, I often use a bit of the leftover bacon grease for added flavor. I add the ground beef and break it apart with a spatula. The aroma is simply heavenly!
Tips for Seasoning the Beef
- Season generously with salt and pepper.
- For extra flavor, consider adding garlic powder or onion powder.
- Cook until browned and no longer pink, about 5-7 minutes.
Step 3: Assemble the Wraps
Now comes the fun part—assembling the wraps! I take a large flour tortilla and lay it flat on a clean surface. First, I spread a generous spoonful of BBQ sauce in the center. Then, I layer on the ground beef, crispy bacon, and a handful of shredded cheese. It’s like building a delicious tower!
Tips for Wrapping Techniques
- Don’t overfill the tortilla; it makes wrapping tricky.
- Fold in the sides first, then roll from the bottom up.
- Secure with a toothpick if needed, but I usually just place the seam side down.
Step 4: Grill or Pan-Fry the Wraps
To finish off these wraps, I like to grill or pan-fry them for a crispy exterior. I heat a bit of oil in the skillet over medium heat and place the wraps seam-side down. The sound of them sizzling is so satisfying!
Tips for Achieving a Golden Brown Finish
- Cook for about 2-3 minutes on each side until golden brown.
- Press down gently with a spatula for even browning.
- Keep an eye on them to avoid burning!
Once they’re golden and crispy, I remove them from the heat and let them cool for a minute. Then, it’s time to slice them in half and reveal that delicious filling. Trust me, the anticipation is worth it!
Equipment Needed for BBQ Bacon Cheeseburger Wraps
Before we dive into the deliciousness of BBQ Bacon Cheeseburger Wraps, let’s make sure we have the right tools at our disposal. Having the right equipment can make the cooking process smoother and more enjoyable. Here’s what you’ll need:
- Large Skillet: A non-stick or cast-iron skillet works best for cooking the bacon and beef. If you don’t have a skillet, a frying pan will do just fine!
- Spatula: A sturdy spatula is essential for flipping the bacon and wraps. I prefer a silicone spatula to avoid scratching my pans.
- Cutting Board: This is where you’ll assemble your wraps. A large cutting board gives you plenty of space to work.
- Knife: A sharp knife is needed for slicing the bacon and any optional add-ons like onions or pickles.
- Paper Towels: These are handy for draining excess grease from the bacon and keeping your workspace clean.
- Toothpicks (optional): If you want to secure your wraps, toothpicks can help keep everything in place.
With these tools in hand, you’re all set to create your BBQ Bacon Cheeseburger Wraps. Remember, cooking is all about improvisation, so feel free to use what you have on hand. Let’s get cooking!
Variations of BBQ Bacon Cheeseburger Wraps
One of the things I adore about BBQ Bacon Cheeseburger Wraps is their flexibility. You can easily switch things up to keep your taste buds excited! Here are a few variations that I’ve tried and loved:
- Spicy BBQ Bacon Cheeseburger Wraps: Add some diced jalapeños or a splash of hot sauce to the ground beef for a fiery kick. It’s like a flavor explosion in every bite!
- Veggie Lover’s Wrap: Swap out the beef for black beans or lentils. Add in some grilled bell peppers and zucchini for a hearty, meatless option that’s still packed with flavor.
- Buffalo Chicken Wrap: Instead of beef, use shredded rotisserie chicken tossed in buffalo sauce. Top it off with blue cheese crumbles for a tangy twist that’s sure to please!
- Breakfast Wrap: Use scrambled eggs instead of ground beef, and add crispy bacon, cheese, and a drizzle of BBQ sauce. It’s a delicious way to start your day!
These variations not only keep things interesting but also allow you to cater to different dietary preferences. I love experimenting with new flavors, and I encourage you to do the same! The sky’s the limit when it comes to creating your perfect BBQ Bacon Cheeseburger Wrap.
Cooking Notes for BBQ Bacon Cheeseburger Wraps
As I whip up my BBQ Bacon Cheeseburger Wraps, I’ve learned a few cooking notes that can elevate the experience. These little tips can make a big difference in flavor and presentation!
- Preheat Your Skillet: Always make sure your skillet is hot before adding the bacon. This helps achieve that perfect crispy texture right from the start.
- Let the Bacon Cool: After cooking, let the bacon cool slightly before chopping it. This helps it retain its crunch when added to the wraps.
- Don’t Rush the Beef: When cooking the ground beef, take your time. Browning it well adds depth to the flavor. A little patience goes a long way!
- Experiment with Sauces: While BBQ sauce is a must, don’t hesitate to mix in some ranch or sriracha for a unique twist. It’s all about finding that perfect balance of flavors.
- Serve Immediately: These wraps are best enjoyed fresh off the skillet. The crispy exterior and gooey cheese create a delightful contrast that’s hard to resist!
By keeping these cooking notes in mind, you’ll be well on your way to creating BBQ Bacon Cheeseburger Wraps that are not only delicious but also memorable. Happy cooking!
Serving Suggestions for BBQ Bacon Cheeseburger Wraps
Once your BBQ Bacon Cheeseburger Wraps are ready, it’s time to think about how to serve them for maximum enjoyment! I love to make the presentation as delightful as the flavors. Here are some of my favorite serving suggestions:
- Side Dishes: Pair your wraps with crispy sweet potato fries or a fresh garden salad. The sweetness of the fries complements the savory wraps perfectly!
- Dipping Sauces: Serve with extra BBQ sauce, ranch dressing, or even a zesty chipotle mayo for dipping. It adds an extra layer of flavor that everyone will love.
- Garnishes: Top the wraps with fresh cilantro or green onions for a pop of color and freshness. A squeeze of lime juice can also brighten up the flavors!
- Platter Style: Arrange the wraps on a large platter, cut in half, and serve them family-style. It encourages sharing and makes for a fun dining experience!
These serving suggestions not only enhance the meal but also create a festive atmosphere. Whether it’s a casual dinner or a gathering with friends, these wraps are sure to be a hit!
Tips for Making BBQ Bacon Cheeseburger Wraps
As I’ve crafted my BBQ Bacon Cheeseburger Wraps over the years, I’ve gathered a treasure trove of tips that can help you achieve wrap perfection. These little nuggets of wisdom can make your cooking experience smoother and your wraps even more delicious!
- Prep Ahead: If you’re short on time, consider prepping your ingredients in advance. Chop your veggies, cook the bacon, and even brown the beef a day before. This way, assembly becomes a breeze!
- Use Fresh Tortillas: Fresh tortillas make all the difference. They’re softer and more pliable, making it easier to wrap without tearing. If you can, warm them slightly before filling.
- Don’t Skip the Cheese: Cheese is the glue that holds everything together! Use a generous amount to ensure that every bite is gooey and satisfying.
- Experiment with Seasonings: Don’t be afraid to play with spices! A sprinkle of smoked paprika or a dash of cayenne can elevate the flavor profile of your beef.
- Let Them Rest: After cooking, let the wraps sit for a minute before slicing. This helps the cheese set slightly, making for cleaner cuts and less mess!
With these tips in your back pocket, you’ll be well on your way to creating BBQ Bacon Cheeseburger Wraps that are not only tasty but also a joy to make. Happy cooking!
Breakdown of Time for BBQ Bacon Cheeseburger Wraps
When it comes to cooking, I always appreciate knowing how much time I need to set aside. It helps me plan my meals better and ensures I can enjoy the process without feeling rushed. Here’s a quick breakdown of the time required to make these delicious BBQ Bacon Cheeseburger Wraps:
- Prep Time: 15 minutes
- Cooking Time: 20 minutes
- Total Time: 35 minutes
In just 35 minutes, you can have a plateful of these mouthwatering wraps ready to serve! I love how quick and easy they are, making them perfect for a weeknight dinner or a last-minute gathering. So, roll up your sleeves and let’s get cooking!
Nutritional Information for BBQ Bacon Cheeseburger Wraps
As a home cook, I always find it helpful to know the nutritional value of the meals I prepare. It allows me to enjoy my food while being mindful of what I’m eating. Here’s a general breakdown of the nutritional information for one BBQ Bacon Cheeseburger Wrap, assuming it’s made with the main ingredients listed:
- Calories: Approximately 550-600 calories
- Protein: 30-35 grams
- Fat: 35-40 grams
- Carbohydrates: 30-35 grams
- Sodium: 800-900 mg
- Fiber: 2-3 grams
Keep in mind that these values can vary based on the specific ingredients you choose, such as the type of cheese or the brand of BBQ sauce. If you’re looking to lighten things up, consider using leaner ground beef or whole wheat tortillas. I love how these wraps can be adjusted to fit different dietary needs while still being delicious!
Frequently Asked Questions about BBQ Bacon Cheeseburger Wraps
As I’ve shared my love for BBQ Bacon Cheeseburger Wraps, I often get questions from fellow home cooks eager to try this delicious recipe. Here are some of the most common questions I’ve encountered, along with my answers to help you on your culinary journey!
Can I make BBQ Bacon Cheeseburger Wraps ahead of time?
Absolutely! You can prepare the filling in advance and store it in the refrigerator for up to 2 days. When you’re ready to eat, simply assemble the wraps and grill or pan-fry them. This makes for a quick and easy meal on busy nights!
What can I use instead of ground beef?
If you’re looking for alternatives, ground turkey or chicken works wonderfully! You can also try plant-based options like lentils or black beans for a vegetarian twist. The key is to season them well to ensure they’re packed with flavor!
How do I store leftovers?
To store leftovers, wrap the BBQ Bacon Cheeseburger Wraps tightly in plastic wrap or place them in an airtight container. They can be kept in the refrigerator for up to 3 days. When reheating, I recommend using a skillet to maintain that crispy texture!
Can I freeze BBQ Bacon Cheeseburger Wraps?
Yes, you can freeze them! Just make sure to wrap each wrap individually in plastic wrap and then place them in a freezer-safe bag. They can be frozen for up to 2 months. When you’re ready to enjoy, thaw them in the refrigerator overnight and reheat in a skillet.
What’s the best way to serve these wraps?
I love serving BBQ Bacon Cheeseburger Wraps with a side of crispy sweet potato fries or a fresh salad. You can also offer a variety of dipping sauces like ranch or extra BBQ sauce for a fun twist. It makes for a delightful meal that everyone will enjoy!
These FAQs should help you navigate your BBQ Bacon Cheeseburger Wrap adventure with ease. Remember, cooking is all about experimenting and having fun, so don’t hesitate to make these wraps your own!
Conclusion on BBQ Bacon Cheeseburger Wraps
In conclusion, BBQ Bacon Cheeseburger Wraps are more than just a meal; they’re a celebration of flavors and creativity in the kitchen. With their juicy beef, crispy bacon, and smoky BBQ sauce, these wraps are sure to tantalize your taste buds and leave you craving more. What I love most is their versatility—whether you’re feeding a crowd or enjoying a cozy dinner at home, they can be easily customized to suit any palate.
Not only are they quick to prepare, but they also bring a sense of fun to mealtime. I cherish the moments spent assembling these wraps with my family, sharing laughter and stories as we create our own delicious masterpieces. Plus, with the option to prep ingredients ahead of time, they fit seamlessly into even the busiest of schedules.
So, whether you’re hosting a backyard barbecue or simply looking for a satisfying weeknight dinner, BBQ Bacon Cheeseburger Wraps are the perfect choice. I encourage you to give this recipe a try and make it your own. Happy cooking, and enjoy every delicious bite!