
Introduction to Apple Danish Two Ways
As a busy mom, I know how precious time can be, especially when it comes to preparing meals. That’s why I’m excited to share my recipe for Apple Danish Two Ways! This delightful pastry is not only a quick solution for breakfast but also a sweet treat that can impress your loved ones. With its flaky layers and warm apple filling, it’s like a hug in pastry form. Whether you’re looking to whip up something special for a weekend brunch or a cozy dessert, this recipe is sure to become a favorite in your kitchen!
Why You’ll Love This Apple Danish Two Ways
This Apple Danish Two Ways recipe is a game-changer for busy days. It’s incredibly easy to make, taking just 45 minutes from start to finish. The taste? Absolutely divine! With the sweet, spiced apple filling and flaky pastry, it’s a delightful treat that satisfies both breakfast cravings and dessert desires. Plus, you can customize it to suit your family’s preferences, making it a versatile addition to your recipe collection!
Ingredients for Apple Danish Two Ways
Gathering the right ingredients is the first step to creating your delicious Apple Danish Two Ways. Here’s what you’ll need:
- Puff Pastry: The star of the show! This flaky pastry creates a light and airy base for your danish. You can find it in the freezer section of your grocery store.
- Diced Apples: Fresh apples are essential for that sweet, juicy filling. I love using Granny Smith for a tart kick, but feel free to mix varieties for a unique flavor.
- Sugar: A little sweetness goes a long way. It balances the tartness of the apples and enhances their natural flavors.
- Cinnamon: This warm spice adds a cozy touch to your filling. It’s like a sprinkle of autumn in every bite!
- Lemon Juice: A splash of lemon juice brightens the apple mixture and prevents browning. It’s a small but mighty ingredient!
- Egg (for egg wash): This is your secret weapon for achieving that golden, glossy finish. It makes your pastries look as good as they taste!
- Cream Cheese (optional): For the second variation, cream cheese adds a rich, creamy layer that pairs beautifully with the apples. You can use low-fat cream cheese if you prefer.
- Powdered Sugar (for glaze): A light drizzle of glaze adds a sweet finishing touch. It’s optional, but who can resist a little sweetness on top?
For exact measurements, check the bottom of the article where you can find everything listed for easy printing. Happy cooking!
How to Make Apple Danish Two Ways
Step 1: Preheat the Oven
Preheating your oven is crucial for baking pastries. It ensures that the puff pastry rises beautifully and bakes evenly. Set your oven to 400°F (200°C) and let it warm up while you prepare the filling. This way, your Apple Danish will be perfectly golden and flaky!
Step 2: Prepare the Apple Filling
In a mixing bowl, combine your diced apples, sugar, cinnamon, and lemon juice. Stir gently until the apples are well-coated. The sugar will draw out the juices, creating a sweet syrup. The cinnamon adds warmth, while the lemon juice brightens the flavors. This filling is the heart of your Apple Danish!
Step 3: Roll Out the Puff Pastry
Take your puff pastry sheets out of the freezer and let them thaw for a few minutes. Once they’re pliable, roll them out on a lightly floured surface. Cut the pastry into squares, about 4 inches each. This will be the base for your delicious Apple Danish!
Step 4: Assemble the First Variation
Place a generous spoonful of the apple mixture in the center of each pastry square. Then, fold the corners over the filling, creating a little pocket. Pinch the edges to seal them tightly. This variation is simple yet delightful, allowing the apple goodness to shine through!
Step 5: Assemble the Second Variation
For the second variation, spread a layer of cream cheese on the pastry before adding the apple mixture. This creamy layer adds richness and balances the sweetness of the apples. Once you’ve added the filling, fold the corners over just like the first variation. It’s a delicious twist!
Step 6: Brush with Egg Wash
To achieve that beautiful golden finish, brush the edges of each pastry with an egg wash. Simply beat an egg and use a pastry brush to apply it. This step is essential for giving your Apple Danish a shiny, appetizing look that will make everyone want to dig in!
Step 7: Bake the Pastries
Place your assembled pastries on a baking sheet lined with parchment paper. Bake them in the preheated oven for 20-25 minutes. Keep an eye on them; they should be golden brown and puffed up. A little patience here will reward you with a delightful treat!
Step 8: Cool and Glaze
Once baked, remove the pastries from the oven and let them cool on a wire rack. After they’ve cooled slightly, drizzle with a powdered sugar glaze for that sweet finishing touch. This step is optional, but it adds a lovely sweetness that complements the apple filling perfectly!
Tips for Success
- Make sure your puff pastry is cold for easier handling and better flakiness.
- Don’t overfill the pastries; a spoonful of filling is just right!
- Experiment with different apple varieties for unique flavors.
- For a fun twist, add nuts or raisins to the apple mixture.
- Serve warm for the best taste and texture experience!
Equipment Needed
- Baking Sheet: A standard baking sheet works perfectly. If you don’t have one, a large oven-safe dish will do.
- Parchment Paper: This helps prevent sticking. If you’re out, lightly greasing the baking sheet is a good alternative.
- Mixing Bowl: Any bowl will work for mixing your apple filling.
- Pastry Brush: Use this for the egg wash. A clean paintbrush can be a handy substitute!
Variations
- Nutty Delight: Add chopped walnuts or pecans to the apple filling for a crunchy texture and nutty flavor.
- Raisin Surprise: Toss in some raisins or dried cranberries for a sweet and chewy contrast to the apples.
- Spiced Up: Experiment with spices like nutmeg or allspice alongside cinnamon for a warm, aromatic twist.
- Gluten-Free Option: Use gluten-free puff pastry to make this recipe suitable for those with gluten sensitivities.
- Vegan Variation: Substitute the egg wash with a plant-based milk wash and use dairy-free cream cheese for a vegan-friendly treat.
Serving Suggestions
- Pair your Apple Danish with a hot cup of coffee or tea for a cozy breakfast experience.
- Serve with a dollop of whipped cream or a scoop of vanilla ice cream for a delightful dessert.
- Garnish with fresh mint leaves for a pop of color and freshness.
- For a brunch spread, include fresh fruit or yogurt on the side.
FAQs about Apple Danish Two Ways
Can I use frozen apples for the filling?
Absolutely! Frozen apples work well in this recipe. Just make sure to thaw and drain any excess liquid before mixing them with sugar and spices. This will keep your filling from becoming too watery.
How do I store leftover Apple Danish?
Store any leftovers in an airtight container at room temperature for up to two days. If you want to keep them longer, refrigerate them for up to a week. Just reheat in the oven for a few minutes to restore that flaky texture!
Can I make Apple Danish ahead of time?
Yes! You can prepare the pastries and freeze them before baking. Just assemble them, place them on a baking sheet, and freeze until solid. Then transfer to a freezer bag. When you’re ready to bake, just add a few extra minutes to the baking time.
What can I serve with Apple Danish?
These pastries pair wonderfully with coffee, tea, or even a scoop of vanilla ice cream. For a brunch, consider serving them alongside fresh fruit or yogurt for a balanced meal!
Can I customize the filling?
Definitely! Feel free to get creative with your filling. You can add nuts, raisins, or even other fruits like pears or berries. The possibilities are endless, making this recipe a fun canvas for your culinary creativity!
Final Thoughts
Making Apple Danish Two Ways is more than just baking; it’s about creating moments of joy in your kitchen. The aroma of warm apples and cinnamon fills the air, wrapping your home in a cozy embrace. Whether you’re sharing these pastries with family at breakfast or enjoying one as a sweet treat after dinner, each bite is a reminder of the love and care you put into your cooking. Plus, the versatility of this recipe means you can adapt it to suit any occasion. So, roll up your sleeves and let the magic of baking bring happiness to your table!
Print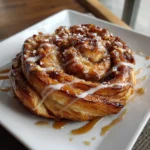
Apple Danish Two Ways: Discover Delicious Variations!
- Total Time: 45 minutes
- Yield: 12 servings 1x
- Diet: Vegetarian
Description
Apple Danish Two Ways is a delightful pastry recipe that showcases two variations of the classic apple danish, perfect for breakfast or dessert.
Ingredients
- 2 sheets of puff pastry
- 2 cups of diced apples
- 1/2 cup of sugar
- 1 teaspoon of cinnamon
- 1 tablespoon of lemon juice
- 1 egg (for egg wash)
- 1/4 cup of cream cheese (optional for one variation)
- 1/4 cup of powdered sugar (for glaze)
Instructions
- Preheat the oven to 400°F (200°C).
- In a bowl, mix diced apples, sugar, cinnamon, and lemon juice.
- Roll out the puff pastry sheets and cut them into squares.
- For the first variation, place the apple mixture in the center of the pastry squares and fold the corners over.
- For the second variation, spread cream cheese on the pastry before adding the apple mixture.
- Brush the edges with egg wash.
- Bake for 20-25 minutes or until golden brown.
- Let cool and drizzle with powdered sugar glaze if desired.
Notes
- Feel free to add nuts or raisins for extra texture.
- Serve warm for the best flavor.
- Can be made ahead and frozen before baking.
- Prep Time: 20 minutes
- Cook Time: 25 minutes
- Category: Pastry
- Method: Baking
- Cuisine: American
Nutrition
- Serving Size: 1 danish
- Calories: 250
- Sugar: 12g
- Sodium: 150mg
- Fat: 10g
- Saturated Fat: 5g
- Unsaturated Fat: 3g
- Trans Fat: 0g
- Carbohydrates: 35g
- Fiber: 2g
- Protein: 3g
- Cholesterol: 30mg
Keywords: Apple Danish, Pastry, Breakfast, Dessert, Baking


