Introduction to Apple Crisp Cheesecake Bars
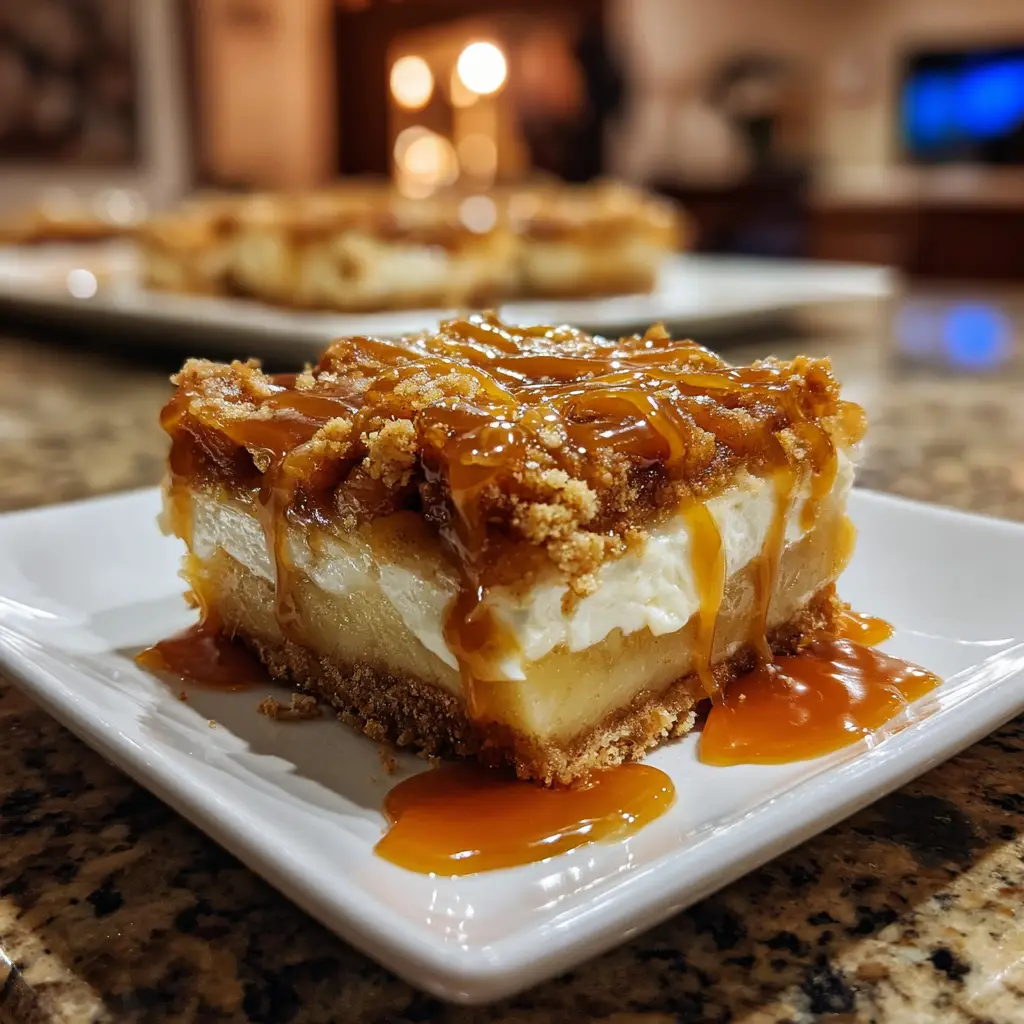
As a busy mom, I know how precious time can be, especially when it comes to whipping up something delicious. That’s why I’m excited to share my recipe for Apple Crisp Cheesecake Bars! These bars are the perfect blend of creamy cheesecake and sweet, tart apples, all topped with a crunchy oat topping. They’re not just a treat for the taste buds; they’re a quick solution for a busy day or a delightful dessert to impress your loved ones. Trust me, once you try these, they’ll become a staple in your home!
Why You’ll Love This Apple Crisp Cheesecake Bars
These Apple Crisp Cheesecake Bars are a dream come true for anyone juggling a busy schedule. They come together quickly, making them perfect for last-minute gatherings or a sweet treat after dinner. The combination of creamy cheesecake and spiced apples is simply irresistible. Plus, the crunchy oat topping adds a delightful texture that will have everyone coming back for seconds. You’ll love how easy they are to make and how much joy they bring!
Ingredients for Apple Crisp Cheesecake Bars
Gathering the right ingredients is the first step to creating these delightful Apple Crisp Cheesecake Bars. Here’s what you’ll need:
- Graham cracker crumbs: These form the base of your crust, providing a sweet and crunchy foundation.
- Unsalted butter: Melted butter binds the crumbs together, adding richness to the crust.
- Sugar: A touch of sweetness enhances the cheesecake filling and balances the tartness of the apples.
- Cream cheese: The star of the show! It gives the cheesecake its creamy texture and rich flavor.
- Eggs: They help set the cheesecake, giving it that perfect sliceable consistency.
- Vanilla extract: A splash of vanilla adds warmth and depth to the cheesecake filling.
- Apples: Choose your favorite variety! They bring a sweet and tart flavor that pairs beautifully with the cheesecake.
- Cinnamon: This spice adds a cozy, warm flavor that complements the apples perfectly.
- Rolled oats: These create the crunchy topping that contrasts beautifully with the creamy filling.
- Brown sugar: It adds a hint of caramel flavor to the topping, enhancing the overall sweetness.
- All-purpose flour: This helps to bind the topping together, giving it a nice texture.
For those looking for alternatives, you can use gluten-free graham crackers for a gluten-free version. And if you want to elevate your dessert, consider serving it with whipped cream or a drizzle of caramel sauce. The exact quantities for each ingredient are listed at the bottom of the article, ready for printing!
How to Make Apple Crisp Cheesecake Bars
Now that you have all your ingredients ready, let’s dive into the fun part—making these Apple Crisp Cheesecake Bars! Follow these simple steps, and you’ll have a delicious dessert that will wow your family and friends.
Step 1: Preheat the Oven
First things first, preheat your oven to 350°F (175°C). Preheating is crucial because it ensures even baking. If you skip this step, your bars might not set properly, and nobody wants a gooey mess!
Step 2: Prepare the Crust
In a mixing bowl, combine your graham cracker crumbs and melted butter. Stir until the crumbs are well-coated. This mixture should resemble wet sand. Next, press it firmly into the bottom of a greased baking dish. Use the back of a measuring cup or your fingers to create an even layer. This crust is the foundation of your bars, so make it sturdy!
Step 3: Make the Cheesecake Filling
In another bowl, beat the softened cream cheese and 1/2 cup of sugar until smooth and creamy. I like to use an electric mixer for this, but a whisk works too—just be prepared for a workout! Add in the eggs, one at a time, mixing well after each addition. Finally, stir in the vanilla extract. This filling is what makes your bars so rich and delicious!
Step 4: Layer the Cheesecake Mixture
Now it’s time to spread that luscious cheesecake mixture over your crust. Use a spatula to smooth it out evenly. This layer is the heart of your Apple Crisp Cheesecake Bars, so take your time to make it look nice!
Step 5: Prepare the Apple Layer
In a separate bowl, toss your sliced apples with the remaining sugar and cinnamon. This step is where the magic happens! The sugar will draw out the juices from the apples, making them sweet and flavorful. Layer the apple mixture over the cheesecake filling, spreading it out evenly. The apples will add a lovely tartness that balances the richness of the cheesecake.
Step 6: Create the Crisp Topping
In another bowl, combine the rolled oats, brown sugar, and flour. Mix until everything is well combined. Then, sprinkle this mixture generously over the apples. This topping is what gives your bars that delightful crunch, so don’t be shy!
Step 7: Bake to Perfection
Place your baking dish in the preheated oven and bake for 45-50 minutes. Keep an eye on it! You’ll know it’s done when the topping is golden brown and the cheesecake is set. A toothpick inserted in the center should come out clean. If it’s still gooey, give it a few more minutes.
Step 8: Cool and Slice
Once baked, remove the dish from the oven and let it cool completely. This step is essential! If you slice them too soon, they might fall apart. Once cooled, cut into bars and enjoy the fruits of your labor. Trust me, the wait will be worth it!
Tips for Success
- Use room temperature cream cheese for a smoother filling.
- Don’t skip the cooling step; it helps the bars set properly.
- Feel free to mix different apple varieties for added flavor.
- For a fun twist, add chopped nuts to the crisp topping.
- Store leftovers in an airtight container to keep them fresh.
Equipment Needed
- Baking dish: A 9×13 inch dish works perfectly. If you don’t have one, a similar-sized pan will do.
- Mixing bowls: Use any size you have on hand; just make sure they’re large enough for mixing.
- Electric mixer: A hand mixer is great, but a whisk will work if you’re feeling strong!
- Spatula: Essential for spreading the cheesecake mixture evenly.
- Measuring cups and spoons: Accurate measurements make a difference in baking.
Variations
- Nutty Delight: Add chopped walnuts or pecans to the crisp topping for an extra crunch and flavor.
- Spiced Up: Experiment with different spices like nutmeg or allspice for a unique twist on the classic cinnamon flavor.
- Fruit Fusion: Mix in other fruits like pears or cranberries with the apples for a delightful medley of flavors.
- Vegan Option: Substitute cream cheese with a plant-based alternative and use flax eggs for a vegan-friendly version.
- Gluten-Free: Use gluten-free graham crackers and ensure all other ingredients are certified gluten-free for a safe treat.
Serving Suggestions
- Serve warm with a dollop of whipped cream for a decadent touch.
- Drizzle with caramel sauce for an extra layer of sweetness.
- Pair with a scoop of vanilla ice cream for a delightful contrast.
- Garnish with a sprinkle of cinnamon for a beautiful presentation.
- Enjoy with a cup of hot tea or coffee for a cozy treat.
FAQs about Apple Crisp Cheesecake Bars
As you embark on your journey to make these delightful Apple Crisp Cheesecake Bars, you might have a few questions. Here are some common queries I’ve encountered, along with helpful answers to guide you along the way!
Can I use different types of apples for this recipe?
Absolutely! Mixing different apple varieties can enhance the flavor. I love using a combination of sweet and tart apples, like Granny Smith and Honeycrisp, for a balanced taste.
How do I store leftover Apple Crisp Cheesecake Bars?
Store any leftovers in an airtight container in the refrigerator. They’ll stay fresh for up to three days. Just be sure to let them cool completely before storing!
Can I freeze these bars for later?
Yes, you can freeze them! Wrap the bars tightly in plastic wrap and then in aluminum foil. They’ll keep well in the freezer for up to three months. Just thaw in the fridge before serving.
What can I serve with Apple Crisp Cheesecake Bars?
These bars are delicious on their own, but you can elevate them with a dollop of whipped cream, a drizzle of caramel sauce, or even a scoop of vanilla ice cream. They pair wonderfully with a warm beverage too!
Can I make these bars ahead of time?
Definitely! These bars can be made a day in advance. Just store them in the fridge, and they’ll be ready to serve when you are. Perfect for busy days or special occasions!
Final Thoughts
Making Apple Crisp Cheesecake Bars is more than just baking; it’s about creating memories in the kitchen. The delightful aroma of spiced apples and creamy cheesecake wafting through your home will bring smiles to your family’s faces. These bars are perfect for sharing at gatherings or enjoying on a cozy night in. Plus, they’re simple enough to whip up even on your busiest days. I hope you find as much joy in making and sharing these bars as I do. Trust me, once you take that first bite, you’ll be hooked on this delicious combination!
Print
Apple Crisp Cheesecake Bars: Indulge in Pure Delight!
- Total Time: 1 hour 10 minutes
- Yield: 12 bars 1x
- Diet: Vegetarian
Description
Apple Crisp Cheesecake Bars combine the creamy richness of cheesecake with the sweet and tart flavor of apples, all topped with a crunchy oat topping.
Ingredients
- 2 cups graham cracker crumbs
- 1/2 cup unsalted butter, melted
- 1 cup sugar, divided
- 2 (8 oz) packages cream cheese, softened
- 2 large eggs
- 1 tsp vanilla extract
- 3 cups apples, peeled and sliced
- 1 tsp cinnamon
- 1 cup rolled oats
- 1/2 cup brown sugar
- 1/2 cup all-purpose flour
Instructions
- Preheat the oven to 350°F (175°C).
- In a bowl, mix graham cracker crumbs and melted butter, then press into the bottom of a greased baking dish.
- In another bowl, beat cream cheese and 1/2 cup sugar until smooth. Add eggs and vanilla, mixing until combined.
- Spread the cream cheese mixture over the crust.
- In a separate bowl, toss sliced apples with remaining sugar and cinnamon, then layer over the cheesecake mixture.
- In a bowl, combine oats, brown sugar, and flour. Sprinkle over the apples.
- Bake for 45-50 minutes or until the topping is golden brown.
- Allow to cool before slicing into bars.
Notes
- For a gluten-free version, use gluten-free graham crackers.
- Serve with whipped cream or caramel sauce for extra indulgence.
- Store leftovers in the refrigerator for up to 3 days.
- Prep Time: 20 minutes
- Cook Time: 50 minutes
- Category: Dessert
- Method: Baking
- Cuisine: American
Nutrition
- Serving Size: 1 bar
- Calories: 320
- Sugar: 18g
- Sodium: 200mg
- Fat: 15g
- Saturated Fat: 8g
- Unsaturated Fat: 5g
- Trans Fat: 0g
- Carbohydrates: 42g
- Fiber: 2g
- Protein: 4g
- Cholesterol: 50mg
Keywords: Apple Crisp, Cheesecake, Dessert Bars, Fall Desserts


