Introduction to Mini Orange Mousse Cheesecake Recipe
As a passionate home cook, I find joy in creating desserts that not only taste divine but also bring a smile to the faces of my loved ones. One of my all-time favorites is the Mini Orange Mousse Cheesecake. This delightful treat combines the creamy richness of cheesecake with the light, airy texture of mousse, all wrapped up in a zesty orange flavor that dances on your taste buds. It’s like a sunny day on a plate!
Let me take you back to the first time I made this recipe. It was a warm summer afternoon, and I had a craving for something sweet yet refreshing. I rummaged through my pantry and found a few simple ingredients: cream cheese, oranges, and some graham crackers. With a sprinkle of creativity and a dash of enthusiasm, I whipped up these mini cheesecakes. The moment I took my first bite, I was transported to a citrus grove, the sun shining down, and the sweet scent of oranges filling the air. It was pure bliss!
What I love most about this Mini Orange Mousse Cheesecake Recipe is its versatility. Whether you’re hosting a summer barbecue, celebrating a birthday, or simply indulging in a sweet treat after dinner, these mini cheesecakes are perfect for any occasion. Plus, they’re easy to make and can be prepared ahead of time, allowing you to enjoy the moment with your guests instead of being stuck in the kitchen.
In this article, I’ll guide you through the ingredients, preparation steps, and tips to ensure your mini cheesecakes turn out perfectly every time. So, roll up your sleeves, and let’s embark on this delicious culinary adventure together!
Ingredients for Mini Orange Mousse Cheesecake Recipe
Before we dive into the delightful world of making Mini Orange Mousse Cheesecakes, let’s gather our ingredients. Having everything ready makes the cooking process smoother and more enjoyable. I always find that when I have my ingredients prepped, it feels like I’m setting the stage for a beautiful performance in the kitchen!
Main Ingredients
- 1 cup of graham cracker crumbs
- 4 tablespoons of unsalted butter, melted
- 8 ounces of cream cheese, softened
- 1/2 cup of granulated sugar
- 1 teaspoon of vanilla extract
- 1 cup of heavy whipping cream
- 1/2 cup of fresh orange juice (about 2-3 oranges)
- 1 tablespoon of orange zest (from about 1 orange)
- 1 teaspoon of unflavored gelatin (optional, for a firmer mousse)
When selecting your ingredients, I recommend using fresh oranges for the juice and zest. The vibrant flavor of fresh citrus truly elevates this dessert. If you can, opt for organic oranges; they tend to have a more robust flavor and are free from harmful pesticides. As for the cream cheese, make sure it’s at room temperature for a smooth and creamy filling.
Optional Add-ons
- Fresh mint leaves for garnish
- Chocolate shavings for a touch of decadence
- Additional fruit toppings like berries or kiwi for a colorful twist
- Crushed nuts for added crunch
These optional add-ons can take your mini cheesecakes to the next level. I love to sprinkle some chocolate shavings on top for a little extra indulgence. And if you’re feeling adventurous, try adding a layer of mixed berries on top for a burst of color and flavor. The possibilities are endless!
How to Prepare Mini Orange Mousse Cheesecake Recipe
Now that we have our ingredients ready, it’s time to roll up our sleeves and dive into the preparation of these delightful mini orange mousse cheesecakes! I promise, the process is as enjoyable as the final result. Let’s get started!
Step 1: Prepare the Crust
First things first, we need to create a delicious crust that will serve as the foundation for our cheesecakes. In a mixing bowl, combine the graham cracker crumbs and melted butter. Stir until the crumbs are evenly coated and resemble wet sand.
Tips for a Perfect Crust
- Press the mixture firmly into the bottom of your mini cheesecake cups. I like to use the back of a measuring cup to get an even layer.
- For an extra crunch, consider adding a tablespoon of sugar to the crust mixture.
- Don’t skip the chilling step! Pop the crust in the fridge for about 10-15 minutes to help it set before adding the filling.
Step 2: Make the Cheesecake Filling
Next, let’s whip up the creamy cheesecake filling. In a large mixing bowl, beat the softened cream cheese and granulated sugar together until smooth and fluffy. This usually takes about 2-3 minutes. Then, add in the vanilla extract, fresh orange juice, and orange zest. Mix until everything is well combined.
Tips for Creamy Filling
- Make sure your cream cheese is at room temperature. This helps avoid lumps and ensures a silky texture.
- Don’t overmix! Just blend until smooth to keep the filling light and airy.
Step 3: Prepare the Orange Mousse
Now comes the fun part—making the orange mousse! In a separate bowl, whip the heavy cream until soft peaks form. Gently fold the whipped cream into the cheesecake mixture. If you’re using gelatin, dissolve it in a tablespoon of warm water and add it to the mousse at this stage.
Tips for Fluffy Mousse
- Be gentle when folding the whipped cream into the mixture. You want to keep that airy texture!
- For a lighter mousse, you can whip the cream to stiff peaks, but be careful not to overwhip.
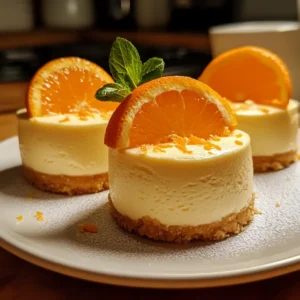
Step 4: Assemble the Cheesecakes
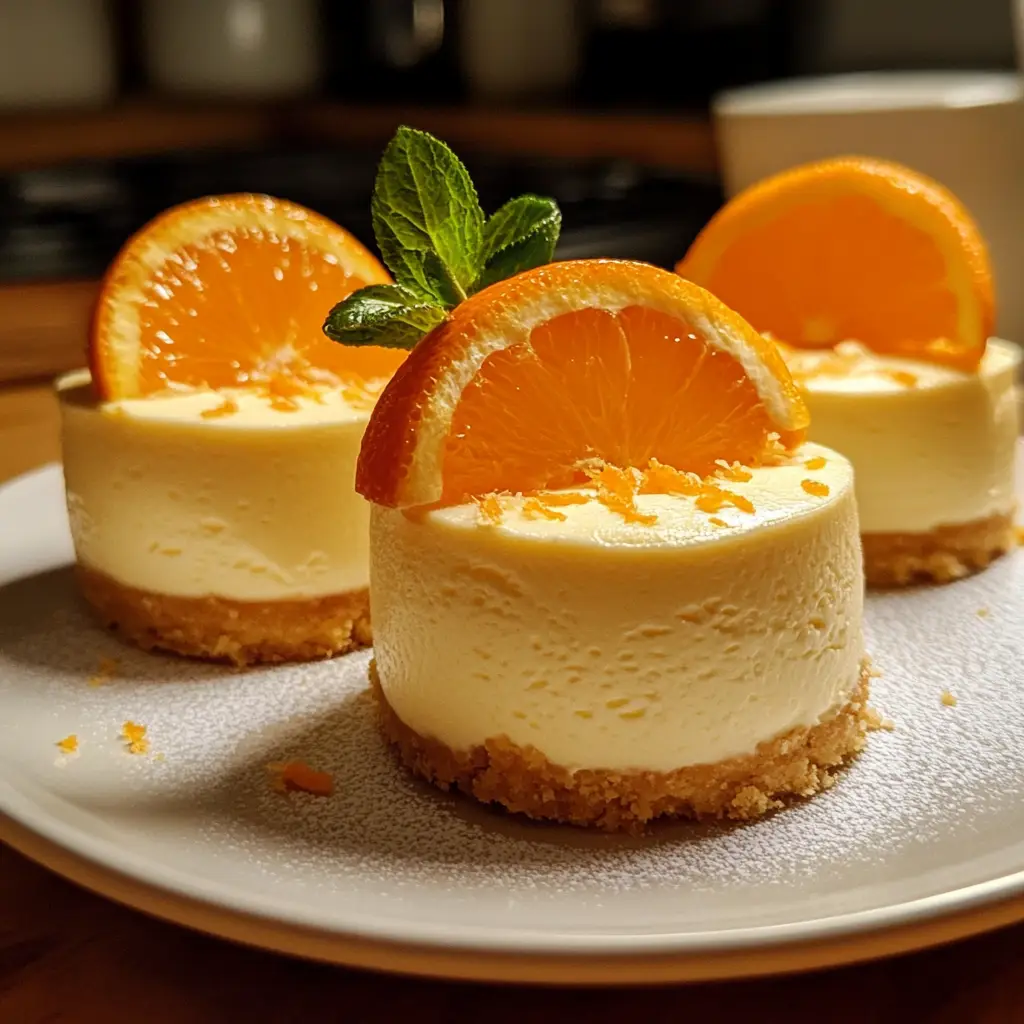
It’s time to bring everything together! Spoon the cheesecake filling over the chilled crusts, filling each cup about three-quarters full. Then, add a generous dollop of the orange mousse on top. I love to create a little swirl with a toothpick for a beautiful presentation!
Tips for Layering
- Use a piping bag for a neat and tidy way to layer the mousse on top.
- Feel free to get creative! You can alternate layers of cheesecake and mousse for a stunning effect.
Step 5: Chill and Serve
Finally, it’s time to let our mini cheesecakes chill in the fridge. Cover them with plastic wrap and let them set for at least 4 hours, or overnight if you can wait that long. This step is crucial for the flavors to meld and the texture to firm up.
Tips for Chilling Time
- For the best results, let them chill overnight. The longer they sit, the better they taste!
- Before serving, garnish with fresh mint leaves or chocolate shavings for that extra touch of elegance.
And there you have it! Your Mini Orange Mousse Cheesecakes are ready to dazzle your friends and family. I can already imagine the smiles on their faces as they take that first bite. Enjoy every moment of this delicious journey!
Equipment Needed for Mini Orange Mousse Cheesecake Recipe
Before we embark on our culinary adventure, let’s gather the essential tools that will help us create these delightful Mini Orange Mousse Cheesecakes. Having the right equipment makes the process smoother and more enjoyable. Here’s what you’ll need:
- Mixing Bowls: A couple of medium-sized mixing bowls will do the trick. I love using glass bowls because they’re easy to clean and you can see the beautiful colors of your ingredients.
- Electric Mixer: A hand mixer or stand mixer is perfect for whipping the cream and blending the cheesecake filling. If you don’t have one, a whisk will work, but it’ll take a bit more elbow grease!
- Measuring Cups and Spoons: Accurate measurements are key to a successful recipe. I always keep a set of measuring cups and spoons handy.
- Mini Cheesecake Cups: You can use silicone molds, muffin tins, or even small glass jars. If you don’t have mini cups, regular muffin tins will work just fine—just adjust the chilling time accordingly.
- Spatula: A rubber spatula is great for folding in the whipped cream and scraping down the sides of the bowl. It’s like a trusty sidekick in the kitchen!
- Piping Bag (optional): If you want to get fancy with your mousse layers, a piping bag will help you achieve a beautiful presentation. If you don’t have one, a zip-top bag with a corner snipped off works just as well.
With these tools at your side, you’re all set to create your Mini Orange Mousse Cheesecakes. Remember, the kitchen is your playground, so feel free to improvise with what you have. Let’s get cooking!
Variations of Mini Orange Mousse Cheesecake Recipe
As a home cook, I love to experiment with flavors and textures. The beauty of the Mini Orange Mousse Cheesecake Recipe is its versatility! Here are a few delightful variations that I’ve tried and absolutely adored:
- Berry Bliss: Swap out the orange juice for a mix of fresh berries like strawberries, blueberries, or raspberries. The tartness of the berries adds a refreshing twist that’s perfect for summer!
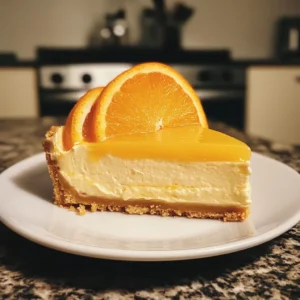
- Chocolate Orange: For all the chocolate lovers out there, add a layer of melted dark chocolate to the crust. The combination of chocolate and orange is simply divine!
- Coconut Cream: Incorporate coconut cream into the mousse for a tropical flair. You can even sprinkle some toasted coconut flakes on top for added texture.
- Spiced Pumpkin: In the fall, I love to use pumpkin puree and a pinch of cinnamon in the cheesecake filling. It gives a cozy, seasonal vibe that’s perfect for gatherings.
These variations not only keep things exciting but also allow you to tailor the recipe to your taste preferences or seasonal ingredients. I encourage you to get creative and make this recipe your own. After all, cooking is all about having fun and sharing delicious moments with those you love!
Cooking Notes for Mini Orange Mousse Cheesecake Recipe
As I’ve journeyed through the delightful process of making Mini Orange Mousse Cheesecakes, I’ve gathered a few cooking notes that can help you achieve the best results. These little nuggets of wisdom can make a big difference in your baking adventure!
- Room Temperature Ingredients: Always ensure your cream cheese and eggs (if using) are at room temperature. This helps create a smooth and creamy filling without lumps. Trust me, it’s worth the extra time!
- Freshness Matters: Use fresh oranges for juice and zest. The vibrant flavor of fresh citrus elevates the entire dessert. I can still remember the first time I used store-bought juice—it just didn’t compare!
- Chill Time is Key: Don’t rush the chilling process. Allowing the cheesecakes to set properly in the fridge ensures a firm texture and enhances the flavors. I often make them a day ahead, so they’re ready to impress my guests!
- Experiment with Sweetness: If you prefer a sweeter dessert, feel free to adjust the sugar in the filling. Just remember, the orange flavor should shine through, so don’t go overboard!
- Presentation Counts: A little garnish goes a long way! Whether it’s a sprig of mint or a sprinkle of chocolate shavings, a beautiful presentation makes the dessert even more inviting.
These cooking notes are like little guiding stars in your culinary journey. They remind me of the joy of creating something special in the kitchen. So, keep them in mind as you whip up your Mini Orange Mousse Cheesecakes, and enjoy every delicious moment!
Serving Suggestions for Mini Orange Mousse Cheesecake Recipe
When it comes to serving my Mini Orange Mousse Cheesecakes, I love to make the experience as delightful as the dessert itself! Presentation is key, and there are so many fun ways to serve these little gems. Here are some of my favorite serving suggestions that never fail to impress:
- Chilled Delight: Serve the mini cheesecakes straight from the fridge for a refreshing treat. The coolness enhances the zesty orange flavor, making each bite a burst of sunshine!
- Garnish Galore: Top each cheesecake with a dollop of whipped cream, a sprinkle of orange zest, or a few fresh berries. This adds a pop of color and a touch of elegance to your presentation.
- Individual Touch: For a personal touch, consider placing each mini cheesecake in a decorative cupcake liner. It adds charm and makes them easy to grab and enjoy!
- Pair with Beverages: These cheesecakes pair beautifully with a glass of iced tea, sparkling water, or even a light dessert wine. The refreshing drinks complement the citrusy flavors perfectly.
- Platter Presentation: Arrange the mini cheesecakes on a beautiful serving platter, and add some edible flowers or mint leaves for a stunning centerpiece at your gathering.
These serving suggestions not only enhance the visual appeal but also elevate the overall experience of enjoying these delightful treats. I always find that a little extra effort in presentation makes the dessert taste even better. So, get creative and have fun serving your Mini Orange Mousse Cheesecakes!
Tips for Perfecting Mini Orange Mousse Cheesecake Recipe
As I’ve whipped up countless batches of Mini Orange Mousse Cheesecakes, I’ve gathered a treasure trove of tips that can help you achieve perfection every time. These little nuggets of wisdom can make a world of difference in your baking journey!
- Use Quality Ingredients: The flavor of your cheesecakes starts with the ingredients. Opt for high-quality cream cheese and fresh oranges. Trust me, it makes a noticeable difference!
- Don’t Rush the Process: Take your time with each step. Allow the crust to chill properly and give the mousse enough time to set. Patience is key to achieving that perfect texture!
- Experiment with Flavors: Feel free to play around with the orange flavor. Add a splash of orange liqueur for an adult twist or mix in some vanilla bean for added depth.
- Mind the Temperature: Keep an eye on the temperature of your ingredients. Room temperature cream cheese blends more smoothly, while chilled whipped cream holds its shape better.
- Presentation is Everything: A little garnish can elevate your dessert. Whether it’s a sprig of mint or a sprinkle of zest, a beautiful presentation makes the cheesecakes even more inviting!
With these tips in your back pocket, you’re well on your way to creating Mini Orange Mousse Cheesecakes that will wow your family and friends. Remember, cooking is all about enjoying the process, so have fun and savor every moment in the kitchen!
Breakdown of Time for Mini Orange Mousse Cheesecake Recipe
As a home cook, I know that time management is key to a successful kitchen adventure. When it comes to making these delightful Mini Orange Mousse Cheesecakes, it’s helpful to have a clear idea of how long each step will take. Here’s a quick breakdown of the time you’ll need:
- Prep Time: Approximately 30 minutes. This includes gathering your ingredients, preparing the crust, and mixing the cheesecake filling and mousse.
- Chilling Time: At least 4 hours. I recommend letting them chill overnight for the best flavor and texture, but if you’re in a hurry, 4 hours will do the trick!
- Total Time: About 4 hours and 30 minutes (or overnight if you choose). This total time includes both the prep and chilling time, ensuring your mini cheesecakes are perfectly set and ready to impress.
By keeping this timeline in mind, you can plan your baking session more effectively. I often find that making these mini cheesecakes a day ahead of time not only saves me stress but also allows the flavors to meld beautifully. So, grab your ingredients, and let’s get started on this delicious journey!
Nutritional Information for Mini Orange Mousse Cheesecake Recipe
As a passionate home cook, I believe that enjoying a delicious dessert doesn’t have to come with a side of guilt. Understanding the nutritional information of my Mini Orange Mousse Cheesecakes helps me appreciate the balance of flavors and ingredients. Here’s a quick overview of the nutritional content per serving, assuming this recipe yields about 12 mini cheesecakes:
- Calories: Approximately 180 calories
- Protein: 3 grams
- Fat: 12 grams
- Carbohydrates: 15 grams
- Sugar: 8 grams
- Fiber: 0.5 grams
These mini cheesecakes are a delightful treat that can fit into a balanced diet. The use of fresh oranges not only adds a burst of flavor but also provides a dose of vitamin C. While they do contain sugar and fat, the portion size makes it easy to indulge without overdoing it. I often enjoy one of these mini delights after a meal, savoring each bite while knowing I’m treating myself to something special.
Remember, moderation is key! These Mini Orange Mousse Cheesecakes are perfect for sharing, so consider serving them at gatherings or special occasions. That way, you can enjoy the sweetness of life without feeling like you’ve gone overboard. Happy baking!
Frequently Asked Questions about Mini Orange Mousse Cheesecake Recipe
As I’ve shared my Mini Orange Mousse Cheesecake Recipe with friends and family, I’ve noticed a few common questions pop up. It’s always great to clarify any doubts, especially when it comes to creating such a delightful dessert. Here are some frequently asked questions that I hope will help you on your culinary journey!
Can I use store-bought orange juice instead of fresh?
While you can use store-bought orange juice in a pinch, I highly recommend using fresh oranges. The flavor is so much brighter and more vibrant! Fresh juice really makes a difference in the overall taste of your mini cheesecakes.
How long can I store the mini cheesecakes?
You can store your Mini Orange Mousse Cheesecakes in the fridge for up to 3 days. Just make sure to cover them with plastic wrap or keep them in an airtight container. They’re best enjoyed fresh, but they still taste delightful after a couple of days!
Can I make these mini cheesecakes ahead of time?
Absolutely! In fact, I often make them a day in advance. The flavors meld beautifully overnight, and the texture becomes even creamier. Just remember to let them chill for at least 4 hours before serving, or overnight for the best results.
What if I don’t have gelatin? Can I skip it?
Yes, you can skip the gelatin if you prefer a softer mousse. The gelatin helps to firm up the mousse a bit, but the cheesecakes will still be delicious without it. Just be sure to whip the cream to soft peaks for a light texture!
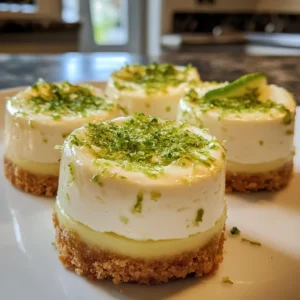
Can I use a different fruit instead of orange?
Definitely! This recipe is quite versatile. You can substitute the orange juice and zest with other fruits like lemon, lime, or even berries. Just keep in mind that the flavor will change, but it will still be delicious!
These FAQs are just a few of the questions I’ve encountered while making my Mini Orange Mousse Cheesecakes. I hope they help you feel more confident as you embark on this sweet adventure. Remember, cooking is all about experimenting and having fun, so don’t hesitate to make this recipe your own!
Conclusion on Mini Orange Mousse Cheesecake Recipe
As I wrap up this delightful journey through the world of Mini Orange Mousse Cheesecakes, I can’t help but feel a sense of joy and satisfaction. This recipe is not just about creating a dessert; it’s about crafting a moment of happiness to share with family and friends. The combination of creamy cheesecake and light, fluffy mousse, all infused with the bright flavor of fresh oranges, makes for a treat that’s both indulgent and refreshing.
What I love most is how versatile this recipe is. Whether you’re celebrating a special occasion or simply treating yourself after a long day, these mini cheesecakes fit the bill perfectly. Plus, they can be made ahead of time, allowing you to enjoy the company of your loved ones without being stuck in the kitchen.
So, gather your ingredients, unleash your creativity, and dive into this culinary adventure. I promise that with each bite of your Mini Orange Mousse Cheesecake, you’ll be reminded of the joy of cooking and the sweet moments that come from sharing delicious food. Happy baking!