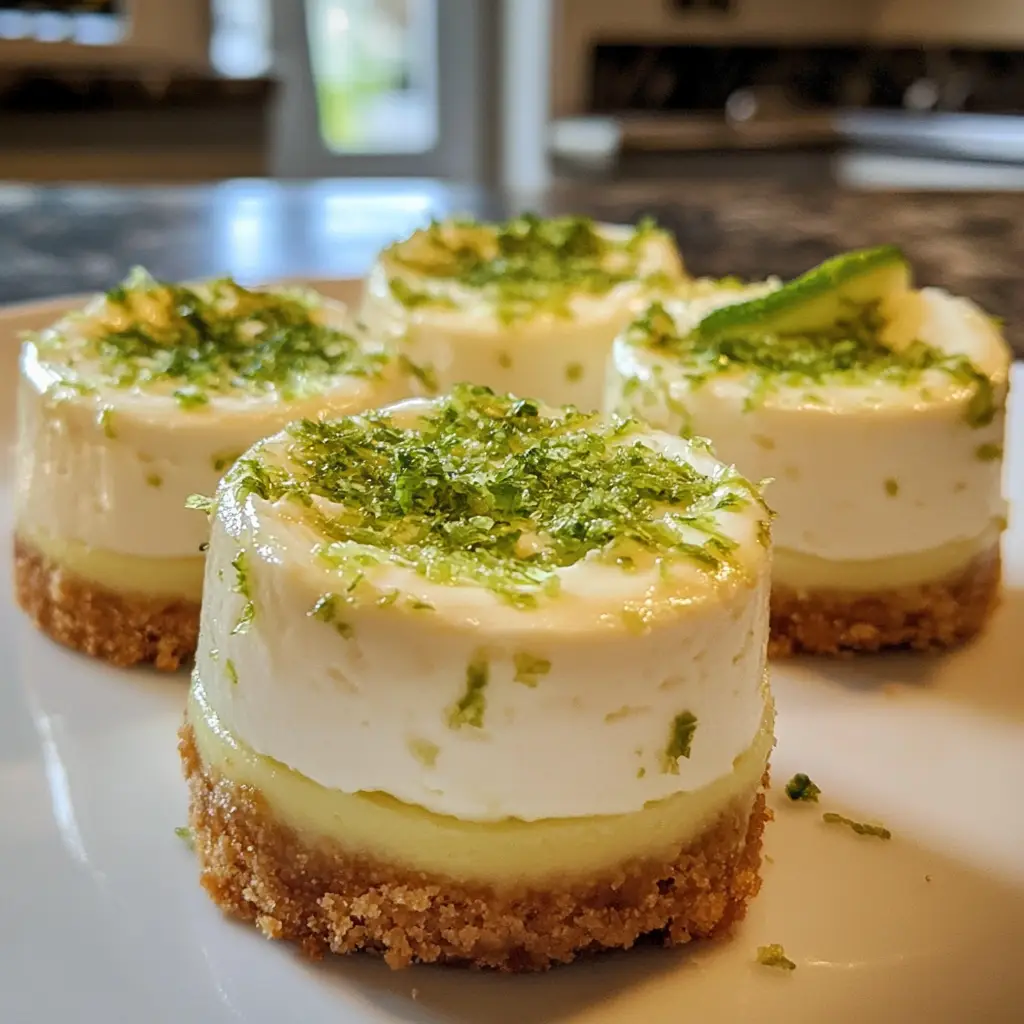
Introduction to Mini Key Lime Cheesecakes Recipe
As a passionate home cook, I find joy in creating desserts that not only taste amazing but also bring a smile to the faces of my loved ones. One of my all-time favorites is the Mini Key Lime Cheesecakes. These little bites of sunshine are perfect for any occasion, whether it’s a summer barbecue, a birthday party, or just a cozy night in. The tangy flavor of key limes combined with the creamy texture of cheesecake creates a delightful harmony that dances on your taste buds.
My love for these mini cheesecakes began during a family vacation to Florida. I remember sitting on the beach, the warm sun kissing my skin, and savoring a slice of key lime pie. It was love at first bite! The zesty flavor and smooth creaminess were unforgettable. When I returned home, I wanted to recreate that experience, but with a twist. That’s when I decided to make mini versions, perfect for sharing and indulging without the guilt of a full slice.
What I adore about this recipe is its simplicity. You don’t need to be a professional baker to whip these up. With just a handful of ingredients and a little bit of time, you can impress your friends and family with a dessert that looks as good as it tastes. Plus, they’re so cute! Each mini cheesecake is like a little gift, waiting to be unwrapped and enjoyed.
So, grab your apron and let’s dive into the world of Mini Key Lime Cheesecakes. I promise, once you try this recipe, it will become a staple in your dessert repertoire. Let’s make some magic happen in the kitchen!
Ingredients for Mini Key Lime Cheesecakes Recipe
Before we embark on our culinary adventure, let’s gather all the ingredients we need for these delightful Mini Key Lime Cheesecakes. I always believe that quality ingredients make a world of difference in the final product. So, let’s make sure we have everything ready to go!
Main Ingredients
- 1 cup of graham cracker crumbs
- 1/4 cup of granulated sugar
- 1/2 cup of unsalted butter, melted
- 16 ounces of cream cheese, softened
- 1 cup of granulated sugar (for the filling)
- 1/2 cup of sour cream
- 1/4 cup of fresh key lime juice (about 4-5 key limes)
- 1 teaspoon of vanilla extract
- 2 large eggs
When it comes to the key lime juice, I highly recommend using fresh key limes if you can find them. They have a vibrant flavor that bottled juice just can’t match. If you’re in a pinch, regular limes can work too, but the taste will be slightly different.
Optional Add-ons
- Whipped cream for topping
- Key lime zest for garnish
- Fresh berries (like raspberries or blueberries) for a pop of color
- Chocolate shavings for a decadent twist
These optional add-ons can elevate your mini cheesecakes even further. I love adding a dollop of whipped cream on top, along with a sprinkle of key lime zest. It not only looks beautiful but also enhances the flavor. Feel free to get creative and make these mini treats your own!
How to Prepare Mini Key Lime Cheesecakes Recipe
Now that we have all our ingredients ready, it’s time to roll up our sleeves and get cooking! Making Mini Key Lime Cheesecakes is a fun and rewarding process. I love how each step brings us closer to that delicious moment when we can finally take a bite. Let’s dive into the preparation!
Step 1: Prepare the Crust
First things first, we need to create a delicious crust that will hold our creamy filling. In a mixing bowl, combine the graham cracker crumbs, granulated sugar, and melted butter. Mix until everything is well combined and resembles wet sand.
Next, take a muffin tin and line it with cupcake liners. This makes it easier to remove the cheesecakes later. Now, press about a tablespoon of the crust mixture into the bottom of each liner. Use the back of a spoon or your fingers to pack it down firmly.
Tips for Step 1
- For an extra crunch, you can toast the graham cracker crumbs in the oven for a few minutes before mixing them with the butter.
- Make sure to pack the crust tightly; this will help it hold together when you take a bite!
Step 2: Make the Cheesecake Filling
Now, let’s whip up that creamy filling! In a large mixing bowl, beat the softened cream cheese until it’s smooth and fluffy. I usually use an electric mixer for this, but a whisk works too if you’re feeling strong!
Once the cream cheese is ready, add in the granulated sugar, sour cream, fresh key lime juice, and vanilla extract. Mix until everything is well combined. Finally, add the eggs one at a time, mixing just until incorporated. Be careful not to overmix; we want our filling to be light and airy!
Tips for Step 2
- Make sure your cream cheese is at room temperature. This helps it blend smoothly without lumps.
- For a zesty kick, you can add a bit of key lime zest to the filling!
Step 3: Bake the Cheesecakes
With our crust and filling ready, it’s time to bake! Preheat your oven to 325°F (160°C). Carefully pour the cheesecake filling over the crusts in the muffin tin, filling each liner about three-quarters full.
Place the muffin tin in the oven and bake for about 20-25 minutes. The edges should be set, but the center will still have a slight jiggle. This is perfect because it will firm up as it cools!
Tips for Step 3
- To prevent cracks, you can place a shallow pan of water in the oven while baking. This adds moisture and helps keep the cheesecakes smooth.
- Keep an eye on them! Ovens can vary, so check a few minutes before the timer goes off.
Step 4: Cool and Chill
Once baked, remove the cheesecakes from the oven and let them cool in the pan for about 10 minutes. Then, carefully transfer them to a wire rack to cool completely. After they’ve cooled, pop them in the fridge for at least 2 hours, or overnight if you can wait!
This chilling time is crucial. It allows the flavors to meld and the texture to become perfectly creamy.
Tips for Step 4
- Don’t rush the cooling process! If you try to remove them too soon, they might fall apart.
- For the best flavor, I recommend letting them chill overnight. They taste even better the next day!
Equipment Needed for Mini Key Lime Cheesecakes Recipe
Before we dive into the kitchen, let’s make sure we have all the right tools at our fingertips. Having the right equipment can make the process smoother and more enjoyable. Here’s what you’ll need to whip up these delightful Mini Key Lime Cheesecakes:
- Muffin Tin: This is essential for shaping our mini cheesecakes. If you don’t have a muffin tin, you can use a mini cheesecake pan or even a silicone mold for easy removal.
- Cupcake Liners: These help keep the cheesecakes intact and make for easy serving. If you’re out of liners, you can grease the muffin tin well with butter or cooking spray.
- Mixing Bowls: A couple of medium-sized mixing bowls will do the trick. I like to use glass bowls because they’re easy to clean and you can see the mixture as you whip it up.
- Electric Mixer or Whisk: An electric mixer makes it easy to achieve that smooth, fluffy cream cheese filling. If you prefer a workout, a good old-fashioned whisk works just fine!
- Measuring Cups and Spoons: Accurate measurements are key to baking success. Make sure you have these handy to get the right proportions.
- Rubber Spatula: This is perfect for scraping down the sides of your mixing bowl and ensuring everything is well combined.
- Wire Rack: A wire rack is great for cooling the cheesecakes evenly. If you don’t have one, a plate will work in a pinch.
With these tools in hand, you’ll be well-equipped to create your mini masterpieces. Remember, the right equipment can make all the difference in your cooking adventure. Now, let’s get back to the fun part—baking!
Variations of Mini Key Lime Cheesecakes Recipe
While I absolutely adore the classic Mini Key Lime Cheesecakes, there’s something thrilling about experimenting with variations. Each twist brings a new flavor profile that can surprise and delight your taste buds. Here are a few fun ideas to get your creative juices flowing:
- Chocolate Key Lime Cheesecakes: Add a layer of melted chocolate to the crust or mix cocoa powder into the filling for a rich, chocolatey twist. The combination of chocolate and key lime is simply divine!
- Berry Swirl: Before baking, drop spoonfuls of berry puree (like raspberry or blueberry) into the filling and swirl it gently with a toothpick. This not only adds a pop of color but also a burst of fruity flavor.
- Coconut Key Lime Cheesecakes: Mix in some shredded coconut into the crust or the filling for a tropical vibe. You can even top them with toasted coconut flakes for an extra crunch.
- Mini Key Lime Cheesecake Parfaits: Instead of baking, layer the crust, filling, and toppings in small glasses for a no-bake version. This is perfect for a quick dessert that still looks impressive!
These variations are just the tip of the iceberg! I encourage you to let your imagination run wild. Each time I try a new twist, it feels like a mini culinary adventure. So, don’t be afraid to mix things up and make these mini cheesecakes your own!
Cooking Notes for Mini Key Lime Cheesecakes Recipe
As I’ve journeyed through the delightful world of baking these Mini Key Lime Cheesecakes, I’ve gathered a few cooking notes that can help you achieve the best results. These little nuggets of wisdom can make a big difference in your baking experience!
- Room Temperature Ingredients: Always ensure your cream cheese and eggs are at room temperature before mixing. This helps create a smooth filling without lumps, making your cheesecakes creamy and luscious.
- Don’t Overmix: When combining the filling ingredients, mix just until everything is incorporated. Overmixing can introduce too much air, leading to cracks in your cheesecakes as they bake.
- Cooling Time is Key: Patience is a virtue! Allow your cheesecakes to cool completely before chilling them in the fridge. This step is crucial for achieving that perfect texture.
- Check for Doneness: Remember, the center of the cheesecakes should still have a slight jiggle when you take them out of the oven. They will continue to set as they cool, so don’t be tempted to bake them until they’re completely firm.
- Storage Tips: These mini cheesecakes can be stored in an airtight container in the fridge for up to a week. They also freeze beautifully! Just wrap them tightly and thaw in the fridge when you’re ready to enjoy.
With these cooking notes in your back pocket, you’ll be well on your way to creating the most delightful Mini Key Lime Cheesecakes. Happy baking, and may your kitchen be filled with the sweet aroma of success!
Serving Suggestions for Mini Key Lime Cheesecakes Recipe
Now that our Mini Key Lime Cheesecakes are ready to dazzle, let’s talk about how to serve them for maximum impact! Presentation can elevate any dessert, and these little gems are no exception. Here are some of my favorite serving suggestions that will make your cheesecakes shine:
- Garnish with Whipped Cream: A dollop of freshly whipped cream on top adds a light and airy touch. It’s like a fluffy cloud resting on a sunny cheesecake!
- Sprinkle with Key Lime Zest: A sprinkle of bright green key lime zest not only enhances the flavor but also adds a pop of color that’s visually appealing.
- Serve with Fresh Berries: A few fresh berries, like raspberries or blueberries, can add a burst of color and a hint of tartness that complements the sweetness of the cheesecake.
- Drizzle with a Fruit Sauce: A drizzle of berry sauce or a tangy key lime glaze can take your cheesecakes to the next level. It adds a beautiful contrast and a delicious flavor boost!
- Mini Dessert Plates: Presenting each cheesecake on a cute mini dessert plate can make your dessert table look extra special. It’s all about those little details!
These serving suggestions not only enhance the visual appeal but also add layers of flavor that will leave your guests raving. I love to get creative with my presentations, and I encourage you to do the same! After all, we eat with our eyes first, and these Mini Key Lime Cheesecakes deserve to be the star of the show!
Tips for Perfect Mini Key Lime Cheesecakes Recipe
As I’ve baked these delightful Mini Key Lime Cheesecakes time and time again, I’ve picked up a few tips that can help you achieve perfection. These little nuggets of wisdom can make all the difference in your baking journey. Here’s what I’ve learned:
- Use Fresh Ingredients: Always opt for fresh key limes and high-quality cream cheese. The flavor of your cheesecakes will shine through when you use the best ingredients.
- Preheat Your Oven: Make sure your oven is fully preheated before baking. This ensures even cooking and helps prevent cracks in your cheesecakes.
- Don’t Skip the Chilling: Allow your cheesecakes to chill for at least two hours after baking. This step is crucial for achieving that creamy texture and letting the flavors meld beautifully.
- Experiment with Flavors: Don’t hesitate to try different flavor combinations! Adding a hint of coconut or a swirl of berry puree can create a unique twist on the classic recipe.
- Keep an Eye on Baking Time: Ovens can vary, so check your cheesecakes a few minutes before the timer goes off. You want them to be set around the edges but still slightly jiggly in the center.
With these tips in your back pocket, you’ll be well on your way to creating the most scrumptious Mini Key Lime Cheesecakes. Happy baking, and may your kitchen be filled with the sweet aroma of success!
Breakdown of Time for Mini Key Lime Cheesecakes Recipe
As a home cook, I know that time management is key in the kitchen. When I’m whipping up my Mini Key Lime Cheesecakes, I like to have a clear idea of how long each step will take. This way, I can plan my baking adventure without any surprises. Here’s a quick breakdown of the time you’ll need:
- Prep Time: Approximately 20 minutes. This includes gathering your ingredients, preparing the crust, and mixing the cheesecake filling. It’s a fun and engaging process that sets the stage for the deliciousness to come!
- Cooking Time: About 20-25 minutes. This is when your cheesecakes will be baking in the oven, filling your kitchen with that irresistible aroma. Keep an eye on them to ensure they’re perfectly set.
- Total Time: Roughly 2 hours and 45 minutes. This includes the cooling and chilling time. While the cheesecakes are cooling, you can tidy up your kitchen or even prepare some toppings. The waiting is the hardest part, but trust me, it’s worth it!
With this time breakdown, you’ll be well-prepared to create your Mini Key Lime Cheesecakes. Just remember, good things come to those who wait, and the end result will be a delightful treat that everyone will love!
Nutritional Information for Mini Key Lime Cheesecakes Recipe
As a passionate home cook, I always find it helpful to know the nutritional information of the dishes I prepare. It allows me to enjoy my culinary creations while being mindful of what I’m eating. Here’s a general breakdown of the nutritional information for one Mini Key Lime Cheesecake, based on the ingredients listed in the recipe:
- Calories: Approximately 200 calories
- Protein: 3 grams
- Fat: 12 grams
- Carbohydrates: 22 grams
- Sugar: 10 grams
- Fiber: 0.5 grams
Keep in mind that these values can vary based on the specific brands of ingredients you use and any optional add-ons you choose to include. If you’re looking to lighten up the recipe, consider using reduced-fat cream cheese or a sugar substitute. Regardless of the nutritional content, I believe that enjoying a sweet treat like these Mini Key Lime Cheesecakes in moderation is part of a balanced lifestyle. So, indulge a little and savor every bite!
Frequently Asked Questions about Mini Key Lime Cheesecakes Recipe
As I’ve shared my love for Mini Key Lime Cheesecakes, I’ve noticed that many home cooks have similar questions. It’s always great to clarify any doubts to ensure your baking experience is as smooth as possible. Here are some of the most frequently asked questions I’ve encountered, along with my answers:
Can I use regular limes instead of key limes?
Absolutely! While key limes have a unique flavor that’s hard to replicate, regular limes can work in a pinch. Just keep in mind that the taste will be slightly different. If you can find key limes, I highly recommend using them for that authentic zing!
How do I know when the cheesecakes are done baking?
The best way to check is to look for a slight jiggle in the center of each cheesecake. The edges should be set, but the middle should still have a little movement. They will firm up as they cool, so don’t worry if they seem a bit soft when you take them out of the oven.
Can I make these cheesecakes ahead of time?
Yes, you can! In fact, I often make them a day in advance. They taste even better after chilling overnight, as the flavors meld beautifully. Just store them in an airtight container in the fridge until you’re ready to serve.
What’s the best way to store leftover cheesecakes?
To keep your Mini Key Lime Cheesecakes fresh, store them in an airtight container in the fridge for up to a week. If you want to keep them longer, they freeze well too! Just wrap them tightly in plastic wrap and place them in a freezer-safe container. Thaw them in the fridge when you’re ready to enjoy.
Can I use a different crust instead of graham crackers?
Definitely! While graham crackers are traditional, you can experiment with other options like crushed Oreos, vanilla wafers, or even a nut-based crust for a gluten-free version. Each option will bring its own unique flavor to the cheesecakes!
These questions are just a few of the common queries I’ve encountered while baking Mini Key Lime Cheesecakes. If you have any other questions or need further clarification, feel free to reach out! I’m always here to help fellow home cooks on their culinary adventures.
Conclusion on Mini Key Lime Cheesecakes Recipe
In conclusion, Mini Key Lime Cheesecakes are not just a dessert; they are a delightful experience that brings joy to any gathering. Their vibrant flavor and creamy texture make them a crowd-pleaser, while their adorable size makes them perfect for sharing. I love how easy they are to prepare, allowing even novice bakers to create something truly special.
These mini treats are versatile, inviting you to experiment with flavors and toppings, making each batch uniquely yours. Whether you’re celebrating a special occasion or simply indulging in a sweet moment, these cheesecakes are sure to impress. So, gather your ingredients, unleash your creativity, and let the magic of Mini Key Lime Cheesecakes brighten your kitchen and your heart!


