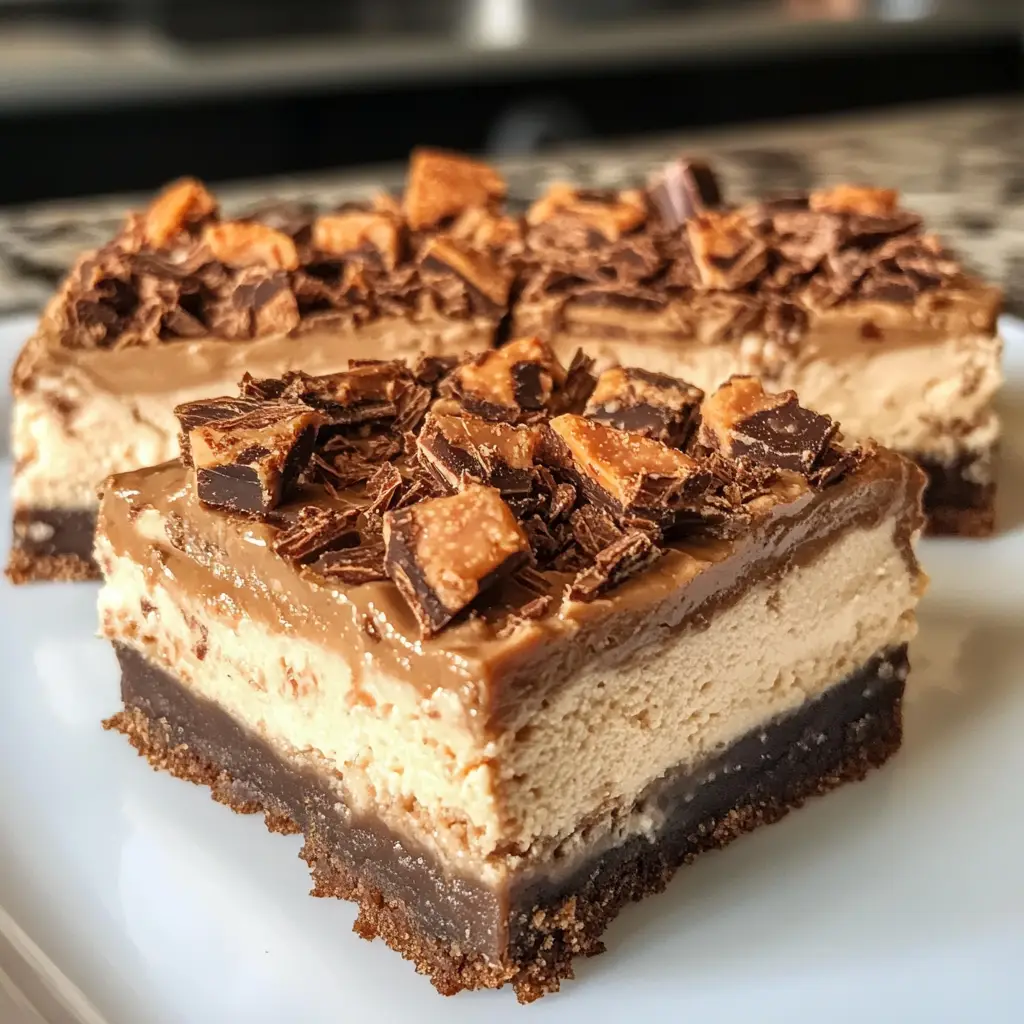
Introduction to No-Bake Butterfinger Cheesecake Bars Recipe
As a passionate home cook, I find joy in creating desserts that not only satisfy my sweet tooth but also bring smiles to the faces of my family and friends. One of my all-time favorite treats is the No-Bake Butterfinger Cheesecake Bars. These delightful bars are a perfect blend of creamy cheesecake and crunchy Butterfinger candy, making them an irresistible dessert that’s sure to impress.
Let me take you back to the first time I made these bars. It was a warm summer afternoon, and I wanted to whip up something special for a gathering. I had a few Butterfinger bars left over from Halloween, and I thought, why not incorporate them into a cheesecake? The idea sparked a culinary adventure that turned into a delicious success! The best part? No baking required! Just a little mixing, chilling, and voilà—dessert is served!
What I love most about this recipe is its simplicity. It’s perfect for those busy days when you want to treat yourself or your loved ones without spending hours in the kitchen. Plus, the combination of the creamy filling and the crunchy topping creates a delightful texture that keeps everyone coming back for more. Trust me, once you try these bars, they’ll become a staple in your dessert repertoire.
So, grab your apron and let’s dive into the world of No-Bake Butterfinger Cheesecake Bars. I promise you’ll love every bite!
Ingredients for No-Bake Butterfinger Cheesecake Bars Recipe
Before we embark on our delicious journey, let’s gather all the ingredients we need for these scrumptious No-Bake Butterfinger Cheesecake Bars. I always believe that the quality of ingredients can make or break a recipe, so I recommend using the best you can find. Here’s what you’ll need:
Main Ingredients
- 1 ½ cups of graham cracker crumbs
- ½ cup of unsalted butter, melted
- 2 (8-ounce) packages of cream cheese, softened
- 1 cup of powdered sugar
- 1 teaspoon of vanilla extract
- 1 cup of heavy whipping cream
- 1 cup of Butterfinger candy bars, chopped (about 4-5 bars)
When I make these bars, I always opt for high-quality cream cheese. It really enhances the creaminess of the filling. Also, using real butter instead of margarine makes a noticeable difference in flavor. Trust me, your taste buds will thank you!
Optional Add-ons
- 1 tablespoon of cocoa powder for a chocolatey twist
- Extra Butterfinger pieces for topping
- Chopped nuts, like pecans or walnuts, for added crunch
- Drizzle of chocolate or caramel sauce for serving
Feel free to get creative! I sometimes add a sprinkle of cocoa powder to the filling for a chocolatey surprise. And if you have a sweet tooth like me, a drizzle of chocolate sauce on top is simply divine. The possibilities are endless!
How to Prepare No-Bake Butterfinger Cheesecake Bars Recipe
Now that we have all our ingredients ready, it’s time to roll up our sleeves and get to the fun part—preparing these delightful No-Bake Butterfinger Cheesecake Bars! I love how simple and straightforward this process is. Let’s dive into the steps together!
Step 1: Prepare the Crust
First things first, we need to create a delicious crust that will hold all that creamy goodness. In a mixing bowl, combine the graham cracker crumbs and melted butter. Stir until the crumbs are evenly coated and resemble wet sand.
Next, press this mixture firmly into the bottom of a lined 9×9-inch baking dish. I like to use the bottom of a measuring cup to really pack it down. This helps create a sturdy base for our cheesecake bars.
Tips for Step 1
- For an extra flavor boost, try adding a pinch of cinnamon to the crust mixture.
- Make sure to press the crust down firmly; a well-packed crust will hold together better when you cut the bars.
Step 2: Make the Cheesecake Filling
Now, let’s whip up that creamy cheesecake filling! In a large mixing bowl, beat the softened cream cheese until it’s smooth and fluffy. This usually takes about 2-3 minutes. Then, gradually add in the powdered sugar and vanilla extract, mixing until well combined.
In a separate bowl, whip the heavy cream until stiff peaks form. Gently fold the whipped cream into the cream cheese mixture. This step is crucial for achieving that light and airy texture we all love in cheesecake!
Finally, fold in the chopped Butterfinger pieces, making sure they’re evenly distributed throughout the filling.
Tips for Step 2
- Ensure your cream cheese is at room temperature for easier mixing.
- Be gentle when folding in the whipped cream; you want to keep that airy texture!
Step 3: Assemble the Bars
With the crust and filling ready, it’s time to assemble our bars! Pour the cheesecake filling over the prepared crust, spreading it evenly with a spatula. I like to take my time with this step to ensure every corner is filled with that creamy goodness.
For an extra touch, sprinkle some additional chopped Butterfinger pieces on top of the filling. This not only adds a nice crunch but also makes the bars look extra tempting!
Tips for Step 3
- Use a spatula or the back of a spoon to smooth the top of the filling for a polished look.
- Don’t be shy with the Butterfinger topping; it adds a delightful crunch!
Step 4: Chill and Set
Now comes the hardest part—waiting! Cover the baking dish with plastic wrap and place it in the refrigerator. Let the bars chill for at least 4 hours, or overnight if you can resist the temptation. This allows the filling to set properly, making it easier to cut into bars.
Tips for Step 4
- If you’re in a hurry, a 4-hour chill will work, but overnight is best for the perfect texture.
- Once set, use a sharp knife to cut the bars for clean edges. Wipe the knife with a damp cloth between cuts for neat slices.
Equipment Needed for No-Bake Butterfinger Cheesecake Bars Recipe
Before we dive into the kitchen, let’s make sure we have all the necessary tools at our fingertips. Having the right equipment can make the process smoother and more enjoyable. Here’s what you’ll need to whip up these delightful No-Bake Butterfinger Cheesecake Bars:
- 9×9-inch baking dish: This is where the magic happens! If you don’t have one, a similar-sized dish will work just fine.
- Mixing bowls: I recommend having at least two—one for the crust and one for the filling. It keeps things organized and makes mixing easier.
- Electric mixer: A hand mixer or stand mixer is perfect for beating the cream cheese and whipping the cream. If you don’t have one, a whisk will do, but it’ll take a bit more elbow grease!
- Spatula: This handy tool is essential for spreading the filling and folding in the whipped cream. A silicone spatula works wonders for scraping every last bit from the bowl.
- Measuring cups and spoons: Accurate measurements are key to a successful recipe, so don’t skip these!
- Parchment paper: Lining your baking dish with parchment makes it easy to lift the bars out once they’re set. If you don’t have parchment, you can lightly grease the dish instead.
With these tools in hand, you’re all set to create your No-Bake Butterfinger Cheesecake Bars. Remember, cooking is all about having fun, so don’t stress if you need to improvise with what you have. Happy cooking!
Variations of No-Bake Butterfinger Cheesecake Bars Recipe
While the classic No-Bake Butterfinger Cheesecake Bars are absolutely delicious on their own, I love experimenting with different flavors and textures to keep things exciting. Here are a few variations that I’ve tried and absolutely adore:
- Chocolate Peanut Butter Version: Swap out some of the Butterfinger pieces for chopped Reese’s Peanut Butter Cups. The combination of chocolate and peanut butter is a match made in dessert heaven!
- Minty Fresh Twist: Add a few drops of peppermint extract to the cheesecake filling for a refreshing mint flavor. Top with crushed Andes mints for an extra touch of minty goodness.
- Fruit Fusion: Incorporate fresh berries like raspberries or strawberries into the filling. The tartness of the fruit pairs beautifully with the creamy cheesecake.
- Cookie Crust: Instead of a graham cracker crust, use crushed Oreos or chocolate cookies for a richer base. This adds a delightful chocolatey flavor that complements the Butterfinger perfectly.
These variations not only add a fun twist to the original recipe but also allow you to cater to different tastes and preferences. I encourage you to get creative and make these bars your own. After all, cooking is all about expressing yourself and having fun in the kitchen!
Cooking Notes for No-Bake Butterfinger Cheesecake Bars Recipe
As I’ve learned through my culinary adventures, a few cooking notes can make all the difference in achieving the perfect No-Bake Butterfinger Cheesecake Bars. Here are some tips that I always keep in mind when making this delightful dessert:
- Room Temperature Ingredients: Make sure your cream cheese is at room temperature before mixing. This helps create a smooth and creamy filling without lumps.
- Chill Time is Key: Patience is a virtue! Allowing the bars to chill for the recommended time ensures they set properly. Trust me, the wait is worth it!
- Storage: These bars can be stored in an airtight container in the refrigerator for up to a week. They also freeze well, so you can make a batch ahead of time for unexpected guests.
- Cutting the Bars: For clean cuts, use a sharp knife and wipe it with a damp cloth between slices. This keeps the edges neat and tidy.
- Serving Temperature: I find that letting the bars sit at room temperature for about 10-15 minutes before serving enhances the flavor and texture. It makes them even more enjoyable!
By keeping these cooking notes in mind, you’ll be well on your way to creating the most delicious No-Bake Butterfinger Cheesecake Bars. Happy baking!
Serving Suggestions for No-Bake Butterfinger Cheesecake Bars Recipe
When it comes to serving my No-Bake Butterfinger Cheesecake Bars, I love to get a little creative! Presentation can elevate the experience, making it even more delightful for everyone. Here are some of my favorite serving suggestions that add a special touch:
- Garnish with Whipped Cream: A dollop of freshly whipped cream on top adds a light and airy touch. It’s like a cloud of sweetness that complements the rich cheesecake.
- Chocolate Drizzle: Drizzling melted chocolate or caramel sauce over the bars not only looks stunning but also adds an extra layer of flavor. It’s a sweet finishing touch that everyone will love!
- Serve with Fresh Fruit: Pairing the bars with fresh berries, like strawberries or raspberries, adds a pop of color and a refreshing contrast to the creamy filling. Plus, it’s a great way to balance the sweetness!
- Individual Portions: For a fun twist, cut the bars into smaller squares and serve them in cupcake liners. This makes for easy serving and adds a festive flair to your dessert table.
- Accompany with Coffee or Tea: These bars pair beautifully with a cup of coffee or tea. The warm beverage enhances the flavors and makes for a cozy dessert experience.
With these serving suggestions, you can turn your No-Bake Butterfinger Cheesecake Bars into a show-stopping dessert that’s perfect for any occasion. Whether it’s a family gathering or a casual get-together with friends, these bars are sure to impress!
Tips for Perfect No-Bake Butterfinger Cheesecake Bars Recipe
As I’ve whipped up these No-Bake Butterfinger Cheesecake Bars time and time again, I’ve gathered a few tips that can help you achieve perfection in every bite. Here’s what I’ve learned along the way:
- Use Quality Ingredients: The better the ingredients, the better the bars will taste. Opt for real butter, high-quality cream cheese, and fresh Butterfinger bars for the best flavor.
- Don’t Rush the Chilling: I know it’s tempting to dig in right away, but allowing the bars to chill for the full time is crucial. This helps them set properly and makes cutting easier.
- Experiment with Flavors: Don’t hesitate to try different add-ins or toppings. Whether it’s a sprinkle of sea salt or a layer of chocolate ganache, these little tweaks can elevate your bars.
- Keep It Neat: For clean cuts, use a sharp knife and wipe it between slices. This keeps your bars looking as good as they taste!
- Serve at the Right Temperature: Letting the bars sit out for a few minutes before serving enhances their flavor and texture. It’s a small step that makes a big difference!
With these tips in your back pocket, you’re all set to create the most delightful No-Bake Butterfinger Cheesecake Bars. Enjoy the process and happy baking!
Breakdown of Time for No-Bake Butterfinger Cheesecake Bars Recipe
As a home cook, I know that time management is key in the kitchen. When it comes to making these No-Bake Butterfinger Cheesecake Bars, it’s all about planning ahead. Here’s a quick breakdown of the time you’ll need to whip up this delightful dessert:
- Prep Time: 20 minutes – This includes gathering your ingredients, preparing the crust, and mixing the cheesecake filling. It’s a breeze!
- Chilling Time: 4 hours – This is the hardest part, but it’s essential for the bars to set properly. If you can, I recommend letting them chill overnight for the best results.
- Total Time: 4 hours and 20 minutes – With just a little bit of patience, you’ll have a delicious dessert ready to impress!
By keeping this time breakdown in mind, you can easily plan your day around making these scrumptious bars. Whether it’s for a special occasion or just a sweet treat for yourself, you’ll find that the wait is well worth it. Happy baking!
Nutritional Information for No-Bake Butterfinger Cheesecake Bars Recipe
As a passionate home cook, I always find it helpful to know the nutritional information of the dishes I prepare. It allows me to enjoy my creations while being mindful of what I’m eating. Here’s a general breakdown of the nutritional content for one serving of No-Bake Butterfinger Cheesecake Bars, assuming the recipe yields 12 bars:
- Calories: Approximately 250
- Fat: 18g
- Saturated Fat: 10g
- Cholesterol: 50mg
- Sodium: 150mg
- Carbohydrates: 22g
- Fiber: 1g
- Sugar: 12g
- Protein: 3g
Keep in mind that these values can vary based on the specific brands of ingredients you use and any optional add-ons you decide to include. If you’re looking to lighten things up, consider using reduced-fat cream cheese or a sugar substitute. Regardless of the nutritional content, I believe that enjoying a sweet treat like these No-Bake Butterfinger Cheesecake Bars is all about balance. So, indulge a little and savor every bite!
Frequently Asked Questions about No-Bake Butterfinger Cheesecake Bars Recipe
As I’ve shared my No-Bake Butterfinger Cheesecake Bars with friends and family, I’ve noticed a few common questions pop up. It’s always great to clarify any doubts, especially when it comes to creating such a delightful dessert. Here are some frequently asked questions that I hope will help you on your baking journey:
Can I use a different type of candy instead of Butterfinger?
Absolutely! While Butterfinger adds a unique crunch and flavor, you can easily swap it out for other candies. I’ve tried using Reese’s Peanut Butter Cups, Snickers, and even crushed Oreos. Each variation brings its own delicious twist to the bars!
How long do these cheesecake bars last in the fridge?
These bars can be stored in an airtight container in the refrigerator for up to a week. However, I find they taste best within the first few days. If you want to keep them longer, you can freeze them for up to three months. Just make sure to wrap them well!
Can I make these bars gluten-free?
Yes! To make gluten-free No-Bake Butterfinger Cheesecake Bars, simply use gluten-free graham crackers for the crust. There are many delicious options available that work just as well. Your gluten-free friends will thank you!
What can I use instead of heavy cream?
If you’re looking for a lighter option, you can substitute heavy cream with whipped coconut cream or a non-dairy whipped topping. Just keep in mind that the texture and flavor may vary slightly, but it will still be delicious!
Can I make these bars ahead of time?
Definitely! In fact, I recommend making them a day in advance. This allows the flavors to meld together beautifully and ensures the bars set properly. Just remember to cover them well in the fridge to keep them fresh!
With these answers, I hope you feel more confident in making your own No-Bake Butterfinger Cheesecake Bars. If you have any other questions, don’t hesitate to reach out. Happy baking, and enjoy every delicious bite!
Conclusion on No-Bake Butterfinger Cheesecake Bars Recipe
In conclusion, the No-Bake Butterfinger Cheesecake Bars are not just a dessert; they are a delightful experience that brings joy to any gathering. With their creamy filling, crunchy Butterfinger pieces, and simple preparation, these bars are perfect for both novice and seasoned cooks alike. I love how they require no baking, making them an ideal choice for those hot summer days when turning on the oven feels like a chore.
What truly makes this recipe special is its versatility. You can easily customize it to suit your taste or dietary needs, whether you want to swap out the Butterfinger for another candy or make it gluten-free. Plus, the joy of sharing these bars with family and friends is unmatched. Watching their faces light up with each bite is what makes all the effort worthwhile.
So, whether you’re celebrating a special occasion or simply treating yourself, I encourage you to give these No-Bake Butterfinger Cheesecake Bars a try. I promise they’ll become a beloved addition to your dessert repertoire, just as they have in mine. Happy baking, and enjoy every delicious moment!